Daz 3D is part of 
Connect
DAZ Productions, Inc.
7533 S Center View Ct #4664
West Jordan, UT 84084
Licensing Agreement | Terms of Service | Privacy Policy | EULA
© 2026 Daz Productions Inc. All Rights Reserved.
Comments
or minotaurs and gargoyles, or west side story of minotaus, gargoyles, cant get away from broadway musical theme lol
rulez say climax of the battle
tee hee pillow fight? the climax would be when the pillows burst and feathers are flying
Chickenman... you could model a sphere for a stack of cannon balls... Rule 4 does say etc
I'm off to a very slow and not so great start. I need to start over on my critter object as is it's probably around 20' long and looks nothing like I intended but then I have no creased lines and some stretching and saling to do yet... gosh almost forgot it needs a head and some legs too. :). I started out modeling it in a medium scene at defaults... should have set the grid to inches or less or even modeled in a small scene as it should be rather small... about 6". Ohhh... here is what I have so far. Please let me kow if you notice anything wrong in my settings... I've never quite got replicate right This is not the final scene setup... I'll likely use one of my terrains or make a new one.
Oh is it ok to use Replica... I used Replicate for the one below.
Yeah, it's not a nasty rule... just a nice way to make sure that contestants know how to get into the room or access the tools.
I hear ya, wgdjohn. I'm slow to the get-go too. Hopefully I'll find a bit of time to work/play more....
The latest thing I've worked on for this is my new Astral Armor I got with my new Charger Horse for Christmas. Still need a bit of work on the shaders - which is where I've already spent the most time with this fella - but still not happy with them.
Modeling is great fun - I think I'll be modeling some fortess ruins and maybe a bunch of swords... not even sure I'll get time. Hope so ;)
Here's my initial attempt at my Astral War Horse
great start wgdjohn, it's the journey that counts :)
@Dart particularly like the viewpoint angle of this - is very monumental
Very nice... I'm jealous and won't be satisfied until I can creat atmosphere half as good as you.
Models don't have to be complicated. Simple models are often best because most objects around us are made of simple shapes. For example, a spear is just a cylinder with the very tip narrowed and a slight bulge where it meets the shaft. Here is Daz's Jack Pumpkin turned into a phalanx by modeling a spear from a cylinder.
Encourage everyone to participate, as always. But if this challenge is not for you for any reason, then look forward to seeing you in a future challenge.
Thanks :)
He's a Heavy War Horse! They are quite monumental beings! ;)
Thanks!
It's not my fault... it's Carrara!
With regular Realistic Sky settings, except with fog turned on, distance creates atmosphere.
If we cannot afford distance for any reason, we can multiply the effect using 1 mile in Carrara = (higher value) miles in the scene
This thickens the atmosphere. I also used Gamma Correction = 2.2 After seeing all of the work PhilW put into his discovery of it, I've noticed that all PBR engines also use it by default. He has shown me they way, I just followed. There are a few situations where I want or need the higher contrast of not using it, like stark space scenes sometimes.. but I still often use it there as well.
So I created a new Uniform/Armour for Lorenzo.
They will form the main defense-line in my battle scene.
Dart, Cool... found it under Realistic Sky/Edit near for Atmosphere, first selction above cloud settngs, it's settings are at right. I need to experiment with Realistic Sky settings more. I try to always set at 2.2 Gamma Corect unless getting busy and neglecting it.
Fantastic, Varsel! I love it! Very authentic looking. I imagine you must put in a bunch of research when making these things, don't you? It just seem obvious looking at your collection - your store at ShareCG. So is this an Oriental soldier? That's what it looks like to my uneducated eyes. When I was young, War irked me, so I never did all that great in History class. Now I wish I would have gotten into it a lot more. When my Son was in school, he liked to read to me, which helped him to absorb the knowledge. What a blast that was! I learned a lot more from him reading to me than I did when I was in school myself - on History, that is. I better ask him to read more to me about this stuff!
Looks excellent, Varsel. Can't wait to see your replications. Don't forget, the gauntlet has been thrown down - or whatever.
Yup, and the first button down on the left takes us to the Fog/Sun Rays area.
I like to bring my Fog horizon way down (Fog is Off by default) from 50% to something like 10 or 12 or so... depending upon what I'm doing. Then I keep the intensity at the default of 10, maybe increase to around 12 (which is about where it is in my EnvironKits)
This Fog also helps immensely to hide any problems with the horizon line without having to find other ways to block it.
================================================
This Realistic Sky fog may also be used for interiors where we cannot even catch a glimpse of the outdoors. Great way to add some atmosphere to industrial scenes, though I barely ever do it. I normally use one or both of these methods for interiors
Volumetric Clouds - these things at default opacity are fairly invisible when we're in the middle of them, and thicken up further away from the camera - kind of like real fog/clouds. Still, I usually lower the density and mess with the settings to taste. Then, back in the Assemble Room, I hit Edit > Center Hotpoint (otherwise it's on a lower corner) and then Edit > Send to Origin - then I move and scale it to taste. For things like 14MU Link massive Sci-Fi interior type of things, I like to have most, if not the whole cloud inside, as well as setting the height scale the same as horizontal in the cloud modeler room - so that the outer edge details of this fantastic cloud system become visible. But for atmosphere, just leave it nice and big. Try all sorts of things. Just know that Volumetric Clouds slow down renders quite a bit - so I try to save render times in other areas as well.
Spot Lights - The Light Cone feature in the effects tab has it's own system for creating lit volumetric fog. It requires a Gel in the Gel tab, then in the Light Cone effect, enable the Fog function. I also enable 3D Shadows, but often leave the Light Through Transparency disabled, unless I need these cone shadows to be seen passing through some special trans map in the scene - otherwise it'll just slow things down unnecessarily. Again, I play around a lot, and shoot test renders a lot, adjusting the fall-off in the light cone effect and adjust the cone settings vs the actual spot light settings... I take my time setting this part up, so that once I get it how I like it, I save it.
Fog - If I'm not using a lot of transparency maps, I also enjoy using the Fog effect. I used to use this all the time when I was too impatient to wait for Volumetric Clouds to render, and was unaware of the above spot light trick, which I found on my own, just messing around with light cones on street lights. Fog is an animated effect, which can look really cool, or can look absolutely disastrous! Again, it pays to take the time to adjust the settings carefully and thoroughly. ExtruD taught me that, with Fog, subtlety is everything - and ever since he taught me that, I had a much easier time loving this awesome effect!
Keep in mind that there are still many other ways to achieve atmosphere. We can use particles creating steam, smoke, bugs, water, whatever we can dream up. We can use specially created shaders on an Ocean primitive set vertically for subtle motion in whatever we shade it to be. I've even used a bunch of off-camera lights, aimed into the scene towards the camera to create atmosphere. I've still not tried the Old Volumetric Clouds, but I bet those are worth a look as well.
Carrara has Vastness to any topic we can dream up!
Oh yes. I spend a lot of time, finding references, pictures, blueprints and reading history. And for me, thats half the fun.
This one is Oriental inspired. It is not a copy of anything that exist, to my knowledge.
Fantastic... "Pearls of Wisdom" from Dartanbeck... they are to be cherished. Old Voumetric Clouds have different and less settings... also no preview of the cloud type/settings. But then I've not used it this year... dunno if I ever did... maybe with Carrara 5/6.
Thanks again Dart.
@Varsel - truly, the attention to detail that you display in your models in each of the challenges is inspirational. The eastern influence in your latest armor is very well done.
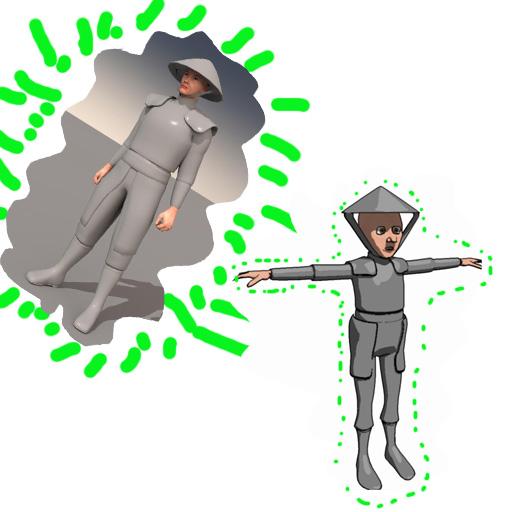
And yet - the Daz Gremlin transformer ray has struck!
Just how well will toonified versions of these scifi warriors stand up to the cyclopstritch cavalry? We shall see. We shall see.
All in good fun.
.
.
.
Wow that is absolutely some great modeling. Love the look but not a fan of the shader. :)
It looks kind of scifi with that shiny grey shader on it.
be patient... young padawan
for this low-poly models, textures and shaders are everything. Here are some preliminary off that sort...
And I thought the old logo look good on him.... What will Chohole say ....
And Diomede, when my armory are done with their production ..... your mounted guys wouldn't stand a chance.
awesome Varsel.. like it
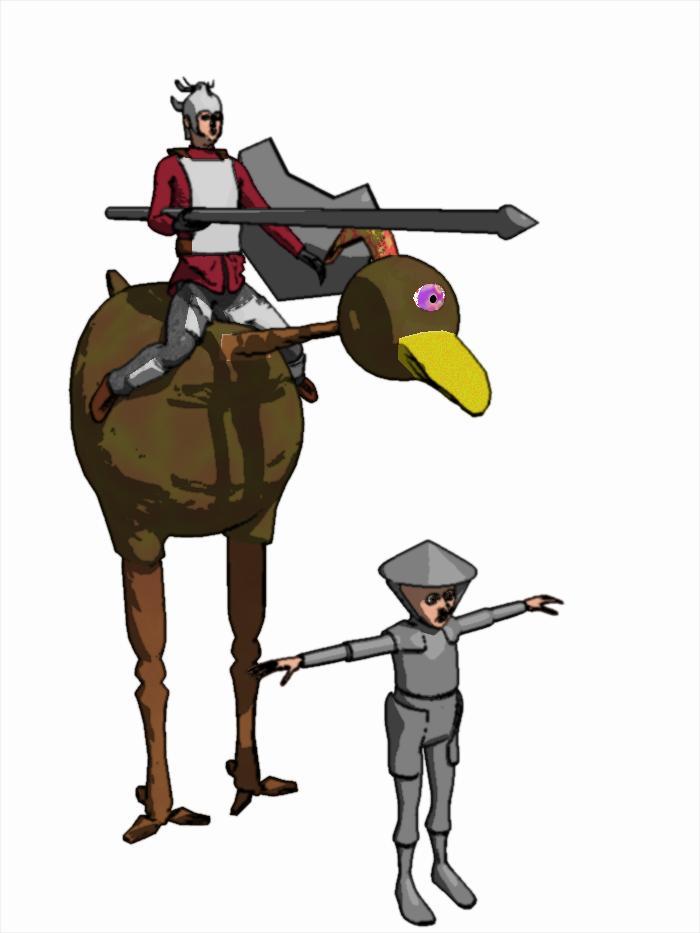
Here is my second one... Carrarians vs Dazonians
with help from the Forumites!
Carrarians vs Dazonians
with help from the Forumites!
composited
Exactly! I don't even hope to achieve a place at the top... what I want is to finally learn replicating well. The journey should of course continue beyond a Carrara Challenge... if one does not keep using the many features we/I learn there is no hope of getting better. Repetition and experimentation is how we grow. Always dream of what can be done... then go accomplish it by never giving up on an idea.
Hey folks... Great ideas and models... I'm impressed and inspired.
Varsel and Stezza - both looking terrific, each in their own way!
It's all out War, I tell you!!!
Stezza, Love those starship models! I thought I said that earlier but I dn't think the post went through... so just know that I was a fan from the start! ;)
Varsel, Love your modeling/texture work! Bravo, man!
Okay I am clearly doing something wrong. I'm trying to follow the simple spear instructions. I got to select top and weld all points. That's fine. However No matter how many times I select loop it won't loop. Doesn't matter if I select one point or two point or whatever. It SAYS it looped but it doesn't. I can undo loop even though nothing shows as looped. Not sure what I am doing wrong.
Oh and if I DO manage to get it to loop it loops top to bottom not around.
Here are a couple of tips for using the loop tool. These are for the vertex modeler. You can use loop to encircle a row of edges. You can use loop to encircle a row of polygons.
For a circle of edges, select the first edge then hit loop. If you are having trouble selecting an edge to start (if lines are too close together), you can set the selection tool to edges only in the upper right if necessary.
For a circle of polygons, select two polygons next to each other in the direction you want, then hit loop. You can set the selection tool to polygons only in the upper right if necessary.
Working on my assault on the temple of evil/beholders entry a bit more today. I added a couple of my Lorenzo Lorez guards: some running from the temple, one lying dead near the camera and one getting attacked by a beholder's eye beam.
I'm particularly pround of the eye beam - it's all in Carrara, no post-work! The beam consists of:
If you change the selection tool, remember to set it back to the multiple selecter.