The Moon
 Dave Savage
Posts: 2,433
Dave Savage
Posts: 2,433
I discussion about the Moon recently prompted me to have another look at how you can create a Moon instead of using the Bryce default Moon (which as I've recently found out, you can not alter the brightness of).
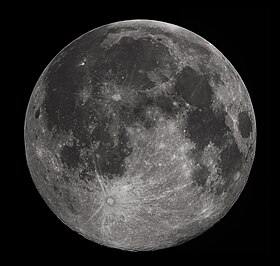
For this tutorial, we are going to use the moon found here in Wikipedia: Download this picture to your hard drive
This is a good one to use because it doesn't need any any work in a photo editor, it will just load as is into Bryce.
Picture 1: So we create a document, delete the ground plane and add a 2D round plane
Picture 2: Set up a suitable background. I'm using the plain Starfield
Picture 3: Select the 2D round plane and click on the 'M' button in it's mini menu to take you into the Material editor.
A; Click in channel A in the Diffuse row to create a 'dot', the A channel nano preview now opens.
[note: ignore the fact mine has already got a moon in it, if yours is the very latest version of Bryce, yours wont have. I'm having to do this in a slightly older version because I am on a Mac and getting pictures into the ME in the latest version doesn't work).
B; Click the little button with a 'P' on it (at this point the latest version of Bryce will load the DaVinci man picture)
C; Click the button directly above it to take you to the picture loading window
Picture 4: Again ignoring that mine has got a Moon in there already, you need to click one of the blank squares in the bottom on this window.
Picture 5: Navigate to the place on your hard drive where you saved the Moon picture you downloaded, select the picture and click the 'open' button.
More to follow as we can only attach 5 pictures at one time. :)
Daz 3D is part of 
Connect
DAZ Productions, Inc.
224 S 200 W, Suite #250
Salt Lake City, UT 84101
Licensing Agreement | Terms of Service | Privacy Policy | EULA
© 2024 Daz Productions Inc. All Rights Reserved.
Comments
Picture 6: So now we have the picture loaded into the first square, we need to click the 'copy' button underneath it and paste the image into the second square. When you click the 'paste' button under the second the square you will be asked if you wish to delete the image.
Don't be fooled into thinking you're deleting your moon image, this will only clear the blank square and replace it with your copied moon image.
Picture 7: Now you have the moon in the first two squares and we're good to go back to the main ME window so click the tick at bottom right.
Picture 8: The mapping mode we are going to use is 'Object Cubic' (don't ask me why, I've no idea, but it works) Access this menue by clicking on the little button with the down arrow at bottom right of the nano preview box.
Picture 9: Let's look at our picture of the Moon in the main viewport. For illustrative purposes, I have created a grey background so we can better see that the Moon doesn't fit exactly, the picture is too small and the black boarder of the photo is showing.
Picture 10: Go back into the Material Editor and click the button at top left in the texture/picture preview box (which I've highlighted with a small red circle), this will open up the texture/picture transformation tools which will allow us resize and if necessary reposition the picture on the 2D plane.
The resize control is the top set of controls (which I've highlighted with a large red circle). You can either place your mouse in the center of this control and drag to resize in proportion (it will go up or down in increments of 1 Bryce Unit, of if you perform the same task with the shift key pressed, it will go up or down in increments of 0.1 Bryce Units), or click in the numerical readout and type in the number you want.
In this instance the Moon picture we're using needs to be set to -1 for the top set of X, Y and Z.
More to follow, but we're nearly done. :)
Picture 11: So we've got out Moon resized on the 2D plane to -1 on X,Y, and Z.
Picture 12: Checking a quick render, we can now see that the black has gone from the edge and the face of the Moon fills the 2D round plane nicely.
Picture 13: We now need to light the Moon up a bit, so create a radial light and set it infront of the 2D plane (how far away you set it is up to you, mine is about the same distance away as the 2D plane is wide). Then click the little 'E' button to enter the Light Lab.
Picture 14: Using the Light Lab to brighten/darken, change the colour of the light and set what this light influences.
A: In my picture I tried a few diffuse settings until it looked right, mine is set to 31 (I didn't edit the specular, that's at it's default).
B: In some scenes a blueish Moon looks good, in others it needs to be a bit yellowy, use this colour palette to choose a colour.
Bearing in mind that the brighter you set the diffuse and specular, the more washed out this colour will look.
C: Lastly, if we set the influence to only include the 2D plane, this will make sure that our 'fake' Moon will not affect the lighting set up in our scene and cause shadows that will look wrong or reflections in the wrong place.
Picture 15: Now our moon is lit, we can see it looks brighter and slightly bluish around the edges. and it's ready to go into the scene.
Here is the same Moon placed over the Bryce moon in my Canyon at night render.
I did alter the lighting bit to match the new Moon better.
Thanks for the tutorial, The Savage. Now that canyon looks as it should. Nice job.
G"day TheSavage64
Here is what I have achieved so far following your directions, I already had a moon image so I used that one, I managed to get the full moon, and saved it in the library for further use, (just need to work on the lighting now.
But I had a play with making a crescent moon, I just duplicated what I had, bought it a 4d circle plane and positioned it, went into the material editor changed the disc to black to blend in and then rendered, but I noticed an absence of stars, so I thought I would go into the material editor again and add a starfield to the disc,, but when I rendered it the disc became invisible, so I then tried adding a starfield image to the disc and the same thing happened,
is this a bug?
I don't think it's a bug.
When you add a star field to a solid, what you are in effect doing is creating an alpha channel with some specular dots in it.
And of course, the alpha channel make things transparent. :)
So for the crescent Moon, Booleans are your friend.
Select your 2D disc and go into the attributes window (that's the little 'A' button in it's mini menu).
Across the top you will see some selection check boxes. you need to select 'Positive'
Then create a cylinder that is just a bit bigger in diameter than the disc and only a few Bryce Units deep.
Go into the attributes of the cylinder and check the 'Negative' box.
Making sure the cylinder is cutting through the disc, select them both and group them.
You will then see that the cylinder has created a cut out from the disc (see picture below).
For different phases of the Moon, you'd alter your cylinder accordingly.
Problems: The main problem with this is if you have stars in the vicinity of the Moon, you don't want them showing up inside the area that has been cut out (because in reality, the Moon is still there, you just can't see it in the night sky). If that happens you can alter the amount of stars in the Sky Lab until it gives you a pattern that doesn't have any stars too close to the Moon.
Working on my first full scene in bryce. I still have some tweeking to do in the DTE as it is still mostly guess and render for me still. But I am wanting to add an alien moon/planet behind the clouds, can I do this in bryce or do I need to do a separate render and photoshop them together?
If the clouds in your scene are the clouds generated by the sky lab then you are limited as to how you can get a moon/planet behind them. The first and most obvious is the Bryce moon - but obviously that's not a very interesting answer - or you can load a HDRI image with a planet on it and put that behind the clouds.
However, if you turn off the clouds in the Bryce sky lab and introduce your own cloud layer, either using an infinite plane with a cloud material applied, an infinite slab with a volume cloud or produce your own clouds using spheres and volumetric materials. There's a lot of scope here for experimentation. Then you can place your moon/planet up above the clouds without any problem.
My recent image with moon done in Bryce. You can compare the look with and without the additional moon. The moon is a sphere with material as shown below. And a finished image after some postpro.
Thanks for the moon pic they give me a good idea of what I want to do...
David thanks for the information.... I guess I will have to jump ahead on the dvd to clouds then...:-) though I know I will be replaying the DTE tuts again....
Also, let's not forget that the default Bryce moon can be changed to any image from the moon options in the skylab and it will appear behind the clouds.
Here for instance is a quick scene I just put together where the standard Bryce moon has been substituted for an image of Jupiter.
Well I didn't have tome to go through the tuts on clouds yet but from your last posts I gleaned enough to throw it together...the mats are just temp I will be working on those....Is there a way to not have the sun effect just the moons so I can use my own lights? I tried adding a light to give some shadow but to no effect...
Yes, you can switch the sun off completely in the Sky Lab.
Access the sky lab by clicking on the little cloud icon that appears when you're on the 'sky & fog' tab.
Then down the right of the window that opens up (where the nano preview shows and the control for the sun position is, you will see a radio button to disable the sun. Click it and the sun will go out. You can then use your own light setup to light your scene.
Other things to bear in mind; Make sure the global shadows are set to 100 (the default for most skies seems to be 90) and adding multiple lights to light up volumetric materials will increase render times drastically.
You may also need to use the 'influence' option in your lights if you get shadows casting on the plane you've put the clouds on.
If it's a problem make sure you exclude the cloud plane from the lights influence (you can always add another light who's influence is set to only include that cloud plane if it needs brightening up).
Well I got my moon(s) looking more like what I wanted. With the big one I added a cloud layer that I was not able to get as transparent as I would have liked, but it turned out ok for me, for now... First time playing with the infinite cloud plane and I got it mostly the way I wanted but I sould like to have made it look like there was more movement. LIghting is still a puzzle for me but I hope to be able to get through some tuts on bryce lights so I can get it the way I want...
Opinions and sugestions welcom, mostly about he moons I guess as that is the topic on this thread.. :-)
I think the boolean cut or completely hiding part of the moon to get a crescent seems inadequate and looks fakey because in real life the dark part of the crescent is not "cut" away but darker and not completely evenly darker...take a good close look. Best accurate solution would be to cast a dark shadow onto a 3D moon...to simulate the real physics.
I've been working on the lights with my moons and I think I have a good set up for it now. I used a very large parallel light targeting the smaller moon, made the light infinite with no falloff. The intensity only had to be 3 to get the shadows I wanted, also I excluded the infinite cloud plane and the "atmosphere" of the large moon.
Although yours is a fantasy scene (and thus anything goes), from a physics point of view when looking from within a sky, anything darker than the sky must be within that sky. So your moons look like they are objects hanging in the sky rather than being behind the sky. Cool, but not realistic. If you search the web for images of "moon in daylight", you'll see how the moon looks behind the sky. When science fiction art smartened up its act in the 1970s, this was one of the changes in style. Nothing wrong with total fantasy moons, of course.
To simulate the "behind the sky" look in Bryce, set the material of the moons to "additive". This will show only the parts of the moon that are brighter than the sky.
Below is an ancient Bryce4 scene from the last century that I've tweaked slightly in Bryce7. Most useful feature of newer Bryce for this was the much brighter sunlight available. Surprising but genuine coincidence of moon positioning and misty gullies.
I was actually wanting just this effect so thank a bunch for the info on doing it. Great render btw.
As an alternative,
locate the Bryce moon in a completely black sky,
in the Light Lab IBL Tab
Use HDRI Image, Skydome only, Use Sky and export the HDRI
The HDRI with the moon can be used to create a very bright moon in another scene
( Bryce is not currently installed on this PC at work, so this is from memory )
Well I was unable to get the additive option to function properly in my scene, I think that is because I have an atmosphere layer over the moon/planet with some transparency and this is throwing it off. So I added a 2d square and placed it between the moons and the terrain, applied the nebula material and set the transparency to 50%. THis gave me a good result I thought....
Here I added a ship I threw together....