How to: Replicators introductory methods, tricks, and advanced tips
 Diomede
Posts: 15,442
Diomede
Posts: 15,442
OK, I confess. I'd like to know more about replicators, and I thought if I started a tutorial, the advanced folks would chime in with good tips and tricks. I was so impressed with Dart's thread on terrain modeling that I thought I would start one for replicators.
I am going to start with a surface replicator. A surface replicator creates the image of multiple copies of the selected object along the surface of a chosen base. You can control the number of replications, and you can control where they occur on the surface of your base. Here is a quick look at the basics.
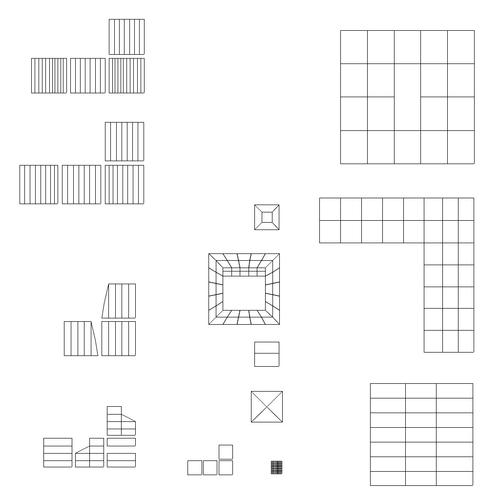
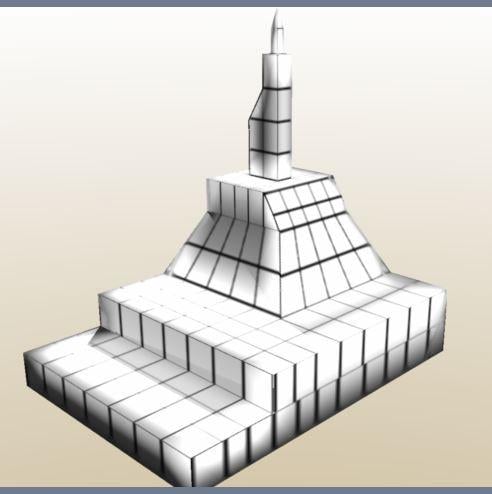
First, we have to assemble the ingredients. We need something to replicate the objects on, and we need some objects to be replicated. I've made a quick vertex object that sort of looks like a lighthouse or a fancy temple. For our purposes, the important thing is that it has a variety of flat and sloped surfaces at different elevations. I have divided the lighthouse into a number of shading domains, and then used the uvmapping function in the modeling room to assign the domains to different regions on the uvmap. That map will be relatively easy to edit in photoshop. For visual effect, I have applied the uvmap back on the model of the lighthouse just so you get a sense of its mesh.
You can see that I am not the world's best uvmapper, but it will suffice for the discussion of replicators.
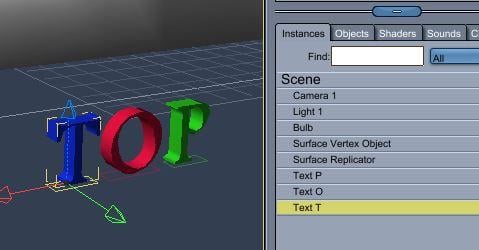
We also need some objects to be replicated. For ease of viewing, I have inserted 3 text objects, a T, an O, and a P. I've assigned each a different color. The placement of the hot point of each of the replicated objects is very important. We'll explore changing the location of the hot point, and what that means, in more detail when the time comes, but for the moment know that having the hot point at the bottom of the object allows the entire object to be above the surface.
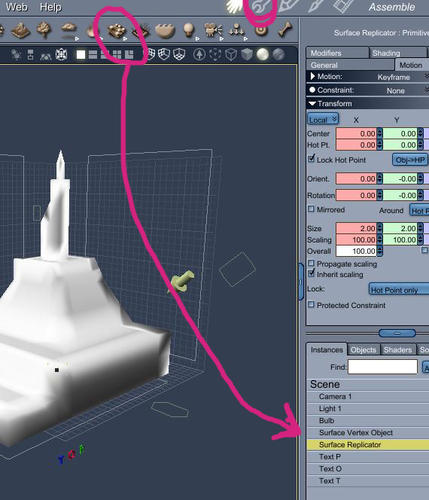
OK, I've got a surface and some objects in my scene, time to start replicating. The surface replicator is on the upper menu and looks like a piece of paper with a few balls scattered on top. You start the replication process by clicking and dragging the surface replicator into your instances tray in the bottom right of your screen. Then with the surface replicator selected, enter the modeling room by clicking the wrench on the upper menu.
The surface replicator menu will appear. And I'll pick up in the next post. Oh, the suspense!
Daz 3D is part of 
Connect
DAZ Productions, Inc.
7533 S Center View Ct #4664
West Jordan, UT 84084
Licensing Agreement | Terms of Service | Privacy Policy | EULA
© 2026 Daz Productions Inc. All Rights Reserved.
Comments
The modeling room for the surface replicator has a number of useful parameters to determine what the surface is, which objects will be replicated, how many will be replicated, how they will be oriented, variations in size, how close together they are, and restrictions on their placement. For the moment, focus on what the surface is and which objects will be replicated.
Number 1 in the pic is the surface to be replicated on. How convenient that I included the word surface in the name of the lighthouse.
Number 2 in the pic is a list of objects to be replicated. I used the menu to select the T, the O, and the P.
Number 3 are parameters to provide variation in the size and orientation of the replicated objects. This variation can be very useful if you want to replicate trees to make a forest, plants to make a garden, or people to make a crowd.
Number 4 says align object to normal. If you want everything to be growing vertically, uncheck this box. Otherwise, objects on sloped surfaces will be perpendicular to the slope (subject to your setting in the rotations already discussed).
Returning to the assembly room by clicking the hand icon, the replicated objects are represented by white boxes. Doing a test render, you can see that the lighthouse has a variety of letters scattered across its surface.
There are a variety of ways to control where the objects are replicated, and the next post will start on that.
The first way to control the distribution of the replicated objects is to use a shader domain that exists on the surface object. As I mentioned, the lighthouse has been divided into shading domains. One of the shading domains is named "Level 1".
The upper right of the replicator modeling room has a menu that says "objects distribution." By default, it says all domains. I used the menu to choose Level 1.
I bet you can tell from the attached pic where Level 1 is.
A second way to control the distribution of objects on the surface is to use a shader tree. Objects will be replicated on white surfaces, and excluded from black surfaces. Therefore, you can use all of the standard shader tree functions of assigning colors to areas of a surface to control the distribution of the objects. For this example, I decided to use the slope function. I want the letters to be replicated on all of the flat surfaces, but not the slopes.
Check the box for using a shader. Then click edit shader. A shader tree will pop up with just the color white (assigning the entire surface for replication). Edit the shader tree to your preferences.
For this example, I used a simple multi-channel mixer. I chose black and white for the two colors. The order of black and white determines which will be high and which will be low. I chose slope for the mixer. Slope is found in the environmental tab of the shader tree menu.
The result is that the letters are now scattered across all of the flat surfaces at various elevations of the lighthouse.
You could use similar methods to put the letters only on the sloped surfaces. Or, you can use elevation instead of slope, to put the letters high on the lighthouse, or low.
You can also use a texture map in the shader tree. That is why the lighthouse was uvmapped. You can create the texture map by editing the uvmap in another program like photoshop, or you can use Carrara's 3D paint tools. I'll provide an example of a distribution map later this weekend.
Let us not forget that you can also use the 3D Paint tool to paint a distribution map directly on the surface you want populated by the replicator.
The neat thing about replicators is that they can replicate groups, lights, animated objects, and they can replicate replicators. You can replicate objects on hidden objects, and you can hide the object you want replicated and the replicants will still be visible.
You can use a surface replicator to replicate objects on almost and surface. My Bikini Car Wash picture uses a surface replicator to replicate a small sphere primitive on the bathing suits to simulate water droplets.
Here's a freebie I made in Carrara that uses a surface replicator to place the lights along the cord. I used the shading domain to restrict the light placement. I also chose to show the mesh in the Assembly room. Since it was only a few replications the hit to performance was minimal and helped me when posing the cord to avoid unwanted collisions.
http://www.sharecg.com/v/73481/view/5/3D-Model/Carrara-rigged-Holiday-Light-String
Trust me, I am never going to forget your bikini car wash picture ;-)
Here is an illustration of using the 3D paint tool to create the distribution map. This list is going to look like a lot of steps, but it isn't really complicated.
The steps are, 1) select the object to be painted and enter the 3D paint room by clicking on the 3D paint icon in the upper left of the assembly room. 2) choose a shader channel to paint on (color, alpha,...). 3) click on the icon that looks like a magic wand in order to create a new map. 4) set the default color (either black or white depending on whether you want to be painting the inclusion zones or the exclusion zones). 5) adjust the size of the characteristics of the 3D paint brush in the tools menu. Set the color of the brush to black or white (opposite of whatever chosen in step (4). 6) Paint the model to create your distribution map. 7) Right click on the newly created map under the texture tab, in order to save your distribution map. 8) Return to the assembly room. 9) Select the surface object and make sure it has the shaders you want. You probably have the new distribution map in the color channel, so put this channel back to whatever you want. For this example, it is the uvmap created in prior posts. 10) Select the surface replicator and click on the wrench to enter the modeling room. 11) In the upper right, make sure the box to use a shader is checked for the distribution. 12) Click edit shader, and then select texture map and import your distribution map.
Note - I have been getting an error in step 12 because I am not exporting properly in step (7). Maybe the real experts can clear this up. In any case, I have no problem if I temporarily open the exported distribution map in PC Paint and resave it under a new name. Carrara can then open it with no problem.
So, I will use a couple of posts to show the screen shots that accompany these steps.
OK, the pics accompanying the previous post show the steps up to clicking the magic wand looking thing and creating the default texture map, in this case all black.
Here I just want to focus on the texture tab in the tools menus. Note that the color menu now has a black square. That is the new texture map. Make sure the paintbrush looking icon is bright (selected) because that determines if you will be painting on this channel. You can paint simultaneously in multiple channels (say color and alpha, or color and distribution) if you enable the paint tools in the channels. You can also paint on layers within a channel by clicking on the triangle and opening the tree. I glossed over it in the popup menus, but you can also limit which shader domains are affected, which can be a big help when painting complex objects.
Now focus on the tool tab. If you have a symmetrical object like a face, the symmetry tab can be very useful, We don't need it for the lighthouse. I used the color wheel to make the color of the brush white so that the brush would paint the inclusion zones on the black object. You can numerically set the size of the brush. However, I find it easier to hover the cursor over the object and hold down the key and click and drag to set the size of the brush (it might be command key on the Mac, but I'm not sure).
You can also set brush properties such as soft edges, opacity, spotty brushes, etc. These can be very useful, especially for a bump channel. However, for this example, we want a simple sharp brush.
I decided that I wanted to have 2 swerving lines of letters marching up to the top of the lighthouse, sort of like two conga lines. You can see the white paths that I painted on the lighthouse. I then returned to the texture tab and right clicked on the black map in the color channel to open the saving/exporting menu.
I then returned to the assembly room. I selected the lighthouse and restored its original texture (in this case, my uvmap). I then selected the surface replicator and entered its modeling room. Under distribution, I made sure the shader box was checked, then edited the shader domain to load my exported 3D paint map in the color channel.
And here is the lighthouse with two conga lines of letters marching up to the top.
It will add an extra step, but here's a little tip for those that need to see a little detail on the object they are painting: Select white as the base color and paint black where you want the replicated objects to be distributed, then when you set up the distribution shader, and load the image map that was created by 3D paint, enable the Invert Color checkbox.
Sorry. Just noticed this. Maybe this will help? When I get to the point where I want to save the map and use it for my distribution shader, I do this:
I do as you do in your instructions, I select the object to be painted, select the 3D paint icon, Carrara throws up the warning dialogue, I click through, I create a new shader and Carrara throws up the dialogues you mention, and I set the map size, color, type, etc, then the save location and format, then I paint the model. When I'm done, I exit the paint function and then I save my scene. I think this is when the map is also saved. If I try to open it before saving my scene, I get a blank document in the image format I initially chose, or I get an error as you described. Closing the paint function then saving the scene seems to allow Carrara to write the paint data to the image file.
Thanks, EP. I knew there was something I was missing.
Now I am going to provide an example of using an external image editor like photoshop to control a distribution map. Remember, the key point to remember is that the distribution process places replicated objects in white areas and excludes black areas. We just need a way to tell it which parts are white and which are black. Now that we have used (1) a shading domain, (2) a slope shader in the shader tree, and (3) the 3D paint tool to paint a texture map, it is time to try using an image editor like photoshop. The basic process is to open an existing texture, define excluded areas as black and included areas as white, save it in a format that Carrara can import, and use the map in the replicator distribution channel.
If you have acquired 3rd party content from Daz or other sources, it is likely that it came with texture maps, and perhaps a template. I am going to use a prop that I acquired from Daz to illustrate how to edit an existing texture map to create a distribution map for the replicator. Daz and the vendor Karanta produced a product suite called dream home, that included rooms, furniture, etc. I am going to take an area rug designed for the Dream Home Great Room and use it as the base surface. I am then going to assume that some children have been playing marbles and replicate some multicolored spheres on the surface. This will also be an opportunity to demonstrate the importance of the hot point.
I loaded the DHGR area rug in Carrara. I also added and reduced three spheres, each of which I gave different textures.
Step 1 is to find the texture map or the template for your content. That depends on your download preferences and how you organize your content. However, if you don’t know, you can go into the objects texture room and hover over the name of the texture map in the color channel. The file path should appear on the screen.
Step 2 is to load the texture or template in Photoshop or image editor of your choice. Paint the areas that you want the objects white. Paint the areas you want to exclude the objects black. Save the texture map or template with a new name.
Step 3 is to return to Carrara and follow the standard steps (in previous examples) to load the new texture map in the color channel of the distribution menu of the replicator room.
The screen shots illustrate the steps.
Wait! The marbles are half buried in the rug! That is because the spheres loaded with the hot point in the center by default. I will correct this, and explore the parameters for more detailed distribution controls in the next post.
Correcting the buried spheres is easy. You just need to move the hot point from the middle of the each sphere to the bottom of that sphere. To move a hot point, select the object and hit caps lock. Now when you use the move tool, the hot point will move instead of the object. Remember to turn off caps lock when you are done (I always forget, aaargh).
There are several other parameters than can control the distribution of the marbles that are worth taking a look at now.
Number 1 - displays the number of objects that have been replicated on the surface of the object.
Number 2 - displays the maximum number of replicated objects that you will allow.
Number 3 - sets the minimum distance between objects. If you lower this value, then more objects will fit on the surface.
Number 4 - allows you to set minimum distances along a specific axis. Lower values allow for more objects.
via Dartanbeck - here is a tip for replicating on terrains in very large scenes.
My question could be stupid but, is it possible to use a channel of a shader to place the duplicated objects?
I am explained, if there is a shader of terrain, one has several areas of various colors and according to altitude… Can one select an area (colour) to place his duplicated objects there or must one obligatorily pass by 3D Paint?
You can use procedural functions to distribute, but those aren't in the shader for the object that has the objects being replicated on it, the functions would be applied in the distribution shader of the surface replicator.
You could copy a function such as cellular from the surface's shader and paste it into the distribution shader.
OK, I just want to make sure that I am following you. Unfortunately, we have to repeatedly use similar words such as shader, texture, region, replicated surface, shader of the surface, etc. to mean slightly different things and it is easy for me to get lost. I am going to make a couple of statements that I think are true, that I hope will help sort a few things out.
1) There is an object that represents the surface that another object will be replicated on. For now, call it a terrain.
- this object has a shader to control its appearance.
2) There is a second object that is going to be replicated on the first object. For now, call it a tree.
- this object has another shader that controls its appearance
3) In the scene, we also insert a replicator that controls how the tree will be replicated on the terrain.
- this replicator instance has a control in the upper right portion of its modeling room that refers to a shader.
- this shader in the replicator modeling room controls the distribution of the tree on the terrain.
- therefore, this shader in the replicator modeling room is actually a description of the terrain
- however, the shader in the replicator shading room does not texture the terrain, it applies the tree to the terrain.
4) The shader of the terrain (point 1) need not be the same as the shader in the replicating modeling room (point 3), even though they refer to the same surface (they both refer to the terrain).
5) Yes, the shader in the replicator modeling room (point 3) can be used to distribute the trees in my example, without using the paint tool. This is what I did with the slope function in one of the examples.
If you go back in this thread (I think post #3), I believe that there is a description of how to use the shader terrain to apply the letters to the lighthouse. It uses the a mixer of black and white, controlled by a slope function in the shader tree of the replicator modeling room, to apply the replication. The actual shader for the lighthouse remains the box map.
Hope this helps. I think I said the same thing as EP, but I got lost.
Maybe one of us is clear, but it is fairly convoluted.
To further the already muddy waters, when you click the shader option in the Surface Replicator "room," it opens a new master shader in Carrara's Texture room, if you haven't already created one. As diomede has said, this is a distribution shader, but it can use any of the shader types, such as multi-channel. You could also select a terrain shader as the top level and use one of the terrain functions such diomede said, such as noise.
If you select the shader type as multi-channel, you could put in an image map, or use a noise function or some other procedural function such as Squares to place the trees on the terrain. If you have a noise function in the shader that defines the appearance of the terrain and you placement of objects also to be defined by that function, then you would copy that function from the terrain's shader and paste it into the distribution shader for the replicator.
To be specific about using the terrain shader, yes, you can use one of the terrain shaders to control the distribution map. In the shader tree contained in the replicator modeling room, change the colors of land, grass, and snow to include or exclude the object to be replicated. For example, if I wanted to replicate trees in the grass area, I would change the color of grass to white, and change the color of land and snow to black. You can grow or shrink the areas for grass, land, snow by adjusting the parameters to the right, especially slope and altitude.
I will try that this evening after my job.
Thanks a lot !
He He, that works well… Thanks to both!
Great! EP also has some great suggestions regarding complex and nested shaders in the terrain modeling thread. Most of those suggestions would also apply to the shader that controls replicator distributions, if used to apply black and white.
OK, so the previous entries that I have posted in this thread have been about replicating objects on a surface, analogous to plants on a terrain. Here is something a little different. This is an old example of mine of using the surface replicator to help make an object. I did this last summer so I think i could do a better job now (make more diverse branches, use a more efficient mesh for the leaves, and that sort of thing). But, I think it may still be helpful.
I wanted to make a tree for a prior challenge on gardens. My strategy was to
1) model a base tree trunk and several base branch, with shader domains on the branches but not the trunk.
2) model sub-branches, and again have a separate shader domain from the stem of the sub-branch and the branches of the sub-branch.
3) replicate the sub-branches on to the branches of the base tree
4) {this step would probably be replaced with a nested replication now} convert subbranches to real instances, export result as obj, import tree base and sub-branch obj as single object.
5) model a leaf with separate shader domains for the leaf stem and the leaf foliage. (would probably just use a square grid now and use the alpha channel to make the leaf shape).
6) replicate the leaf on to the shading domain of the branches of the sub-branches.
The screenshots of the stages of the mesh and some shading domains (lower right in global tab) are attached, along with a render of the result on a white background.
The point is, a replicator can be used to help simplify modeling certain complex objects, not just distribute objects on a surface.
I would replicate Carrara plants on the tree trunk as leafy branches. If you were interested in animation, you could then set the replicated trees/branches to rustle or other parameters.
And further, although there's a warning for using "Create", we can use the replicator to spread our stuff where it needs to go, then Create real instances and delete the replicator. I wouldn't do this, of course, for things that are massed in large number across a surface, but for specifically placed items on specific domains that I model in, absolutely. Let the replicator get me there, but then drop it fro a group of individual 'duplicates' that can be manipulated. These are things that I love to do! :)
Replicators are even more powerful when combined with SparrowHawke's free plugin to vary the colors. For example, this can be used to vary the colors of the shirts of replicated figures in a crowd.
Free Instance Randomizer - http://www.sparrowhawke3d.com/InstanceRandomizerPage.html