Building Carrara Terrains Intro
 Dartanbeck
Posts: 22,148
Dartanbeck
Posts: 22,148
Terrains are really fun to make in Carrara and, although the tools and process may be simple for us, the whole set-up is really quite powerful for making very realistic looking terrain.
This is by no means any sort of tutorial you might expect from Mike, but this should help you to get going in a simple, easy to follow manner... I hope ;)
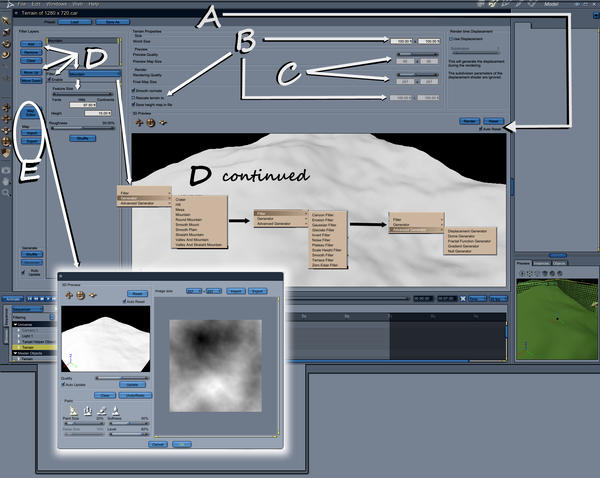
The image below is a collage of several bits of screenshots from the terrain editor and I placed large letters with circles and arrows to help you follow my text. I'll follow this post with another regarding terrain shaders.
To get some practice in, start with a blank scene, so you have low overhead on your computer systems. Some experimentation with filters and generators (more on those in a bit) can cause your computer to slow to a crawl or perhaps even stall entirely. So when I mention 'being nice', I'm talking about preventing choking out your system.
In this empty scene, Insert > Terrain will launch you headlong into the amazing terrain editor. Now we can start to refer to the image below.
 A - The first thing I like to do in this room is to turn off "Auto Reset", which is the only thing that "A" points to. What this does (when you remove the check mark from the box) is to keep the terrain from snapping back to the position shown every time you make a change to something. In other words, by removing this check from the box, when you position you camera view to see the terrain from a specific angle, it will stay at that view until "you" change it - which is a very good thing.
Short story - remove the check from the "Auto Reset" box.
B - points to three related inputs. Let's start at the top.
World Size (100' x 100' in the image) - this sets the actual size and ratio of the terrain object. If you're starting fresh, making a new terrain, it's often easiest to set this first, so that your settings and what you see will make the proper affect to the terrain object. The alternative is to follow the arrow that leads down and to the left and place a check in the "Rescale terrain to" box and entering in the final size in the fields that the final arrow leads you to. The difference here will make perfect sense when you have made the perfect piece of terrain, only to later find that it's the wrong size for your needs. If you resize it using the World Size input at the top, all of your work in setting up the terrain will now be horribly out of scale, in most situations. Rescale Terrain does just that - it scales all of the current terrain details uniformly, keeping the same shape at the new size - smaller or larger. Note that changing the aspect will cause stretching or bunching in the rescaling method. Example: if you rescale 100 x 100 to 500 x 200, although it will try to rescale uniformly, it cannot, due to the change in ratio.
C - points at two inputs: Preview quality and Render quality. Both of these set the fidelity of the virtual mesh that is being made by the terrain settings. Just like resolution of images, higher values will give more accurate results. Turning the preview quality too high and you'll notice that your working view of the assembly room may get sluggish or non responsive. Turn it too low and it becomes more difficult to tell where the surface will be rendered - so things you place on top might render either sunk in, or rising above the surface of the terrain. A good starting point for my machine is 512 x 512 in both. That way I'm seeing what's being rendered.
A general rule of thumb is to use lower values for distant terrain and try higher values for terrain that is up close.
Tip: Make close up terrain small in world size so that you may use higher values of quality. Then accent the background with lower accuracy, larger pieces of terrain.
D - This is where the fun begins! "D" has arrows pointing in different locations, but we'll be talking about the whole thing at once. The lower blocks of grey/beige with lists in them (D Continued) are the different lists available from the blue button that currently says: "Mountain".
This blue button is the selector for which filter, generator, or advanced generator is being used. The "Add" button on the upper left allows you to add more new selections (blue buttons) to further alter the shape. You may add many different generators and filters to create multitudes of different affects.
By default a new terrain comes with a Mountain generator applied. Look at the three gray list boxes below. From left to right these lists are Generators, Filters, and Advanced Generator.
Generators make worldly alterations to the topology of the virtual mesh, while filters add effects, no matter what the surface shape looks like. Advanced Generators further distort the topology in their specific ways.
E - is laying on a circle around three important buttons: Map Editor, and Map Import and Export. Clicking on Map Editor takes you into Carrara's own little paint application with a nice set of brush parameters, as seen in the box at the bottom of the image. This is how you can paint your own height maps - white = highest and black = lowest. Import is where you can load in height maps that have been saved to your computer, whether you made them in Carrara or another app. Export will export a height map gray scale image of the current shape and detail of the terrain.
Have a look at the bottom box in the image - the view of the map editor. You can see by looking at this map that we have a large height in the bottom half, centered and a large depression centered above it. The cloudy cotton candy in gray scale will make details according to their gray value. One last word on this before we move on to a simple exercise - Height maps like this can be very beneficial in getting just the type of terrain you're looking for - but it all takes practice. Painting smooth shades can create nice flat zones for roads, lakes, or other more level needs.
Now that we've covered the A B Cs (lol) of the terrain editors inputs and outputs, let's take a more practical walkthrough.
Starting from the beginning, just after insert > terrain and we're now in the almighty terrain editor, let's start by deselecting that "Auto Reset" check box (A). Now using the Alt key, use your mouse buttons and the other camera controls in there to take a good look at the mountain terrain in the view port. I like to set my view to the best angle that will help me see the shape that I want to ultimately create.
It looks really smooth doesn't it? That's because the Preview Quality (C) is only 65 x 65 pixels. Let's change that to either 256 or 512, your choice. Make sure that the Render Quality is at least as high. When I'm designing, I prefer to set them both the same at either 256 or 512. If I think that I'm really close and/or I want to see it with more detail, I might turn them up a notch and check it out. Log what I'm seeing to my temporary memory and change it back to make more tweaks - or leave it because I'm done. Actually, you'll often find that 256 is high enough for the final fidelity. Other times you might want some really high resolution details. Personally, I like to leave those fort the shader to control.
So we're at 256 or 512 and our World Size (B) is still 100 x 100. Great place to start.
Take another quick look at the image below. Notice that the terrain in the main view port is actually what is loaded into the map editor at the bottom. So that's one of the possible shapes that the Mountain Generator makes. Just under the blue button (Mountain) are sliders/fields for Feature Size, Height, Roughness, and there's a Shuffle button.
Feature Size and Height - These settings work together to determine height and circumference of the features in question. Make the Feature Size smaller without lowering the Height and you'll get sharper peaks. Increase Feature Size using the same Height will smooth the peaks. Dragging the slider of the Feature Size will not update during the slide - only after you're done, and doing so makes drastic changes in the value. For more precise changes you need to enter the number into the field.
While making these changes, the actual information that got sent to the Map Editor in gray scale will remain fairly similar with exception of brighter light shades and darker darks. To change the random generation itself click the Shuffle button. Roughness will add more small bumps of detail to the mesh.
Using the default terrain and the below screenshot as an example, we are basically looking at one main mountain, one lesser one on the opposite corner, some hills and a valley nearly as large as the mountain itself. To increase the number of mountains lower (Slightly - a few whole numbers at a time) the Feature Size a little. In this example, change the '9' to a '6' and you'll see more mountains with steeper walls. Increase the height and most everything will stay the way it was, except that the walls will get even steeper, and the peaks may actually shrink in upper diameter and get sharper. Lower the height and you'll get softer slopes and more real estate on the peaks, while maintaining the amount of features you have.
So this becomes a good exercise right here - looking at what happens when you alter these two numbers. If the effect looks similar to your vision, but the layout of features isn't quite right, click the shuffle button with your mouse hand and sip your coffee with the other. Don't click through too fast... but Ctrl Z (Undo) works on shuffle, so if you ever wish to go back a few, you have that option.
Other Generators have different fields to adjust in order to get the desired affect to take place. If the names are not self-explanatory, just try one. Tweak the values. This terrain editor requires practice whether you are a geography wiz or someone just messing with dials. The key to getting expected results is to pay attention to what happens while experimenting, so you know more and more in regards to what works for what as you play.
I skipped over Generators somewhat, simply because we already have one loaded in, and it's a good one, so let's move on to Filters.
Very much as each of their names imply, Canyon makes gorges, Erosion erodes, Gaussian makes blurs, Invert makes the highs into lows and the lows into highs, and so on. Some of these filters have settings within them that apply a lot of detail to the virtual mesh. Sometimes they can be noticed by what you think they might do, like some of the values you can mess with in 'Erosion'. Cranking too hard on some of these could leave you having to Force quit Carrara and start over. So if you're working on something you wish to keep, save every once in a while before venturing too far into the unknown - but do venture - that's how we learn! That's why I say that it's important to come in sometime when you have some spare time and just play around with absolutely no intentions of saving anything, just to experiment with the controls. I can almost guarantee that some of those sessions will lead you to save and revisit that terrain just a wee bit later, because it's looking so freaking cool!
There are three filters here that, while fairly obvious of what they might do, I find to be very useful in many situations. I'm sure others have their 'goto' filters that they use often too.
Zero Edge - I like to use this one on smaller, close up terrains to get their edges down - so I never have to worry about seeing the back-facing polygons of the edge of the terrain by mistake. If this makes the terrain too small, I make it bigger. Do note that you can change the scale of your terrain using the scale tool in the assembly room too, if you need to.
The Zero Edge filter brings all of the outer polygons to the lowest point of the terrain, and you can control via slider how existent the effect is away from the edge. Love this filter!
Terrace - This one adds terraces to the number that you input. So if you input '3', the mountain walls will have three steps to them. You can crank this one way up there and back down for differing effect, depending upon what lies above it in the list of generators and filters. There are many variations that can be achieved by changing around one slider compared to the next in this one. It can be very useful if you want to sharpen the edge of your cliffs or take the straight steepness away from mountains, etc., and much more.
Invert - Yeah... just like it says. Sometimes flipping the whole thing inside out is exactly what the doctor ordered!
This brings up a very interesting point - and now is the perfect time to mention it. Have a look at the image again. See the gray box of text that says "Mountain", just above the blue button in D? That's your list of generators and filters and you may put a lot of different events in there. That said, 'where' they are in the list can make a difference, depending on what they are. I say this because you can place the Invert filter next after the Mountain. Whatever you add below the Invert filter will not get inverted. Very cool, very very cool. What's that? You wanted it inverted? No problem. Select it and click "Move Up" (D, lower arrow on left) until it is above the invert filter, or Move Down the invert filter.
Since the Map Editor is a 'paint it as you see it' sort of tool, I'll let you play with that one without any further explanation.
Try this out. I have to go for now and I'm sure that I've missed something. Let me know what you need and I'll get back to you. In the mean time, have fun making Carrara Terrains!
Daz 3D is part of 
Connect
DAZ Productions, Inc.
7533 S Center View Ct #4664
West Jordan, UT 84084
Licensing Agreement | Terms of Service | Privacy Policy | EULA
© 2026 Daz Productions Inc. All Rights Reserved.
Comments
I also wanted to share a brief bit about the magic of Terrain Shaders. Like I said above, I'm out of time. So to get by being too brief, yet not leaving this untouched, Have a look at the comparison below. The shader on the left is the default terrain shader that is applied when you Insert > Terrain. The one on the right is one from one of my EnvironKit products. One of the key things that I'd like you to see here are the Layer Names (Left shader - "Land", "Grass", "Snow"), which let you know, often fairly specifically, where that part of the shader gets applied on your terrain. And the other is how I replaced the basic shaders in the list with full multi-shaders in the shader on the right. I also used tiled texture maps in Color, Highlight, and Bump channels of most of them. But you can also use the many wonderful functions offered by Carrara shader channels instead of maps. Like the popular fractal noise, for example.
Okay... until we meet again...
Happy hiking in Carrara! :)
Fantastic tut! Just what kind of texture maps do you use?
Thank you!!! This is great... terrain levels' shaders are errr a shady area for me. So much appreciated. I have tried to do a cliff in vertex modeler, but I think I'd be better off with terrains in the primitive modeler...so will get busy. Definitely will be turning off that pesky auto reset and looking at other of your techniques. Cheers for taking the time to start this off!
xx :) SileneUK
Fantastic tut! Just what kind of texture maps do you use?
You can use almost any thing that will tile. Grass textures, leaf textures, rock textures, and on and on. You can define were the texture appears through terrain distribution functions such as snow, grass, rock, land etc. You can set the slope for instance so that the texture map won't appear on a slope of greater than 45º. You can set the amount of blending so that it doesn't appear to suddenly.
I also like using image maps I create by painting on the terrain with the 3D paint tool as distribution maps for terrain shaders.
Hi Silene,
The terrain editor is great, but it can't do undercuts. The picture above uses a terrain for the hills and river bed, and the undercut cliffs and islands are vertex objects embedded and blended into the terrain. I created those first making my terrain, then inserting a vertex object and editing it in the assembly room. This allowed me to dray the poly line to match the terrain. I select Fill Polygon and the used the Dynamic Extrude tool to extrude the shape up, varying the size as I went. I also periodically selected an individual vertex and moved it in or out a little, or I selected the whole polygon and rotated it slightly, then continued to extrude. The top was flat, so I added and linked vertexes until I had a grid on top. I then used soft select to make the top somewhat uneven. I applied smoothing at 2 levels and then used displacement painting to get a bit of a rougher look.
Many of the terrain shading functions will work just fine on other models. The base shader for the terrain, was the base shader for the vertex cliffs and islands, I just modified the scale, slope and height parameters to better match the smaller scale of the vertex objects.
I love terrains! But I must say that I have no love for the Carrara terrain modeler.
My preferred tool is Daylon Graphic's Leveller product. I export a PNG greyscale heightmap from there and bring it into Carrara.
I may switch to World Machine one day. Both products appear to have far more advanced tools for building terrains. As EP noted, no undercuts though - you need the vertex modeler for that.
Lest I rip on Carrara too much; the terrain shader system is quite good. I find it finicky and requiring a lot of playing around. But the end results are easier than anything I've used thus far. I cannot get decent terrain shading in LightWave (yet).
Hi EP, After I saw your first render of your new model you are working on, (and thanks for the updated views above) I started trying and kept at it and finally got this. I know it's a very humble beginner's effort but it gave me the look I wanted. I ended up putting three of them together in a group as I had trouble keeping control of the big hamburger or mushroom as my husband calls it! (Dart those are EK trees lower left). I have not done anything with light. Am just trying to place things as I make them or pull in rocks, trees, water-course texture, etc. Hope I don't regret not trying to work with light as I go. But that's another area I need to get onto. I do like PhilW's IS tuts on lighting so will re-visit them.
I wanted the cliff face to have that ravaged limestone look....but don't know how to get my head around putting bumps or specular effects when using layered terrain effects...doh on me. More to learn. But it's sort of the basic right "look" I a after.
Hi DART, if you want to take my post out of this thread to keep it tidy for tutorials, that's fine... didn't know where to put it for now. I definitely need to get some basics down and thank you and EP and all other for all the help.
This link shows what limestone effect I am after and what I am trying to do with it. In paleolithic times the limestone cliffs in these valleys would have been more tundra like than wooded as today. People lived on the ledges using hides to make "draperies" or building teepee like structures inside.
http://www.kazeo.com/sites/fr/photos/426/la-roque-saint-christophe_4262012-XL.jpg
http://www.hotel-bugue-perigord.com/cssimg/site/roque-saint-chritophe.jpg
http://media-cdn.tripadvisor.com/media/photo-s/01/71/e2/d1/roque-saint-christophe.jpg
Cheers to all for the help. Working on Carrara has been the best painkiller ever for my back and has kept me from going totally beserk!
xx :) SileneUK
ETA .... EP I prefer your striated horizontal look, too low poly on mine ... so need to practice A LOT!
Silene, the method I described above for the vertex rocks lends itself perfectly for the horizontal striations in the cliffs, judging by the images you posted. The stains can be achieved with terrain shaders. I used displacement painting in the vertex modeler as well. You will need a higher poly mesh than the one pictured. It doesn't need to be a huge amount more, but displacement works best with more polys. You can get more without taxing the system to much by turning on smoothing while you paint in the VM. I would also try and work with quads instead of triangles as they will provide less distortions when shaders or textures are applied.
You could also convert a terrain to a VM, but don't set the size too large. Try a lower setting and see what it gives you. Cliffs in the terrain can then have their vertices pushed and pulled, enabling undercuts.
Thanks for starting this thread and sharing your knowledge. Great stuff. Hopefully, we can get a few more people discussing their terrain strategies. EP's points about overhang are excellent. i would also like to see more discussion of various approaches to shaders. This is very helpful.
I read that Carrara can import files from official sources that correspond to real world terrains. Has anyone had success with this? What is the level of detail? What about shading such terrains? Adding plants, roads, buildings?
see here
http://www.terrainmap.com/rm39.html
That's a big subject my friend. I have not done it personally - I prefer the randomness of my own terrain generators. But you can make or acquire heightfields from various sources and most certainly use them in Carrara.
I don't know about the terrain editor, since I haven't played with it yet, but I've managed to import terrain data from Google Earth by going via Sketchup. Sketchup will directly import DEM data (DEM = Digital Elevation Mesh) from Google Earth. It'll even add the map tiles as texture overlay on the surface if you want it. You can then export that to obj, and import it to the Carrara vertex modeller.
I believe Google Earth's DEM data comes from SRTM (unclear if it's SRTM-I or SRTM-II), which has a base resolution of 90m (i.e. 1 data point every 90 metres). But unmodified SRTM is notorious for voids and spikes, and also for recording cloud tops rather than the underlying terrain. So YMMV. There are much higher resolution meshes, generated by flying aircraft equipped with LIDAR, but that data tends not to be free.
Thanks for the replies. Can you give a few more details about how to use google earth? I especially like that you say that you can apply the google map as a texture. Would you mind posting an example or two?
After a little web surfing, I found that DCG has a plugin to bring real world terrain DEM elevation maps into Carrara. It is called ground control. Has anyone confirmed that it works in 8.5?
It can be found here.
http://www.digitalcarversguild.com/plugin.php?ProductId=7
There is an old tutorial for it here.
http://www.carls-corner.net/tutorials/C4_DEM_GrndCntrl/C4_DEM_tute.htm
I found some free DEM files here
http://www.webgis.com/terraindata.html
I found some pay DEM files (relatively low cost) that I assume are more detailed here.
http://data.geocomm.com/catalog/US/61076/967/group4-3.html
Dart,
Good to see you did this and nice explanations of the Terrain Editor functions. Great job.
Dart, This is a great start for me. I didn't understand all the relationships between generator and filters and how easy the map editor really is to use! Have been doing some basic stuff... and must practice a lot but it's going to be extremely useful as I am not always happy with the Carrara stock terrains. I want my rivers, streams and bumps where I want them...thank you so much!
Mike, I am also working with some basic vertex models to get better control over the extrusion, smoothing and definitely understand now about squares vs triangual polys. Am very grateful. Thank you!
Both of you are very helpful and so unselfish with your time (as are many others!). But to me this just gets the new people more competent with Carrara features they may have shied away from (or were unaware of how useful they were) making better customers for the paid stuff!
Videos are great for tuts...but I personally find a bit of text and illustration are great for getting started or drawing me into the videos.
xx ;) SileneUK
ETA Dio, that digital carver site is very interesting... will have to have a good look even though it's beyond me right now. The price of many of their products and Carrara 8.x plugins are quite reasonable. Anyone use any of them?
Wow!
Rosie and I took our daughter out to a fantastic Hibachi Japanese Steak House to celebrate her graduating college. Boy oh boy... it's been a long time since I've witnessed the deliciousness of a Mai Tai (Rum x 2 beverage). So I ended up sleeping in today.
Look at what's going on in here! Now this is community cooperation if I've even seen such a thing! Beautiful!
EP has been working day and night on perfecting terrains lately. Nice stuff, my friend!
Argus, I like to go for square dimensions and preferably seamless. I've never tried one that isn't - and then used the 'seamless' box in Carrara. One day I'm going to see how well that one works.
When I bought Project Dogwaffle Pro, I also picked up Genetica Basic, which makes seamless texture and bump maps - that's what it's for. Dogwaffle and most other image editors have the ability to crank out seamless maps too.
My buddy, MAT Creator, makes things like this: MC-MMM Carrara
FWDesign and Forbidden Whispers makes these things: Texture Bank #10
DAZ 3D has a Texture Resources category at the store, which has many great packs to look at.
Most of these types of things contain seamless textures in them that can be reused outside of their original intention. Products that are "Merchant Resources" are sold under the assumption that you will include them in other things - either to be sold or not - so those are always 'safe' to use.
More on what evilproducer was saying, I am really getting used to (and fond of) the 3d paint tool in Carrara. Talk about practice... yeah... all of this stuff in the CG world takes practice. The only alternative to constant practice and experimentation is to bu in stuff that someone else made, which is a product of their ever-vigilant practicing! :)
The 3d Paint tool certainly takes practice! But I love it.
Once again, I must go - for now. But I'll be back.
Congrats to your daughter! It's a big achievement and am sure she will have a great future!
xx :) Silene
Congrats to your daughter! It's a big achievement and am sure she will have a great future!
xx :) SileneThank you! I hope so ;)
Okay, so I made some complimentary texture maps for anyone to have, play with, do whatever...
It's a fun process between painting and applying filters and such. I used Howler 9.1 for these. In the following post, I'll describe how I set them up. As their names imply, Limestone_Color is for the Color channel, etc.,
Just right-click on the images below and 'Save Image As', if you wish to keep them. They're free, with no limitations on use. Heck, sell them if you want! :)
Look at the images below and notice what they say.
Notice that in the images above I have set the tiling to 15 in both Vertical and Horizontal for the image maps.
I repeat this step for both Highlight and Bump channel images.
When I did a test render, 15 x 15 was way too much tiling for this test terrain, so I lowered the values each to 3.
I had Howler automate the seamless procedure on the image, so I did not activate "seamless" in the image tiling - but I think you can, if you like. It might even make the tiling more smooth(?), but I'm not sure. I normally make my texture maps seamless and leave this box unchecked.
In my opinion, it is the questions that come up and comments being made that make the whole thing work right. Other people may have the same queries, but wish to remain silent about it. The more interaction we have, the better we all get.
Also, I'm trying to find a way to silence the hum on my microphone so I can finish the shaders tutorials I began. I bought a new mic, but haven't tried it yet. For airflow reasons, I keep my tower up high, along side my monitor. Less dust lands there, I'm told. Anyways, I think that the hum comes from my cooling fans - so I might just have to stick with pictures and words.
The great thing about a forum is the ebb and flow of the "conversation." Sometimes things go off in a tangent that you wouldn't expect and then even the old timers can learn something. ;-)
For this image I used the same chunk of terrain that you see in the above example for setting up shaders, which I created in just a few minutes using the advice I gave in the beginning of this thread, and adding a Mesa Generator along with the Mountain Generator. Like the post said to do as an experiment, I lowered the feature size of the mountain by changing the first digit in 97 to a 6 to make 67 point something. I added a zero edge filter and then the Mesa generator and played with those settings for less than a minute.
I feel confident when I make shaders, yet I still visit them over and over until I am happy with them. At least when it comes to things like this. So for this image I opted for my new Terrain Shader that I made for my new, up and coming EnvironKit - Badlands. I love this shader! But I spent quite some time tweaking on it to get it the way I like it.
Here is the same terrain piece with the Forest terrain shader from Woodlands, but with each map's tiling cranked up to 30 x 30. Notice how the little dry leaves appear to be perched up above the rest of the terrain? I really like that. I've been practicing a lot with this sort of idea lately, to help eliminate the need for ground clutter geometry, when all I really want is background terrain. Why bog down the render, right?
Well on that note, we still have to be mindful of what we're doing - because shaders have the ability to slow down renders just as much, if not even more, than adding extra polygons.
...and now this one, same piece, I used the same distribution layers in the Woodlands shader from the previous image, but added some picks from Ringo's Digital Painters series shaders, and just pasted them in, in place of what I had there from the Forest shader. In this one, where the previous shader had little dry leaves resting on the surface, this one has one of Ringo's 'Pond Water' shaders in that distribution zone, adding a sparkly effect - sort of.
Anyways, I was just trying to help illustrate how forgiving Carrara can be with what we do. None of the shaders I used from Digital Painters was meant to be coloring terrain in this way - but I did it anyways.
In my opinion, Carrara comes with a dynamite collection of sample shaders to help us to learn how to set them up.
Likewise, Carrara (if you've installed Native Content) also includes a great selection of terrain shaders. While many of those don't really meet the needs of what I'm looking for, their distribution layers do. So I can start with a Carrara preset terrain shader and substitute the whole "Shader" portion of each distribution layer to something that resembles what I am looking for.
In this regard, we don't even really need to use texture maps at all, because Carrara shader channels have such a multitude of different functions - like the color gradient and the many types of functions that can control them, like Fractal Noise, Planks, Squares, etc.,
So I have been making a point to try out as many different shaders as I can when I'm in my 'experimentation mode' of working. This truly helps me to learn, not only what some of these different functions do, but also point out the fact (to me) that these functions exist in the first place. There are so many that we can call upon that it would take a lifetime to discover them all, I think.
I also enjoy experimenting with mixing multiple shaders and/or their functions together using either a multiplier, mixer, addition, subtraction, noise functions, etc., as it is amazing at what can be achieved. That's not to mention the fact the these experimentation periods can prove to be most enjoyable... relaxing even.
...and one more from this particular chunk of terrain before I close without saving:
For this one I went back to the Badlands Terrain shader then duplicated the terrain and, in the assembly room with the scale tool I scaled it slightly larger uniformly and then applied the High Quality Water shader.
Oh my... it's frozen in Ice!!!
Hey Dart,
I like the Multi Channel Mixer for creating shaders. See image 1.
I took your Limestone texture (thanks for it by they way.) and placed it in source 1 and then took a snow texture, second image and placed it in source 2.
Using the blender option, mix the two images using snow setting and get image 3
I also used this ground texture http://images.kaneva.com/filestore10/5612493/7257048/Forest_floor_texture_002.JPG
with blender set to elevation and adjusted the height and blend and got the image in the 4th image. If I would have flipped the the two source images it may have looked better. I think if I would have tiled it, it may have looked better too.
OMG...I have my day's work cut out for me! Thank you so much for the limestone shader. Thank you, too, very much kashyyyk for your shading tree demo, it's all very helpful!
I am at the moment doing the displacement/smoothing painting on my new abri/mushroom. I spent all last evening practicing EP's way of creating a vertex model of a cliff. Here's where I am at the moment...slow work. And I will be trimming/morphing the ends when finished. I save various versions of it as I go for safety's sake so I can go back to square one if needed. I am psyched about the terrain tut... not using it now, but I have done a walk through of the features and understand the process a lot more now.
OK...head down and more displacement painting. Not trying to get to a perfect point, just getting control of the tool and the intensity, size and what happens when dabbing vs sweeping, etc. I have left my old shader on there...will try and work with the new one when further on. I have a week before I have to get back to job production so will do as much as possible to get my head around all this until then.
Cheers again for this thread...it's the foundation of my project. People I have been working on look like rubbish if they aren't where they are supposed to be! For now, I have crappy lighting/bcg/terrain on the render, just want to see it in sort of a daylight view. Also, it's a long oval with the back 1/3-1/2 cut out (so I can dive in behind and fiddled from that side if needed).
EP.....It was very interesting working with adding and extruding levels after making my EP-style (but much simpler) polygon. Rounded front/sides and straight across the back. And cut out the back as said above. Once I sort of got the hang of it, I find it a really a great tool and I now need to refine my control of extruding/beveling. Getting the effect without sharp edges is not so easy. I did subdivide and smooth first. Should I have done that after the displacement painting?
Thank you all, this is great beginning of learning something new for me!
xx :) SileneUK
Dart which terrain in which EK did you use for top shader? I have Woodlands and used the block from forest. But it doesn't look like yours. Maybe there's another EK I need to have? (Don't want to be short of EKs as they are so useful).
Here's how I made it work...not sure if it's right but just experimenting. I lowered the light a bit just to see how it might look without such harsh lighting.
:) SileneUK
ETA... will be updating this photo in a while. I'd not tiled seamlessly and at 15 for levels. Do I do the same for the bump and highlight maps? I did... can't tell if there's a lot of difference yet because I have been roughing up the vertex model even more.
Just added 2nd image. Maybe I went too far????