Using Uber Environment 2’s Sky Dome
 Szark
Posts: 10,634
Szark
Posts: 10,634
Lately I have seen many questions regarding adding a sky dome background when using UE2 (Uber Environment 2). UE2 comes with a sky dome Sphere but it is mainly for a visual reference when setting up the direction of UE2. This Sphere is also hidden from rendering, small and locked.
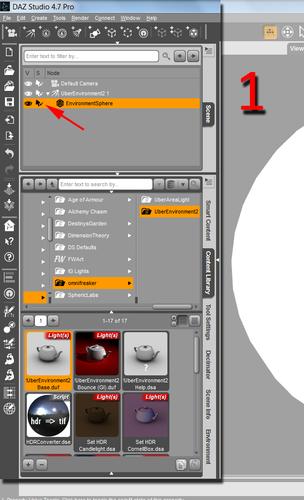
First thing to do is expand UE2 in the Scene Pane and select the Sphere. You should notice a little x beside the eye, click on it to make it a tick. This will make it selectable in the Viewport window. You can also come back and make it a x later if so desired.
Image 1
With the Sphere selected head over to the Parameters Pane. Under Misc turn ON Visible in Render. Leave Cast Shadows Off so light can pass through the Sphere.
Image 2
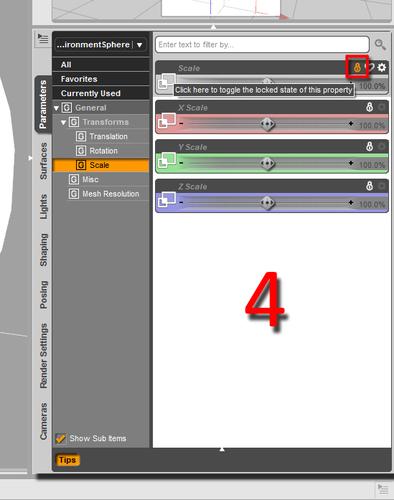
In order to scale the sphere check Show Hidden Properties located in the Parameters Pane Option Box.
Image 3
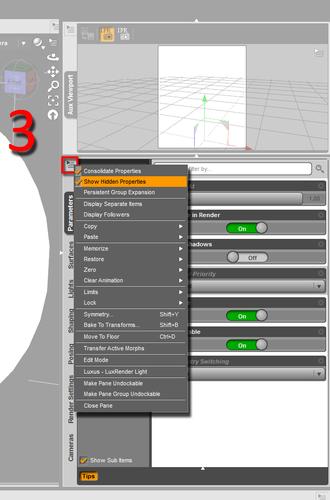
To unlock the Scaling slider click the tiny padlock to the right and above the scaling value. This is a toggle switch, click to unlock, click to lock.
Image 4
Next step is to smooth the Sphere by adding a Sub-D (Subdivision) modifier. You can access the Sub-D modifier via the top menu bar via Edit > Object > Geometry > Convert to Sub-D or via the Scene Pane’s Option Box. This is not just for looks but to stop the wireframe of the Sphere showing in a render which can sometimes happen when using more advanced lighting and low resolution meshes. Another factor for meshes showing in the render are the render settings Shading Rate being too high, 0.20 is a good starting point.
Image 5


Daz 3D is part of 
Connect
DAZ Productions, Inc.
7533 S Center View Ct #4664
West Jordan, UT 84084
Licensing Agreement | Terms of Service | Privacy Policy | EULA
© 2026 Daz Productions Inc. All Rights Reserved.
Comments
Now the sphere is ready for an image to be applied via the Surfaces Pane. Since a few versions ago Daz Studio can use HDRI images as texture maps and for light. In this example I have used a free HDRI image that I got in on magazine disc a while back. It is a big 11K HDRI at a whopping 174 MB.
With the Sphere selected head over to the Surfaces Pane and apply the HDRI to the Diffuse and Ambient Colour channels using a Ambient Strength Value of 100%. Using ambient will ensure that any other lighting doesn’t affect the sphere’s texture map.
Image 6
Also turn ON Raytrace as this will help the sky to show when using raytraced reflections on surfaces.
Image 7
Then select the UE2 light itself and apply the same HDRI image in to the Colour Channel.
Image 8
Because I don’t know the elevation and position of the sun on the HDRI I manually do this by adding a Distant Light. Looking through the Distant light and aiming it at the sun of the HDRI sphere. In order to see the sphere whilst looking through the Distant Light we need to turn ON Cast Shadows for the Sphere via the Parameters Pane whilst the sphere is selected. Once the Distant Light is positioned Parent it to UE2. To Parent the Distant light to UE2 just drag and drop it via the Scene Pane. This way you can rotate UE2 and the distant light will follow. When the light is positioned just make sure you go back and turn OFF Cast Shadows for the Sphere to allow the light from the Distant light to penetrate the sphere.
Image 9
Here is a quick result of what the sky looks like in a render using the same HDRI in UE2 and on the sphere itself, plus a distant light for better directional shadows.
Image 10
In my experience with using UE2 I would say the light Map and the Sky map don’t need to match. But obviously you wouldn’t use a daylight HDRI light map for a night time sky.
The texture size (resolution) for the sky dome should be big, the bigger the better, about 8000 x 4000 will give a good crisp sky render. You can use other image formats, jpg and png for example for the sky dome. But I do find it handy that Daz Studio can use the HDRI maps by default now.
As always if you see any mistakes or anything to add just shout and I will attend to it.
Thank You so much for explaining this Szark. Very helpful.
my pleasure scottidog2
By the way Szark, have you had a look at Hitfilm 3. You can import 3D models into it and create all sorts of visual effects.
https://hitfilm.com/
Downloaded the fully functioning demo and am going through the user manual.
It opens up a lot of possibilities for 3D compositing.
Thanks I have it but as of yet I haven't installed it.