RiverSoft Art First Anniversary Contest SUBMISSION THREAD
 RiverSoft Art
Posts: 6,376
RiverSoft Art
Posts: 6,376
This is the thread for contest submissions, only entries here. No comments or other posts please. Rules are here: https://www.daz3d.com/forums/discussion/233896/riversoft-art-first-anniversary-contest
Please include:
- Image
- RiverSoft Art Products used
- Description about how the product(s) were used and why you think the products made such a difference or such an impact on your image
- Please indicate if you are a PA
Your image and text must be submitted by April 15, 2018, Midnight US Eastern Time.
Note that you are allowed to change your entry at any time before the deadline. However, there is only one FINAL entry per person.
Thanks and Good Luck! 
Post edited by RiverSoft Art on
Daz 3D is part of 
Connect
DAZ Productions, Inc.
224 S 200 W, Suite #250
Salt Lake City, UT 84101
Licensing Agreement | Terms of Service | Privacy Policy | EULA
© 2024 Daz Productions Inc. All Rights Reserved.
Comments
Not An Entry
Back Alley Negotiations
RiverSoft Art Products used:
I'm hoping to do another image just for this competition, but in the meantime, here's my latest render. I could use any render I do where there's a character involved because I now use Eye Clock all the time. It is so intuitive and easy to use. I also used Expression Mixer on this one. It's fast becoming another "can't live without it" tool in my toolbox. Without it, I was clicking all around the Parameters tab looking for the sliders I needed, bouncing back and forth to tweak those in use as they interacted with each other. With the mixer, it was so easy to find the pose controls I needed, and tweaking the controls was even easier. Liam's expression is one of seriousness and resolve with a hint of danger, and the whole thing has this subtlety to it I've never achieved in an expression before. It may help that he's G8 with more facial bones, but I credit Expression Mixer.
Both Eye Clock and Expression Mixer are great time savers, leaving me more time to work on other details. And this image has a lot of details.
Not specific to this image, I find the fact Expression Mixer remembers the last controls used to be very helpful. I was working on something else when my video card locked up and the computer rebooted. I lost everything I was working on. But reapplying the expression was as easy as opening Expression Mixer and clicking on Accept! All the work on the expression would have been lost and I'd have had to start over, but not so with Expression Mixer. It saved me at least 30 minutes of recreating the expression, a lot more if you count the time it would have taken to recreate it without Expression Mixer. Thank you so much.
(Not a PA)
Fabulous
Riversoft Art products used: Look At Me
The worst part of posing for me is setting up appropriate eye contact. In this scene, neither of the base poses interacted with the setting in any meaningful way. The woman stared off straight in front of her, and the man was fixated on the wall to his left, waving to someone he couldn't even see. By hand, this would have meant painstaking wrangling of the neck and head bones, then rotating the eyes to focus correctly, and repeating it every time I changed a pose. With Look At Me, it only took a couple clicks to get a smooth, natural turn of the lady's head towards her partner, and focus the man's attention on someone approaching via the sidewalk.
(Not a PA)
"Hustle and Bustle"
(click image for a larger 2400 x 1350 view)
Used Now-Crowd Billboards - Medieval City Life by RiverSoft along with Medieval Fantasy Village
I like big city scenes whether modern or ancient. And the thing about big cities (or large villages) is there are people, lots of people doing lots of different things. So populating them with characters is one of the biggest problems: from adding in the individual figures, loading their hair and wardrobe, posing and positioning them, adding in props, all takes considerable time. Plus most computers run out of memory before you have more than a few figures in them. Using these billboards cuts most of that work away. This scene has 19 billboards which added in 30 people and a horse. Makes it look full and active. I have quite a few medieval sets, so these billboards are a welcome addition.
Ignem Spirans Draconem
(The full-size image is 3000 x 2400 pixels. Image links to the gallery.)
The Daz Dragon 3 is one of my favorite creatures, but I haven't done much with him because it's such a pain to pose the neck and the tail. I've spent hours trying to modify the base poses I have, only to give up. The neck and tail should look sinuous and graceful, not jerky and broken. I'm so glad I got the bundle rather than just the Bone Control. If you look really closely at the book image, there is a dragon visible behind the membranes of the dragon's wing. I used different poses on the dragons, but the dragon in the foreground used Pose Blender to modifiy parts of the pose, as well as Dragon Pose Control to modify the neck and tail. It was so easy, and I love how moving one segment blends the other segments into a smooth line. I bounced back and forth between the various scripts, tweaking the legs and wings as well as the neck and tail. I consider pose control product a must have for dragon 3 now. The poses are great, too. But if anyone has to choose between them, I'd recomment the control scripts.
When I first got started on this project, I was pretty sure I wasn't going to have enough time, just because posing is always such a chore, but I had the main pose done is about an hour or so. The bigger problem was deciding how to showcase him! I scrapped the first idea I had and went to bed. The next day, the idea with the book came to me and I went with that. I had to modify the pose slightly changing the angle facing the camera and the neck to compensate. I sure could have used an Eye Clock for the dragon, but it would have to control the eyes at the bone level. The dragon is rather lacking in morphs for the face. Not even a side-to-side morph for the eyes.
Because the Dragon Master Pose products make using the dragon so easy, I fully intend to use him more in future renders. (I would love to see a companion Pose Blender script specifically for the dragon, or animals in general. The full Pose Blender worked great on the dragon, but the Selective Pose Blender script didn't have an option for the tail or wings.)
Lady Pain
I used the Word Tattoo for Genesis 3 and 8 Female. I am in a motorcycle club. Many people in my club have finger / word tattoos. It is a very meaningful thing to those that have them. I have seen everything from 'LOVE' to 'HATE'. It is nice to bring an important, often overlooked, real-life nuance to my render - Thanks RiverSoft! (not a PA)
Not sure if this will be my final, I really want to do one with the billboards but I'm not sure I will have time.
Products Used - Look At Camera (LOVE this product and I use it or its counterparts on almost every render that has something with eyes lol) I used the on the two snake monsters although its hard to tell with the glow.
Expression Mixer - This is super useful in making expressions that look real. Even when the subject doesn't. Mixing the expressions gives them subtle little changes that really enhance the emotion that I want to convey. Most expressions aren't JUST one emotion and this makes it super easy to get something believable - Used on the female figure
Pose Randomizer - Same as above - and it really expands the pose sets exponentially. Plus, its just a ton of fun to use - also used on the female figure.
Not a PA
Products used:
Bone Doctor Pose Control - I used the excellent conversion script between Genesis 3 and 8 in conjunction with Assembly Line to quickly set-up base conversions for the Genesis 3 versions of the poses.
Assembly Line Pose Automation Kit - The automation functionality is such a huge timesaver and the ease with which can I adjust/customize the bones effected by the scripts was extremely helpful in the process of creating the hand pose presets.
These two scripts made the process of creating a better (and more complete) pose set alot more pleasurable -and- allowed me more time to focus on the fine-tuning needed after pose conversions. Some of the best purchases I have ever made at DAZ... thank-you so much for creating these!
I am a PA.
Used: Eye Clock Pose Control for Genesis 3 and 8 Male(s) and Female(s), Pose Blender and Bone Doctor Pose Control
I don't remember everthing I did with the poses. I spent a lot of time playing with poses with both both Pose Blender and Bone Doctor, had fun and saved many poses for later. This is what I remember doing with these figures:
I used Pose Blender for the large figures, each one blending two poses. Then I used Eye Clock, which worked great because their lowered eyelids showed where they were looking as much as the actual eye movement. I used Selective Pose Blender on the two Ollies. The right Ollie uses two poses blended except for right arm, head and left hand. I forgot what I did on the other one. I used Bone Doctor Selective Symetry for the two Reptilians from abdomen up changed the perturbation a little in the arms so they weren't identical. (The head poses I changed manually.)
I saved a lot of time creating poses as well as getting some unexpected and fun results from blending, especially selective blending. Watching results in real time make Pose Blender and Bone Doctor worthwhile to me. ( I have another pose mixer that is too tedious to use that doesn't have the real time aspect.)
I am not a PA.
This uses the Medieval billboards behind Bethany 7.
1. Image: Are You There?
2. I used Now-Crowd Billboards - Modern City Life and Look At Me Pose Control
3. Description
4. I am not a PA
I've been working on this image for awhile. I created this last year as I've been learning DAZ. Decided to add the https://www.daz3d.com/now-crowd-billboards-medieval-city-life to the mix and generate this render. Actually the entire image was kind of redone and reorganized as I think the bill boards worked quite well. Still this was only at 8% and 22 hours of render time before I cancelled render. I have other ideas to work on. :-) I think the addtion of the billboards really helped with this shot. I'm in a constant state of learning and that's a good thing.
I'm not a PA.
1. Image: The Dance
2. Riversoft Art Product used: Pose Randomizer
3. Description:
When Pose Randomizer (hereafter refered to as PR) was first released, I saw the potential in such a great product and purchased it immediately. Even though I'm still very noobish, I knew right away how and why I would use it, and here I've demonstrated that use in my entry. When doing any sort of dance scene, nothing suggests failure to my eye faster than a group of dancers all posed perfectly in sync without realistic variations. Just look at the images in this link from the March New User Posing Challenge, but doing all that posing is hard, tedious work. After 4 or 5 meticulous figure posings, time becomes a serious limiting factor, as can system resources on one's computer. PR to the rescue!
I've had a scene like this in my head for some time, but I was working toward having enough knowledge and skill to do it some justice. PR enabled me to focus on everything but the minutia of attempting to pose so many dancers with just enough variation to approach verisimilitude. In putting my entry together for this contest, I deliberately chose to minimize my resources to highlight the way Riversoft's product really shines. So, apart from cameras, lighting, and stage, inspired partly by this image, I've really only used two outfits (Hanami Outfit and Troubadour), two hairs (Fraser for G2M and Anjou for G3F), and two figures (G2M and G3F), with different textures to help make the illusion a little more believable. I think it turned out great, and Riversoft Art made it achievable with a lot less time and labor--and, I think to a much better end, than would otherwise have been possible.
After creating my first female character with base pose, clothing, and hair, I duplicated node hierarchies to make seven identical ladies. Since I needed variety across the forms, I couldn't simply use instancing. I then used another merchant's product to randomize the morphs for each figure to help them look more like individuals. I changed textures for the clothing and hair, and carefully crafted some variety into the hair strands. I went to my first lady, brought up the PR script to vary her pose, selected a lower percentage, and applied. At this point, my old computer was moving more slowly with so many figures on stage at once. Rather than needing to play with each body part on every figure over a long and painful process, it was as simple as point and click. Check the preview before applying. Approve. Wait only a moment. Choose next figure. Point and click. I did the same thing with the males and applied variation in pose for each figure after using shift-y to mirror the original pose. In the end, I only needed to make a very few adjustments to compensate for places where limbs clipped clothes or the stage slightly. The only alteration I made to any pose after hair and slight post-pose corrections was to aim the lead ballerina's eyes at the camera.
I'm convinced that this tool saved me a great deal of production time and resulted in greater organic fluidity than I'd likely have achieved myself. Just look at the lead's toes and compare them across all seven ladies (okay, sorry, a few are hidden). That is the kind of subtle difference that arose spontaneously out of using PR. The kind of loving, careful craft required to manually massage that sort of detail out of seven roughly identical figures is highly time dependant and labor intensive, and honestly wears on one's passion for the project. Imagine now doing a scene with 15 or 20 such figures. I can, thanks to Riversoft Art and Pose Randomizer.
Thank you for reading and looking at my work.
4. So not a PA.
ONE BONE AT A TIME
Angus was already flirting with Aiko as Rose berated Salem for taking the training session too far. Bernard was in pieces. Didn’t Salem know it would take Yuka and rBot hours to rebuild him one bone at a time?
Used:
Pose Blender
Bone Doctor Pose Control
I wanted to tell a story with this render, using four of the Aiko 8 character figures, rBot, and the LoREZ Skeleton. Pose Control and Pose Blender were used on all these figures. Both are remarkable sets of scripts, which enabled me to create unique and figure-specific poses that could be saved to my own personal pose library. Having selected a range of poses with potential from Genesis 2, through Genesis 3 and Genesis 8, I used Bone Doctor Pose Control to do conversion work on the poses so that I could save them as Genesis 8 Aiko poses. This included male poses as well as female where a particular element of the pose could be integrated later on. By the end of this process, I had a quite a range of poses to choose from. For the skeleton, I found Genesis 2 poses were a good match to the figure, and with rBot I was also able to match Genesis 2 poses with a little tweaking of the limbs.
For each character I selected the newly saved poses I wanted to work with and then produced a series of blended poses using Pose Blender. These scripts were used to blend whole and partial poses. Finally, I selected those poses with the right limb positions and used Bone Doctor Pose Control, to build the final pose for the figure. The ability to ‘relax’ or ‘exaggerate’ a full pose or a selected part of the figure is awesome. It totally changes how the figure works in the scene.
It sounds complicated, but it isn’t. I didn’t have to spend hours trying to create the unique poses I was looking for - it was done over a series of mouse clicks. A few minor tweaks using the Daz Studio pose controls, for example the positioning of hands and fingers, are often all that is is needed. Even without all the creative fun of producing new poses through blending, relaxing or exaggerating poses, the ability to convert easily between G3 and G8, and G8 and G3, on its own means that I double the use of my purchased pose library.
I don’t think I would have attempted such a range of new poses for this image without Bone Doctor Pose Control or Pose Blender. It would have been too complex and I honestly don’t think I’d have achieved the impact and story that I’m hoping this image portrays. Having an idea of what you are looking for is a good starting point, but the products produce wonderful surprises that I've used in this render or saved for a later date as a new pose in my library.
I’m sure I haven’t used the products to their full potential. Until now, most of the time I tended to use Pose Blender, but they are most definitely now an integral part of my workflow. Producing this render has taught me that Pose Control is just as useful - if not more so. Hopefully, before long, I’ll be using all its features.
I am not a PA.
Sunset Negotiations — The Butterfly Maiden and the local nature spirit do not always see eye to eye…
Click on image to view the full sized version or view it in my gallery.
Used: Look at me pose control and Pose Blender
Creating unique and believable poses is a lot of fun and easy to do, using Pose Blender. For this render, I combined partial poses and then tweaked her neck, hands and torso so that the fairy's body language appears respectul as she gently explains to the nature spirit her "side of the story" without leaning away or looking fearful. Previously It would have taken me hours to achieve a similar look without the script.
I also used “Look at me Pose Control.” Using the script interface, I chose my character (fairy) and then the nature spirit’s ivy to activate the script. This particular figure didn’t have a “head” but it was easy to direct the gaze of the fairy to the general location. What I like best about this script is that it assists with the process of creating believable eye contact with the render camera or other items in a scene.
Overall, using Riversoft Art’s utilities are an important part of my workflow. The easy to use scripts and interfaces allow me to quickly create a polished final render.
I'm not a PA.
Page Left Intentionaly Blank.
This entry is not to be used for the contest.
Titled:Elves Setting Up X-Mas
I used (Now-Crowd Billboards - Santa's Elves) that was a X-Mas Gift.
I found it really helped with cutting down my rendering time for sure
I am not a PA
RiverSoft Art Products used:
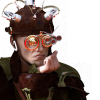
Daydreamer

Items by RiverSoftArt used: Eye Clock Pose Control and Pose Randomizer
Description:
The eyes on a close-up portrait are always difficult and sometimes they just don't work and look fake. While part of that is rendering, a lot of the problem comes with posing and getting the eyes to look right. I had fun playing with Eye Clock because it takes a lot of the guesswork out and I could spin the dial and see immediately how the eyes in my image were going to look. I love that interactive preview. I also used the Pose Randomizer. It helped to soften up the posing on the hands and make them a little more relaxed and natural looking than the original pose. It's nice having the percentage slider because you can just do a little or a lot. Again, that instant preview is really nice to see what I was doing and how much was just too much so I could back off if needed. Both products were great in adding final touches to my image before rendering.
I'm NOT a PA.
edit: spelling
Products Used:
Look at Me Pose Control: I really appreciate all the extra controls on this one. Normally, I just use whatever the defaults for this script give me, but in this case, I didn't want the G3M character (Ahmad) to twist his head/neck as much as the default preset did, so I reduced the percentage on that and let his eyes do the moving.
Bone Doctor Pose Control: This came in very handy on the Genesis 1 character, Bar Soomian, and his "Four Arms" geograft. The M4 pose I used on him didn't turn out that well, and it took a lot of "selective exagerrate pose" to make it look good, along with a fair amount of manual pose tweaking. I was especially grateful that it worked on the geograft, because it won't take poses meant for other figures.
Hoping the internet will last long enough for me to upload my entry...
Don’t Look Right…
They crouched warily in the bushes, hardly daring to breathe, as the guard strode past. A single glance in their direction, and it would all be over…
RiverSoft products used: Pose Blender and Eye Clock
This contest inspired me to see how far I could push my limited selection of poses for Genesis 8 Females using the Pose Blender. Both female characters in the scene are Gen8 (Izanami and P3D Mylou), and the only poses I have for them are the default poses that come with Daz, Dreamy Honeymoon Poses for Genesis 8 Male and Female, Looking At… Poses for Genesis 8 Female, Tree and Swing Scene for Genesis 8, and Z Deadly Weapon – Guns and Poses for Genesis 8 Female and Victoria 8.
Pose Blender to the rescue! I used the partial pose blender almost exclusively, and I kept blending in pose after pose until I was able to construct the pose I wanted. In the end, the only manual tweaking I had to do involved posing Izanami’s fingers around the tree. (I also did the characters’ expressions manually, but I don’t really think of that as posing). Using Pose Blender also gave a wonderful sense of dynamism to the girls’ poses. Blended poses are much less “perfect” than poses that are from a pack or are constructed manually. So the poses that I ended up with have this wonderful sense of arrested motion that’s absolutely perfect. There’s no question that the poses make the picture. They’re what gives the picture a sense of drama and of tension; without them, the figures would look like the posed mannequins they are.
I think of Eye Clock as my secret weapon; unless the render is a close-up of the face, you can’t really tell that it’s been used - but using it takes the render to an entirely different level. Before I used it, the girls’ eyes were kind of vacant; afterward, they have a focus that matches the dynamism of the poses.
Not a PA.
Edited to add paragraph breaks.
Don't know if I'm still in time?
I use the Look At Me scripts for practically all my promo renders. It used to be so fiddly to adjust the eyes manually so they look into the camera, and just using the Point At feature often made the figures look cross-eyed. The script is such a big help and such a time saver! I bought it the day it came out and never regretted it, I only wish I could have had it sooner
Edit: I'm a PA
voted, good job
Technically, your submission is late, but I really appreciate you submitting as there was only Half Life's entry before this. And thank you for the kind words about Look at Me. Since it is only the two of you, I am going to declare you both win.
Very generous! Thank you very much

Results were posted in this thread