How do I center the hotpoint of this object?
 mycranium_1c9dac6033
Posts: 0
mycranium_1c9dac6033
Posts: 0
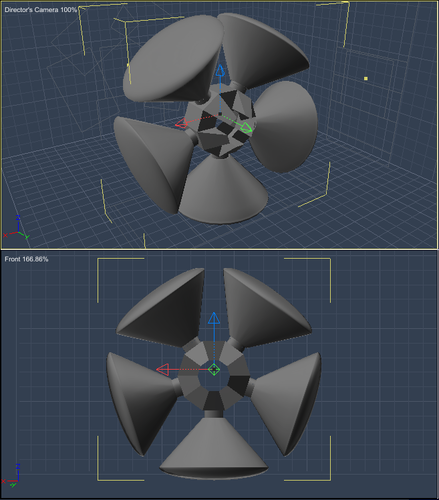
I've made an object composed of several vertex objects. Imagine the hub of a wheel, with 5 spokes. The hub is one vertex object and each spoke is an instance of another vertex object.
Because there are an odd number of spokes, the object is not vertically symmetrical. So the hotpoint sits higher than the centerpoint of the hub. (This would also be the case of trying to find the true center of a triangle - a point halfway up the height of an equilateral triangle oriented point-upward would not be at a point equidistant from each point, so if you spun it around that point it would be eccentric).
What I want to do is have this hub be on an axle, and then have another instance of it rotated half the angle between spokes, so the spokes of the second instance are exactly between the spokes of the first instance. I've tried eyeballing it but I am not getting adequate results.
Is there any way to do this without doing a bunch of math? I feel like there must be an obvious way to accomplish it and I can;t see it because I'm overthinking it.
Edited to add a picture. You can see in the front view how the hotpoint is higher than what would be the desired center of rotation for the object.
Thanks!
-Mike
Daz 3D is part of 
Connect
DAZ Productions, Inc.
7533 S Center View Ct #4664
West Jordan, UT 84084
Licensing Agreement | Terms of Service | Privacy Policy | EULA
© 2026 Daz Productions Inc. All Rights Reserved.
Comments
If they are vertex objects, you could Copy/Paste one of the spoke objects from one vertex model window into the hub model window and adjust or align duplicates there. One other way I know is to align a Target Helper Object in the Assemble room to the hubs center, and parent one of the spoke objects to it. Then duplicate and rotate at the needed angles etc.
Caps lock unlocks your hot point so you can move it where you want it.
It would depend on how the object was built. If the object was built using five independent pieces, then, it can be reconstructed by taking one of the instances, grouping it again to reset a new coordinate system around the instance, setting the hot point to a location that you want to rotate the whole group around, and then duplicating the instance four times rotating appropriately.
What you will get will be five objects with their hot point at the axes location. You can then group the five objects and then move the hot point of the new group to the same location of one of the individual instances.
Put a spin modifier on the group and click the PLAY button. You will see how it wobbles because the hotpoint is offcenter.
Turn off PLAY (so you don't accidentally set a keyframe). Adjust the hotpoint and hit play again. Repeat until it stops wobbling.
Eventually you will have a position that LOOKS balanced. no math involved. ;)
Just set the Hot Point of the Group to the Center Value of the Vertex object that represents the Hub.
Select your Group Object
Uncheck PROPERTIES TRAY->MOTION TAB->TRANSFORM->LOCK HOT POINT
JUMP IN or expand your Group Object from the PROPERTIES TRAY->INSTANCE TAB
Select the Vertex Object to center the rotation around
Copy PROPERTIES TRAY->MOTION TAB->TRANSFORM->CENTER [X] [Y] [Z]
(you may want a pencil & paper or use a text editor)
JUMP OUT or Collapse your Group Object from the PROPERTIES TRAY->INSTANCE TAB
With your Group Instance selected, enter the XYZ values you just copied into:
PROPERTIES TRAY-MOTION TAB->TRANSFORM-HOT POINT [X] [Y] [Z]
Recheck PROPERTIES TRAY->MOTION TAB->TRANSFORM->LOCK HOT POINT