Why are D-formers so bad?
 Steel Rat
Posts: 417
Steel Rat
Posts: 417
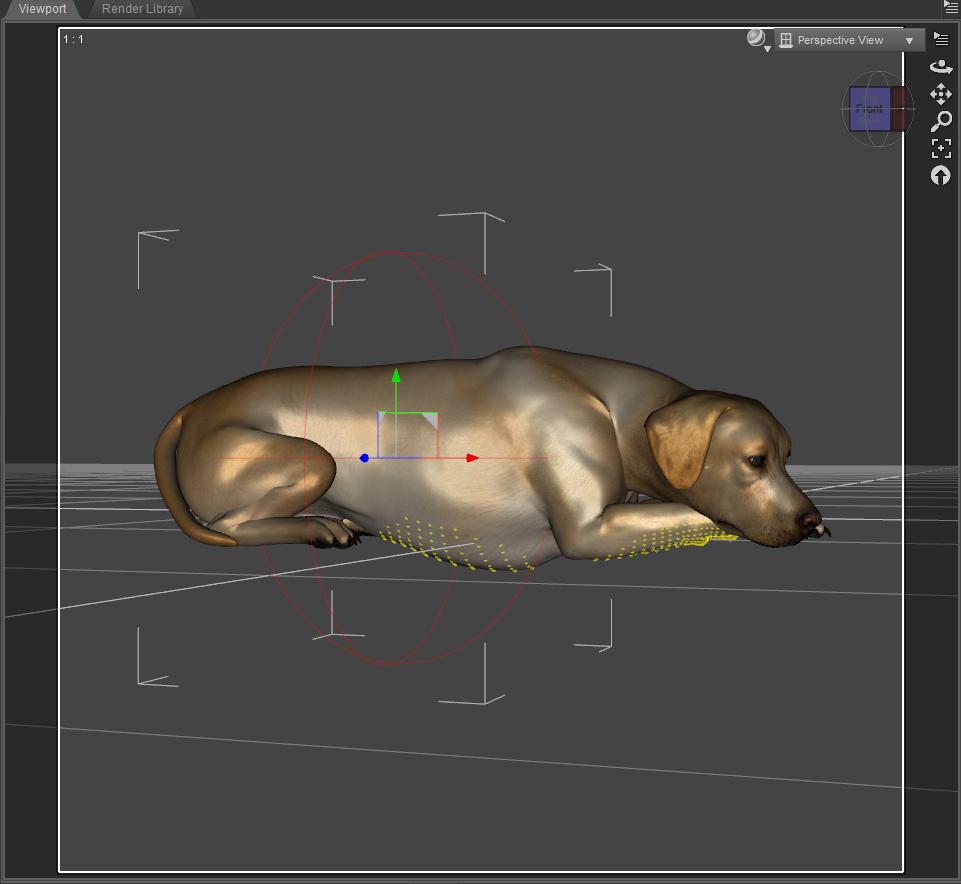
Just trying to adjust the poor doggy's chest so it doesn't extend into the floor from an out-of-the-box pose.
The D-Former field isn't anywhere near where i need it to be. As primarily a Poser user for the last 15 years, things like this have kept me far away from DS. But with the latest figures, I don't have a choice any more. Something that was trivial in Poser is a major hassle, if impossible, in DS. I'm sure there are some things that are conversely true as well. But... Just frustrated.
In general, the stock Dog 8 poses are pretty bad. Not much attention to detail was paid, especially using the stock Lab breed. The sitting pose, the paws aren't touching the ground for the most part, and this lying pose, similar issues. If I have to spend half an hour tweaking a pose so that it does what it should have originally, not good, especially for the cost.
Daz 3D is part of 
Connect
DAZ Productions, Inc.
7533 S Center View Ct #4664
West Jordan, UT 84084
Licensing Agreement | Terms of Service | Privacy Policy | EULA
© 2025 Daz Productions Inc. All Rights Reserved.
Comments
D-formers need to be applied to the figure while it is in the default position. Once applied, it will follow the pose correctly.
Not very practical. Often you don't know you need a D-former until you've spent hours on posing. I suppose you could save the pose/shape, zero, then re-apply, but it still seems odd.
Just one more reason to get familiar with Blender! I have a tutorial on creating a custom morph in Blender on YouTube.
EDIT: It's a custom shape tutorial, but the same concepts apply. Hope it helps!
Change the PoV so you are looking up at the torso of the dog, then scale the field so it only impatcts the required areas. adjust itr's postion for simila reasons and to ensure that the strongest part of the effect (the red dots) are where you want//need them
It would be nice if we could be allowed to select specific and use the UVs or the Surfaces of the object we want to edit & paint an "influence strength weight map' that the dFormer modifies according to the weight strength. Essentially, something like a displacement map for more extreme displacements.
Just curious, would a smoothing modifier work here instead. Create a collision with the floor?
You can use a weight map to paint on the effect of the dForm, that isn't dependent on the pose since you are working directly on the vertices. A Push Modifier with weight map (needs Edit>Figure>Geometry>Apply Push Modifier, then Create>New Push Modifier Weight Access Node) might also work heer since it moves the mesh along the normals, rather than shrinking/expanding from a point or translating in one direction only with a dForm.
+1
And I just explained how to do this in Novica's thread. But I'll post it here, too:
Thanks for all the replies, folks!
I'm hoping that at some point they will make D-Formers as easy to use as Poser magnets. Select a body part, create magnet. Very little guesswork.
This helped immensely! But it's still difficult not to include some other body parts.
Others have shown other methods, but D-Formers should be quick and easy for something like this. At least IMHO.
And there's the pose. The elbows touch the ground, but everything else is a couple inches higher. Frustrating.
Oops, somehow ended up with a double post when I was inserting the image inline. How do I insert the attached image while composing the comment? I can't see the link address of the image, only the thumbnail, until I save the comment.
Edit the post and you can get the link to insert inline. Use the gear icon at top-right of the post.
DS does actually create the dForm for the part with the geometry - the catch is that the geometry belongs to the figure node, the bones are just (controllers for) modifiers for the mesh. In DS3 you did select the bones.
I did that, and somehow ended up with a double post. I must have clicked something wrong somewhere.
But programmatically, they shuold be able to create the dformer based on the part of the body you have selected. But they tell you to select something with geometry. Well, the figure does have geometry. you've just selected a portion of it.
Use blender to make morph.
I find d-formers very difficult to use/get right, so I never use them. A better method is to learn how to make morphs in an external program such a blender or if you can afford it mudbox or zbrush. I can honestly say learning the workflow and how to use Morph Loader Pro has really improved workflow and possibilities in Daz.
Actually this is not the case. But the field has to be positioned like the figure would be in its default position. But yeah having the figure zeroed while adding the dformer is much easier;)
I find using dformers pretty straight forward and use them all the time. Setting it up and getting the expected result is a matter of minutes, most of the time. And the dformer components can be animated, which is why it's not always preferable to spawn to morph.
Obtaining and learning additional software to create a simple deformation doesn't seem like a practical option.
..like Poser Pro does with their weithy mapping brush??
...same here, at first years ago they seemed daunting but I found a good text tutorial (no longer available) that helped significantly.
Too much guesswork for me.
- Choose figure
- Edit > Figure > Memorize Figure Pose
- Edit > Figure > Zero Figure Pose
- Create deformer
- Size and position the deformer field
- Edit > Figure > Restore Figure Pose
-
One thing I don't think anyone's mentioned yet; when rescaling any part of the DFormer, keep in mind that it doesn't have to be spherical — you can adjust the x- y- and z-scaling independently. I've used this a lot, I have scenes where I need the DFormer field to be a long thin cigar-shape. It can get a bit horribly complicated, but it's not too difficult to get used to the weirdness.
The red dots help a lot. :)
Yes, but I've seen times where the restore doesn't work.
"I find using dformers pretty straight forward and use them all the time. Setting it up and getting the expected result is a matter of minutes"
I use them all the time too, but don't always get the expected result. Wanting to make a thin crease, for example, seems very limited, even x or z scaling to a very narrow range, it will only go so far. Perhaps that's a limitation of the object, not enough resolution, don't know.
There is a new tool in the store that might help with things like this.
Laurie
I use Smoothing modifiers to do this sort of thing. It's faster for me.
Select Figure... Edit -> Figure -> Geometry -> Add Smoothing Modifier
Under Parameters... General -> Mesh Smoothing -> Collision Item
Have the body react to a plane rather than the floor object, and you can modify the shape of the primitive plane (or whatever primitive you want to use) in order to cover only the sections that you want to react. Change the number of iterations if you want more smoothing/more impact from the collision item.
It's not perfect, but it's fast.
(Image is Santa leaning against the wall, taking a smoke break. Added some smoothing for his back vs. wall.)
Very interesting, Laurie. Thanks for posting that!
Thanks TBOT, learning something new every day!
I bought that new deformer tool by manfriday as soon as I saw it. It does have some drawbacks. You can't save morp like d-formers and no animation support, but for stills which I use Daz studio for it works great. It works fast and I dont have to play with it as much as daz dformer tool and the geomerty editor is too much work. This is the second product I have purchased from manfriday the first being content bookmarks>> I dont use smart content and this helps me get to certain files and folders I use alot faster. Any product that saves me time is a winner and a must buy. Just because you product is awesome does not make it good, it has to be easy to use! I have some great plugins that are great that I rarely use because they take too much to get to the end result. So even a incomplete tool that is easy to use is better than complete tool that is too much work at least in my opinion.