Transparent Desideria Hair
 Cherubit
Posts: 994
Cherubit
Posts: 994
Help please?
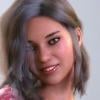
I bought this hair but is looks kinda transparent. Even if I let it render more, it still looks transparent...
How do I make the hair look normal?
This is the product page http://www.daz3d.com/desideria-hair
I believe the promo images were made with 3DL. I am using Iray and the lights are only the default environment HDRI.


aaaaa.JPG
450 x 633 - 45K

efwdfe.JPG
448 x 553 - 42K
Post edited by Cherubit on
Daz 3D is part of 
Connect
DAZ Productions, Inc.
7533 S Center View Ct #4664
West Jordan, UT 84084
Licensing Agreement | Terms of Service | Privacy Policy | EULA
© 2025 Daz Productions Inc. All Rights Reserved.
Comments
I don't think this product comes with Iray materials. Are you applying an Iray shader to the hair, or rendering in Iray with the 3Delight materials?
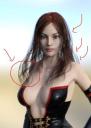
OK, I tried this hair in Iray. It looks bad, just as you demonstrated. One thing you can do to improve it is select all of the the hair surfaces in the Surfaces pane. Then apply the Iray Uber shader. Next select each surface (other than the skullcap) one at a time and click the gear next to Cutout Opacity, select Parameter Settings, and turn limits off (clear the check mark). Then increase the value of Cutout Opacity above 1. Try something around 2.
Something else you can do is use a darker background.
Default Cutout Opacity 1:
Changed Cutout Opacity 2:
Wonder what happens if you put the hair on her twice. Would that make it thicker? Would that even work? Just an odd thought that flashed across my brain lol.
Thank you so much!!! I worked perfectly! Now the hair looks fuller!!!
I think it could work, I will try. It will increase the render time though :P let me see.
Ok I tried and it looks the same as the first one. So I tried moving it, but to do that I had to change the "Fit the hair to" to none insteal of lilith, then the hair shape changed :/ The best way it the one @barbult explained above
This is a common problem if the transparency maps are not 'greyscale' maps, but are RGB and have a color profile attached. One way to fix them is to open them in an image editor, set them to greyscale and resave.
Ahh, thank you :-)
Oh, I didn;t know that! I just pulled up on of the transparency maps for this product in Photoshop. Sure enough, it is RGB with an SRGB color profile.
What about specular maps? Should they need to be converted, too?
Probably...but usually I strip out specular maps and rely on geometry and displacement/bump/normal maps to help with specular control. That said, displacement/bump maps need to be greyscale, too.
Is this an issue for 3Delight, too, or only Iray?
It is if you use Gamma Correction ON in 3DL.
is it the format? :O
Jpeg has and uses all the colorspace info. Png doesn't (it can, but most things just ignore it for pngs). But Iray and 3DL with Gamma on are expecting linear workflow images. The various profiles are not very likely to be linear in nature, so when gamma correction is being applied it is not being correctly applied...either too much or too little, depending on several factors. For a control map, especially a transparency map, it tends to make it into a translucency map...turns the areas that should be white some shade of grey...and that turns what should be opaque strands of hair into gossamer threads.
mjc1016, with your suggestions here, I turned garbage to gold! I edited the transparency maps in Photoshop to change them to grayscale and used levels to adjust the gamma to make them even more toward the white end (I dragged the levels middle control to 2.2.) I resaved the files. Now every materials file uses these new transparency maps and looks so much better in Iray. I hadn't saved the scene I posted earlier, so I started over. I lit the model with bright lighting and used a pure white backdrop for maximum stress test on the hair. I am pleased with how it looks now.
THANK YOU!
The blond seems to show the improvement the most...originally it would have looked like she was wearing a plastic shopping bag on her head (yes, I've had other hairs that do the same).
how do you change it to grayscale on photoshop? :O ps: they look awesome!!!
Oh, I see... Now i need to learn how to change it haha :D
I use GIMP so I'm not entirely sure where it is in Photoshop...it's there, but someone much more familiar with it will need to give the steps.
To change image to grayscale in Photoshop:
Image>Mode>Grayscale
To adjust levels after conversion to grayscale (I thought this hair needed it)
Image>Adjustments>Levels or CTRL L
I could also install GIMP, I used to have it before formating...
Thank you! So I do that with the specular maps? Apparently this hair only has Diffuse, Specular and Opacity maps.
Specular maps aren't as critical and you do have a bit more control/range to play with what results they do give you, as is...so it really becomes a question of 'do I want to' as opposed to 'need to'.
Ahh pardon me that's because I had no idea what were specular maps... :| I will do it to the opacity ones! Thank you!
That is good to know and will be useful for other things as well I think. I did a trial with two sets of hair on my model and it did work I just had to adjust everything twice. But fixing the maps seems like a more permanent solution.