Genesis 2 to Mudbox UVs
 DigiDotz
Posts: 515
DigiDotz
Posts: 515
While Genesis 3 is no problem in Mudbox, Gensis 2 and other figures, if imported as obj come in with overlapping Uv''s so if you try painting one area, you will also be painting over over area's.
If importing into mudbox via fbx the Uv's come in tiled but then, for example the feet are on a separate tile to the legs, so although you can paint seamlesly, you would have to export loads of textures and put em together in photoshop
Do I need to just reassign materials to be able to export a complete genesis 2 "Limbs" texture? what is the best workflow?
Daz 3D is part of 
Connect
DAZ Productions, Inc.
7533 S Center View Ct #4664
West Jordan, UT 84084
Licensing Agreement | Terms of Service | Privacy Policy | EULA
© 2026 Daz Productions Inc. All Rights Reserved.
Comments
I have found a way. I kept going in circles trying in mudbox so resorted to moving the uvs in blender. I will do the rest again but for now I have separated the skin
Pic1. Move the Uv sections by selecting materials (using snap to) in blender save as obj
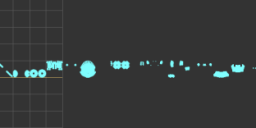
Pic2 imported into mudbox, uv view
yes - Mudbox and other 3 painting solutions create a tile for every Material Zone...
One of the solutions is yours - aka.. use a UV mapper and group everything like you want it...
The other way is doing this in DAZ directly before exporting ...
Use the Geometry Editor to select all surfaces for Torso (Body)... then assign them to one new group ... the body is now white and you need to add the texture file again (or just use one which has the material added allready (torso).
Do the same for limbs and face......
Export
keep the export texture folder and FBX as a dummy for other textures which use the same UV set... just overwrite the texture files later with another skin image set ...
here a screenshot: grouped torso/body parts so that they match the texture template on one UV tile
FBX import in mudbox....
Thanks Andy, That way looks good too and may be easier for some
Andy (or Richard), could you explain this in a little more detail? I've been following the directions and I can't get the expected results when it's imported into Mudbox.
I'm selecting the Surfaces in the Tool Panel using the Geometry Editor tool. The Target Group drop-down shows Surfaces and I'm selecting the most appropriate Group from the Group... drop-down (like Torso, Face, etc). The materials are not turning white for me though...do I have to set them to a brand new group or surface?
When I bring it into Mudbox and choose UV view, the UVs are separate but they're separated by many grid spaces (they're not adjacent). Despite that, I still can't get a texture loaded onto any other surface than the Arms (in my case).
Thanks in advance for any help and I apologize if this was a dumb question. :)
I'm selecting the Surfaces in the Tool Panel using the Geometry Editor tool. The Target Group drop-down shows Surfaces and I'm selecting the most appropriate Group from the Group... drop-down (like Torso, Face, etc). The materials are not turning white for me though...do I have to set them to a brand new group or surface?
If you want a empty UV tile and start painting from scratch in mudbox.. you assign all the parts to a new group - i used torso2 above so that the included body material parts turn empty on the daz model. If your goal is to work on the DAZ texture.. you just assign all the parts to a exstent name... example torso.
When I bring it into Mudbox and choose UV view, the UVs are separate but they're separated by many grid spaces (they're not adjacent). Despite that, I still can't get a texture loaded onto any other surface than the Arms (in my case).
the empty titles between UV's sets are material zones without a UV... empty tiles wont hurt nor slow down mudbox... empty UV tiles ID's will be skipped by mudbox while extracting maps....
After importing in mubox you will have one or to "wrong" painting layers (opactiy and depending on your UV set a bump layer.... DELETE the opacity layer complete - that one comes from the eyes and overlapping UV's..... Also the bump channel is wrong.... delete...
Now you should have a fully diffuse textured model in mudbox 3d view....and you can overpaint the whole model. If this dosent work for you post a screenshot of your UV view.
Recommended preparing before painting the skin in mudbox (only for painting - if you want also sculpt dont touch geometry)....
Delete all not used model parts (mesh) ... select the eyes and mouth using UVs and delete them - this frees up a lot of RAM while uplevelling the resolution ..and you get rid of some of the problems working with gen2 UV's....
Thank you for replying. I'm...even more confused now though, haha. :) We might have to go slowly because I think I'm doing something wrong along the way.
- When you say "assign parts", does that mean "Create Surface from Selected" or "Create Face Group from Selected"?
- Can you also tell me what checkboxes need to be checked when exporting from Studio as an FBX or OBJ?
just tell me exactly what you trying to do - then i will upload some screenshots with settings step by step...
Which UV set?
You want to overpaint a DAZ skin texture or starting your own from scratch ?
BTW i just noted that i can't get the larger uploaded version of my screenshots from above? is that just me or are they not to see for everybody? is there a size limit ?
to answer your first question... Surfaces are used to add shaders and textures ....
Example gen2 FACE......
The needed UV map for the whole face of a Gen2 Female includes 3 surfaces...... face, lips and nostrils....
We have ONE texture for 3 different surfarces... but every surface does result in a own unique UV map and tile while exporting by standard (FBX)...
here the screenshot - with selected surface: face.....
Thanks for your patience. I have an idea what I'm doing, I just can't figure out how to get Mudbox to do what comes so easily in Substance Painter and even Photoshop.
* What I want to do is to get a Genesis 2 figure in Mudbox with all of it's major textures (head, body, limbs, maybe mouth) applied. Then I can save that, add new paint layers, and begin adding detail, cloning out things I don't want, and basically editing the textures.
* OK, I've made and saved a Genesis 2 figure with the materials grouped into new Surfaces (like "1_Face", "2_Body", "3_Limbs"). The surfaces did turn white as expected, and I reapplied a texture to them. That all seems fine. However, when I export it from Studio to Mudbox, all of the UVs are still piled on each other in a single space and if I load a layer to apply a texture, it only applies it to one area. I assume I'm not doing something right with the export from Studio.
Your images above still open large for me. You just have to be signed in to view them full size.
yes... i must actually do it - before i can create and upload screenshoots..... wait till i am ready with screenshoot 3....
3 surfaces selected -> face lips nostrils....
You don't need to explain surfaces to me, I make seam guides for DAZ figures. :) My problem is mainly with getting Mudbox to recognize the multiple UVs.
i believe you but you will be not the only one facing this export import question.... that's why i post it step by step .... i could not find it myself in the whole forum or in a doc.
anyway.... next you assign this 3 surfaces to ONE surface.. i am using face here
I'm sure it will be helpful to others, thank you for taking the time to do this step by step.
welcome...i will go trough the whole workflow circle daz - mudbox - daz.... the resulting FBX file - has also the rigging aka skeleton... which is another plus point for mudbox - it is easy to paint hidden parts in mudbox that way (will show that later)...
ok.. if the face is grouped correct.. lips and nostrils have now a zero count - while face gone uo to 2638.....
Note never save the character while doing this! if you need a save in DAZ as a template for later then use "save as a scene". All the work i am showing right now - is done ONCE.,,, the result is a fully rigged FBX file including orignal diffuse textures, congruent UV' maps and tiles and skeleton.... a template for every future work.
Before i continue with groups and preparing in DAZ3D... it is time to do a test export.....
In Mudbox i need to delete the added opacity paint layer. Right after import it looks like this:
ooo good stuff, will definately try this way again after you finish
welcome DigiDotz


Checking our face i want now see ONE tile with the UV over our DAZ face (head) texture.... and here it is... the rest is still messy
Everything works like it should - now back to DAZ, grouping all the other surfaces including eyes and inner mouth.... this will take me a hour or so
When I exported the figure to Mudbox, it came in with no Opacity paint layer and the texture only applied to the limbs (which is REALLY strange because I exported it after only grouping the head and body surfaces in Studio. Also got an error message upon import, which I think was due to it not being able to find textures (even though the whole figure had textures in Studio and all were exported properly). Limbs are first in my UV layout, followed by the eyes and a bunch of other small elements, then the head and more eye pieces, the limbs later on after some blank spaces, and the torso near the end. No clue what's wrong, I followed your instructions exactly.
try a Import UV again over the allready loaded.... sometimes mudbox messing up with temp variables..... also make sure that all textures are really in your FBX export folder.
ok... i am ready with my surfaces......
I also deleted all not used surfaces (count 0) in DAZ geometry editor -> this is optional... i just wanted to show that the empty UV tiles in mudbox coming from not used surfaces/material - they are gone and this is how my UV view looks now:
There are eye parts on this model (gen2 base fem) such as reflection, tear and cornea which dont have a diffuse texture... this is also why i cant see the eyes with texture in the 3d view. But everything is there like it should be...
I could now delete the emtpy eyereflection but because i want to use this template dummy also for morphs - i dont delete geometry....it is also not my plan to work on the eyes in this example.
NOTE: For the last and final FBX export - dont forget to set the resolution of the model to BASE if you plan to work also on morphs.
Here's what I got in Mudbox once again, a Genesis 2 figure with only the limbs texture applied. Do you have to rename the textures for Mudbox to find them?
I'm about two seconds from sending all of my 3D painters to the Recycle Bin and just use freaking Photoshop, lol
testing now UV's and export....plus a morph
Just a fast painting...and a long nose.... still everything on levell 0 ....
While importing my now ready for morphs and skin FBX... i got my first warning from mudbox...degenrated faces.. i just ignored it... but to be sure to have a working dummy i decided to to this quick test before spending time on a high res model.
skin and morph working like a charme back in DAZ
@SnowSultan no dont give up - mudbox is fun -> i just falled in love to my beautiful new dazmud test model - had to render her .
.
ok - what you can try is to add the textures manually - i really dont have a idea what's gone wrong in your case... the UV's are there and if your texture files are in the automatic generated folder you cant do more then trying to import - you could read the logfile to figure out where the problem is.. but well... all you want is a working dummy.... add the textures manual.. your UV's looking good for the skin.
Thank you, but this is getting frustrating to the point of being ridiculous. Photoshop can import a Collada with all of the textures properly applied, why on earth can a dedicated 3D painter not?
Could you tell me how to import a texture manually? Maybe I'm doing it wrong. I choose Import -> Layer and select a texture. I can choose which channel it goes into (Diffuse, etc) but not which UV to apply it to. Is there a way to assign it to a specific UV space that I'm not seeing?
i would just paint your model with a color - then export the layers --- you will see the UV tille ID names ... texturename_u1_v1 , texturename_u2_v1:......
They are numbered - if you load a file in a layer - mudbox ads automatic all numbered files to the right uv tile...
So you must name your daz texture in the same way (numbers)...
I think I'm done messing with Mudbox for painting. I just tried re-importing the same figure that I'd prepared earlier and now all the UVs are on top of each other again. Thank you very much for the detailed tutorial and I hope it can help others who might have better luck than I did. I might have questions about trying to export displacement maps for sculpted details, but that will probably end up being no less frustrating.
It honestly amazes me how inconvenient it is to use any of the major 3D painting programs with DAZ figures. I can't get it exported properly for Mudbox, Zbrush is just as complicated and requires you subdividing the mesh to extreme levels to paint detail, and good luck getting standard specular/glossiness maps out of Substance Painter.
Photoshop rules all. :)
Everything looks welll..... your uv should work...
 ...
...
reboot your system ... do a fbx export in daz again.. giive it a new name.... and import n mudbox... if the UV's still messing up - reimport only the UV's over your model ....
If this really dosent work - what i can nearly not understand - because i did this with different daz figures and UV's... then you can EASY import manual your textures - manual import i do whenever i want change a skin to a UV set....
All you must do is to name the correct texture with the numbers from your UV tile in mudbox -> import layer... and they are there.. This is a great solution. inDAZ you must go trough every tile and add a new skin step by step... in mudbox.. just name them correct and it is a ONE CLICK IMPORT.
Looking on your UV view above -> LEGS are on tile number 1.. that's why they work without a number...
Face, is your tile id 10....
Reanme your texturefiles using the numbers... and everything will work.
face = texturname_u10_v1.jpg (as example).