Animating glow channel
 Eric3ddd
Posts: 67
Eric3ddd
Posts: 67
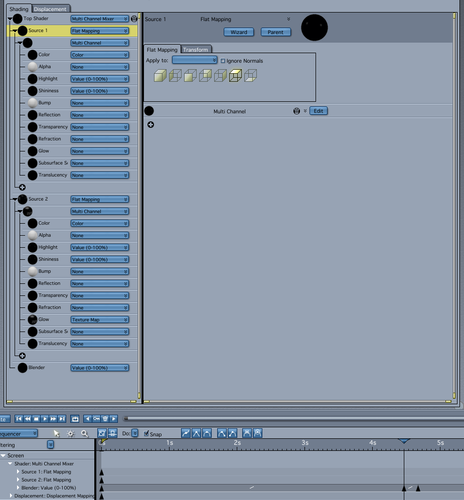
1. I am using the glow channel to simulate the effect of a backlit screen. That part works fine.
2. I use a multi channel mixer to turn the screen on and off (source 1 has black glow channel, source 2 has texture map in glow channel, and blender is a value, which can be animated to turn the screen on and off slowly). That works well too.
3. Now, I want to change the screen image and flip between a few screens. Now, that doesn't work. The multi channel mixer only allows 2 sources. I could possibly nest a mixer inside another mixer, but that would get very complicated fast. Any suggestion?
Daz 3D is part of 
Connect
DAZ Productions, Inc.
7533 S Center View Ct #4664
West Jordan, UT 84084
Licensing Agreement | Terms of Service | Privacy Policy | EULA
© 2026 Daz Productions Inc. All Rights Reserved.
Comments
You may be able to use a multi-shader mixer, where you mix two separate multi-channel shaders similar to a mixer. You could have one shader have a mixer with off and one with an on image and then the second shader could have two slots of a mixer devoted to just the images with no off. It's still a bit like nesting them them.
The other option is to put together a video or image sequence that switches screen images and use that in the image map part of your mixer instead. It may be easier to get the timing you want that way.
This post gave me the answer: http://www.daz3d.com/forums/viewreply/32158/
Essentially, load all the screens as a JPG or PNG sequence and choose which frame to display when.
Thanks evilproducer. Looks like we came to the same conclusion.
Right, you could use image sequences like that. Otherwise, you could simply use a standard Multi-channel shader (instead of a mixer), and put the mixers (Operations > Mixer) into the glow channel and the color channel.
Use the mixer in glow to determine the glow strength, color to determine which image is used. The nice part about this method would be the ease and control over what happens, when. The images in the color mixer will fade from one to the other using any values between 2 and 99 on a Value 1-100 slider, as only one example of how you might control the mix.
Not really nested, just two different mixers, one each in two channels.
But then, if you like, you could nest the color channel (or any other, for that matter) using Operators > Multiply, and having a mixer in each of those two sources. Use one to control which picture is displayed, when, and the other a white and black mixer mode to set a fade to black effect in between. Just another thought to consider to help demonstrate some of the elaborate fun you can have with animated shaders in Carrara.
Further, in the color mixer of images in either of my examples above, you could then load in different image sequences for fading between two animations, rather than two stills, or any combination between those.
Quick Tip for using avi files or Image Sequences in a shader or background/backdrop:
If you want the animation to loop within the rendered animation, set the tweener that controls the animation timeline slider to Oscillate, and set the oscillation mode to Saw Tooth. The number of oscillations must be set to the number of loops to perform. So if that wouldn't turn out exactly within the timing of your animation, just go further down the timeline to the next full interval, and put the keyframe there.
You also want the Saw Tooth to be set so that the fall from each peak is vertical, which may or may not be the default - I do not recall.
Fun stuff, though. Try not to think of nesting shader nodes as a complication... they can be very easy to set up and follow, and can also provide a quite a bit of great results without having to try and make the blend using another piece of software.
Dartanbeck, you're a genius. I didn't think of using the mixer at the glow channel level, but it makes the nesting much simpler and does not repeat the settings that don't change.
Part of why I dread the idea of using other render engines for Carrara. These shaders... the more you investigate and experiment... the more I just love working in Carrara. Just too cool!
Glad it was of help. ;)
Now I'm discovering a lot of that cool endlessness to the vertex modeler as I investigate and experiment in it... there's a lot of really nice features that I just have not been using or familiar with. It used to take me forever to build a shader... now I just do it. Now modeling is getting faster and faster for me... but with better, more predictable results (from myself, I mean), and more precise UV Maps! I just love this software! :ahhh: