►►► Creating stuff for Genesis in Carrara ◄◄◄
 Dartanbeck
Posts: 22,148
Dartanbeck
Posts: 22,148
With Carrara 8.5 we now have the ability to work with the new DAZ Studio Triax rigged models. So for the most part, when I say: "Genesis" loosely, I'll be referring to any model using the new Triax. Carrara not only offers us a great way to now pose, animate, and apply shaders to Genesis, but we also have the power to be able to model support content for Genesis using Carrara's modeling tools!
Like you've seen me do before, I'm going to begin by linking to DAZ 3D's "Publishing" page were you may peruse some very useful instructions on how to do many things for Genesis. Here, they not only discuss ways to make clothing and morphs for Genesis through the help of DAZ Studio Pro's Content Creation Toolkit, but also valuable information on how you may become a DAZ 3D Published Artist. Whether this is your intention or not, info useful to that is always useful in your own endeavors to make high quality items.
Exporting OBJ from Carrara to bring into DS
Right from the start, here, I'd like to demonstrate one way that we can get the scaling correct from one application to the next. I am planning to expand this information as I learn more. But for now, let's begin with what I already know. Different apps use different scaling. So we have to set an appropriate scale before exporting. The one scale that I know of now is the Poser scale. To avoid confusion, I'll explain this in a workflow. Then , once you already know this, you may skip to the bottom to find the correct scale:
You've modeled something to fit Genesis in Carrara and now you need to send it to DAZ Studio to make it into a conforming figure that follows any of Genesis' shaping morphs.
First of all, save a copy of your file in Carrara format before continuing - just in the event that you need to get back to this point. I use My Carrara Browser for this.
Now select your new model and go to the Motion tab in the instances tray on the right.
At the bottom you'll see the controls for scaling.
Place a check in the "Scale Uniformly" box and then, in the overall scale (white) box, type in the following scale: 1.042
Since this just made your object slightly larger than 1% its original size, it has just seemed to disappear. This is the scale we need to use the Poser presets when exporting Wavefront OBJ files from Carrara.
Now when you import this into DS, use the Poser import preset and you'll have the correct scale.
I would like to test the DAZ Studio presets and figure out the needed scaling for this, too. But this is a scaling method that is tested and known to work.
For other duties that you'll be doing to the obj file in DS and/or Carrara, we'll visit those in other posts and the DAZ Studio portions are discussed fairly in-depth in the Publishing page.Instructional Tutorials sold at DAZ 3D
If you're new here, I'd like to first direct you to some Carrara courses that I know you'll like, if you wish to master Carrara:
Carrara 8 Training Videos from Infinite Skills
These are explanations of the training videos featuring Phil Wilkes and include some great sample footage from the series. I strongly recommend these products unless you feel that you are an absolute expert at using Carrara.
Learning Carrara 8
Advanced Carrara Techniques
For our purposes in what we aim to do here, it is Advanced Carrara Techniques that will give you a wealth of information on modeling, UV Mapping, and all of the good stuff you need to know in order to use Carrara as a modeler. Highly entertaining and very useful. No matter your skill level, you'll enjoy this one. But if you're new to Carrara, and are still learning the basics, some of this might go over your head if you don't begin with Learning Carrara 8. He also gets fairly in depth on some really interesting Shader instructions. Like you've most likely heard me say before, I watch these over and over. I enjoy the show, and subsequent times through really helps to instill his lessons - there's a lot of them... Particles, too!
The above information regarding scaling an exporting is well detailed in the Advanced Techniques as well.I haven't tried any of the tutorials in the following list, except where noted (will update as I do). I want to get a list going so that we have an index to work from, and anybody who has tried any of them might be able comment on them. If any of you know of some good, free tutorials on this stuff, please post links!
The blondie9999 collection
Many, if not all, published artists that make conforming items for Genesis or make custom DS figures own some or all of these tutorials, and swear by them.
Rigging Original Figures in DS4 Pro
Description
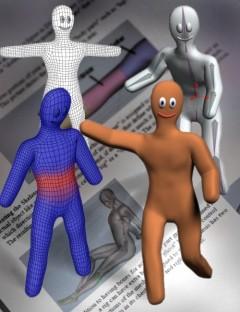
At last-- a comprehensive tutorial on rigging original figures in DAZ Studio 4 Pro, covering every step of the process: grouping, rigging, assigning joint rotations and limits, weight-mapping, bulge-mapping, and adding ghost bones. The tutorial includes explanations of the various concepts involved, including understanding '3-D space' and joint rotation order.The tutorial is designed for all skill levels. Even if you're a complete beginner and have never rigged anything before, this tutorial will take you through the entire process, step by step, from ungrouped, 'raw' object to fully rigged and weight-mapped figure.
The tutorial comes with a 'gingerbread man' model for you to use in following the lessons. (You can also use some other model if you wish.) The information is presented in clear, easy-to-follow steps, and accompanied by plenty of illustrations. Whether you want to create an original, stand-alone figure, or create an add-on figures for geo-grafting, or just learn more about weight-mapping and adding ghost bones for use in clothing creation, this tutorial will teach you all the basics you need to know.
The tutorial is in .PDF format, with bookmarks and table of contents.
Comments About this Tutorial:
'A nice, solid tutorial, which is easy to understand yet doesn't talk down to the reader.' -- Valandar
'blondie's rigging has never been anything but impeccable, and her attention to detail is evident in this tutorial.' --Arien
'Blondie has created a genuinely useful guide to navigating the basic features of figure creation in DS4. Newcomers and those who have created original figures in earlier versions will find this really helpful in adopting the newer features, such as weight-mapping.' --Digital I
'Blondie's guide steps you through rigging, beginning with planning all the way through completing a rigged figure. With the explanations of different rigging concepts, beginners (such as myself) can pick up on rigging characters and make sense of DS4's interface. Also, since rigging a figure from scratch is a superset of creating clothing, the knowledge gained from rigging figures can be applied to creating and adjusting clothing for use with Genesis.' --Male_M3diaAdvanced Rigging in DAZ Studio 4 Pro
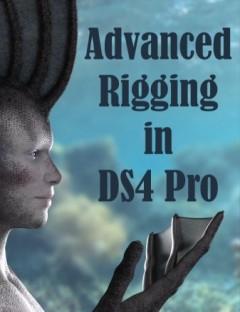
DescriptionIt's here at last-- 'Advanced Rigging in DS4 Pro'!
This manual covers a variety of topics. Although it is intended primarily for people who make (or want to make) add-ons for Genesis, it contains information useful to anyone who uses DAZ Studio and wants to gain a better understanding of 'how things work'-- for instance, 'Why do these boots look so terrible when I bring them into DS with the Transfer Utility?'
Some of the topics included are:
**Tips for modelers on how to model items so that the smoothing modifier doesn't "mash" details or cause distortions;**A discussion of topology;
**Enhanced Remote Control (ERC);
**Refinements to rigging such as joint orientation;
**And much more.
There is also a complete section on geo-grafting, with step-by-step instructions for creating geo-grafts-- whether the graft in question is a simple pair of horns, or a replacement body-part that moves and poses-- as well as section on scale maps and on using ERC to create rigging adjustments to geo-grafts for specific figure shapes that are applied automatically when the FBM for that shape is applied to Genesis.
The manual is profusely illustrated, and comes in .PDF format, with bookmarks and table of contents.
Note: This manual is written with the assumption that you are already familiar with the basics of using the DAZ TriAx rigging system covered in Rigging Original Figures in DS 4 Pro —grouping, setting up “bones,†weight-mapping, etc.
Comments About this Manual:
This tutorial is clear, concise and above all complete. I was especially thrilled to see a full explanation of Geo-Graphting. I feel ready to take on even the most complex rigging job now. . -- Khory
'A nice read... having this sort of information to demystify the process makes me want to give it a go.' --Jack Tomalin
'I'm not one that works with modeling or rigging very often, but the tutorial is written and presented in a way that makes understanding of topics even for newcomers such as myself. A great follow up to the basics, with awesome explanation of the issues which arise with advanced rigging!' --DimensionTheory
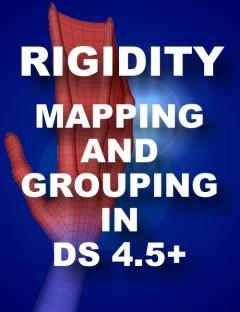
Blondie has provided another informative guide that covers some of the issues rarely covered with Genesis content creation. In addition to discussing rigging techniques and geografting, she adds the bonus of discussing best practices of how to design content for use with Genesis with examples of problems that can occur if clothing or props are designed a certain way. With this, this guide is really a must have for people wanting to design clothing, props or geografted items for Genesis but didn't know where to start.' --Male_M3diaRigidity Grouping and Mapping in DS 4.5+
DescriptionAt long last! -- a tutorial on using the rigidity feature in DAZ Studio 4.5+!!
Over a year in the making (because it took that long to collect enough information about the subject to write a tutorial on it), this tutorial explains what the rigidity feature can and cannot do, how to tell whether it's even needed, and most important, how to use it.
Rigidity can be used to "protect" items such as buttons, buckles, and ornaments from being distorted by figure morphs transferred from the base figure to clothing. It can also be used to force add-on items such as scabbards and arm-mounted weapons to hold their shape. And, of course, where the rigidity feature really shines is in its ability to make geo-grafted items retain their shape, proportions, and rigging.
All these functions are demonstrated and explained with step-by-step instructions and plenty of illustrations.
The tutorial is in .PDF format, with bookmarks and table of contents.
Comments About this Tutorial:
"Very thorough and well explained." -- Allen Renfeldt
"Blondie has been able to demystify something that even very advanced content creation artists have struggled with! Another brilliant tutorial that will be understandable and easy to follow for any skill level." -- Khory
"An exceedingly informative and easy to understand approach to the mystery that is rigidity. I also like the sense of humor and sense of fun that's been interwoven throughout the tut. You will definitely learn about rigidity and have fun doing it." -- IgnisSerpentus
Tutorial: Morphing Genesis 2 Female with DAZ Studio and Hexagon by Winterbrose
This one uses Hexagon, so will likely skip some of the steps necessary in the Carrara workflow, through using the DS > Hex Bridge. See my notes below this list on this.
Description
This 99-page tutorial is a comprehensive step-by-step guide on how to create your own morphs for the Genesis 2 Female figure to use and sell. Each step of the process, from beginning to end, is explained and fully illustrated. It covers problems you may encounter and provides solutions on how to overcome them successfully in order to create your own morphs.This tutorial is designed for all skill levels from beginner to professional. Use it as a learning tool to develop your morphing skills, or keep it as a handy technical reference when you need to brush up on your skills.
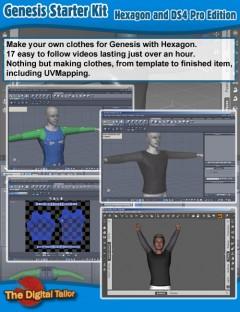
Winterbrose has one for Genesis 1 HereGenesis Starter Kit (I bought, and like this one) by Fugazi 1968
This one comes with a simple shirt template and shows how easy it can be to make a good uniform for Genesis using Hexagon. Again with the bridge, but once you know the procedure I mentioned earlier about scaling to Poser scale in Carrara before exporting, we really don't need a bridge. It's nearly as simple without one. Here's the product information:
DescriptionHave you ever wanted to make your own clothes? Think that it is too hard? Well I'm here to tell you that not only can you make your own clothes, but that you can make them with ease. This tutorial set is firmly aimed at learning by doing, instead of learning Hexagon then making clothes, you'll make clothes while learning Hexagon. Using the mesh template that is included in the package you will learn how to shape it into a shirt for Genesis. Using box modelling techniques to shape, refine and fit the mesh, then moving on to add details. Along the way you'll learn about:- Navigating in Hexagon Selecting polygons, edges and vertices Using symmetry Subdivision modelling Adding and deleting geometry Thickness Adding piping around the hem Mesh displacement with the painting tools Modelling seams Adding materials UVMapping Moving models between DS4 Pro and Hexagon Once you have finished the tutorials you will have a neat shirt ready to be set up in DS4 Pro, and more importantly the confidence and skills to make all kinds of garments out of the template.
Classic Bikini (Hexagon and DAZ Studio 4 Pro Video Tutorial) by Fugazi 1968
Again - another Hexagon tutorial, so we can expect that the bridge is used.
Description
Following on from the previous tutorial, this set shows how to create a garment from scratch. You'll make a garment for the Genesis Female then go on to set it up for use in DAZ Studio 4. In over three hours of video tutorials you'll learn how to create a cool bikini with some neat details. As well as learning some neat tricks to get a good mesh with the proper polygon flow. In the modelling sections you will learn about:Polygon Modelling;
Subdivision;
Edges;
Changing the flow of polygons;
Piping Putting eyelets into the mesh;
UVMapping; and
MaterialsThen it's into DAZ Studio 4 Pro where you'll set up your garment for Genesis, exploring how to fit a garment modeled on a Genesis shape instead of the base Genesis. Then going on to fix up an morph auto generated by DAZ Studio. You'll export the geometry, fix it up, then use it to replace the morph in DAZ Studio. Once all that is done you'll finish off the garment by adding subd and smoothing.
Hexagon Tutorials using the DS > Hexagon Bridge
Please don't feel 'put off' by a tutorial done in Hexagon. You'll find much of the same or similar workflow in Carrara. If questions arise from such, just ask and we'll tackle those issues as (if) they arise. The thing with the bridge is that we never have to worry about scaling or exporting or any of that. The DS > Hex bridge makes the transition between the two apps smooth as silk - which I like very much. However, now that I've started doing my modeling in Carrara, I like this workflow much better. Probably because I'm more used to Carrara and just feel more comfortable. Modeling over a base model in the Assembly room is an experience that just blows away any other cloth modeling I've ever attempted. Toward the top of this post I discuss exporting and scaling. That is the information you need to create your workflow without a bridge. It's really that small a difference.
Other Tutorials
Please post a link if you know of any tutorials you may know of. If there is enough interest in this subject matter, this thread will grow and change as needs be.
Also, if you have comments regarding anything discussed here, please feel welcome and encouraged to speak freely.
Daz 3D is part of 
Connect
DAZ Productions, Inc.
7533 S Center View Ct #4664
West Jordan, UT 84084
Licensing Agreement | Terms of Service | Privacy Policy | EULA
© 2026 Daz Productions Inc. All Rights Reserved.
Comments
Poke Through
I don't know if PokeAway 2! for Genesis 2 Female(s) fully removes Poke through in Carrara, but it looks nice. Lots of different dials for different things. And dialing one way changes the clothes, dial the other way to decrease the size of the Genesis body part instead, so you have a choice to either enlarge the clothing or reduce the body part... Quite the product!
Below I discuss methods we may implement to change the shapes of clothing without changing the shape of Genesis. It might seem like a lot of work and, if you wanted to create something as complex as xenic101's PokeAway, it really would be. To get that much power, I'd rather buy PokeAway! But for making our own, custom stuff, here's an option I'm going to be trying very soon, here:
Load in which ever Genesis figure - but just the base. In other words, all morph dials at zero.
Load on a good set of clothing that really shows off some horrible poke through - like, the worse example.
Select Actor of that base Genesis (or Gn2) figure and click the little hand in the upper left corner to edit it's mesh.
Go through the whole protected topology thing - turning it off.
Now select a ploygon and turn on symmetry and soft selection. Leave the soft selection as high as it is and test for the right mount of influence and using the poke through as a guide, imagine how much bigger the figure would have to be fit to in order to eliminate the poke through. That came out awkward. Hmmm. Basically double, at least, the amount of poke through. We're not looking for uniform scaling here, nor are we worried about what poor Genesis is looking like - because you won't actually see this version.
If you think thhat clothing, in general needs to be bigger 'in this spot', then sculpt the figure bigger in the right directions to get the results you want. What we're doing is pulling out the clothes where we pull out on Genesis. We just can't see that yet.
When you're done, get out of edit mode and export that poor, weird-looking figure out as an OBJ. Use DAZ Studio preset (?) I'll get back to you on that one. I've always scaled down universally, in the motion tab to 1.042 and used the Poser preset. But I want to try the DS preset to see if scaling is required. Does anbody know?
Okay. Now open DAZ Studio Pro and load in a fresh copy of the same Genesis model you edited, but before the editing. Load in the OBJ you made in Carrara as a morph onto Genesis using the Morph Loader Pro.
With Genesis selected, go to Save As > Support Assets > Morph Assets
The dialog that comes up is a nice worksheet where you give each yourself and your morph a name and then select what part of the figure is affected with this morph. For what we're doing in this example, we're going to open up the Genesis hierarchy, then Actor, Full Body and Stylized. This will place our morph below the dials for Victoria 5 or 6, depending, etc., on the Genesis figure. When you're done hit Accept.
Now go to that folder on your computer. The place where you just saved that DUF. Copy the folder that it is in. Before pasting it again (in the same spot) rename the original to "Projected Morphs". Now paste the folder back. You should now have two folders in that location, with the same file in each.
Go back into DS Pro and load in a new scene with a fresh version of the base Genesis you're using. Save As and save it in the exact place using the same name. Same as before, we're going to Save As > Support Assets > Morph Assets, open up the Genesis hierarchy, then Actor, Full Body and Stylized. "Overwrite the existing file?" "Yeah... Do it!" I mean... Yes.
Now you'll have a clothing adjustment tool right within Genesis. This could make for a powerful tool - and allow us to more freely use all of our Genesis stuff. Oh, and this will also work on clothing that was auto-fit. It actually tells the clothes that the changes are being made to Genesis - so it follows. New feature, courtesy the wonderful Devs at DAZ 3D! ;)
That said... whew. We can make all sorts of shape shifters!
Diomede64 has started a very informative thread specifically on the topic of fixing poke through:
Five ways to fix poke through without using conforming figures which has a wealth of great information.
Also, here's a tutorial in the store on the subject, not in Carrara.
How To Remove Poke Through by V3Digitimes
Description
How many of you have already found the perfect shape, the perfect pose, the perfect lights and camera frame for a character, and suddenly, everything is compromised by a poke through in the outfit? You know, when the figure you're using "pokes" above its outfit... Most of you probably. I think I could say all of you.
There are many solutions to this problem.
The goal of this tutorial is to explain the many tools you have how to solve this problem, working on a concrete example, and using various techniques.
This tutorial is divided in four video tutorials (resolution 1280x720). One for Poser users, one for DAZ Studio 3 users, one for DAZ Studio 4.5 users, and the last tutorial for all users since it describes how to remove your poke through once your image is calculated, using postwork in a 2D software.
In all the tutorials - except the Postwork one - you will find the methods common to Poser and DAZ Studio including, how to :
- Use node properties
- Create and apply opacity/transparency maps
- Use magnets/deformers, and spawn them (only in DAZ Studio 3 and 4.5 Tutorials) as morphs
In the Poser Tutorial you will also find more specifically how to solve poke through using :
- The morphing tools included in Poser (Poser 7 and above)
- The new morphing tools included in Poser Pro 2014
- The ZBrush Goz in order to morph outfits
- Blender, a free 3D software in order to repair the geometries (useful for Poser versions older than Poser 7)
In the DAZ Studio 3 Tutorial you will also find specific solutions to solve poke through using:
- Blender, a free 3D Software, and the morph loader to create a morph on your Posed Figure or on your Zero Figure, and the consequences of your choice.
In the DAZ Studio 4.5 Tutorial you will also find specific solutions to solve poke through using :
- The Smoothing Modifier and the Transfer Active Morph tools
- Blender and the Morph Loader Pro to Create Morphs
- The ZBrush Goz to Create Morphs
With all these tools, you will quickly be able to remove all poke through from your scenes - whatever the poke through you have and whatever the software you use!
Before I move away from the topic of removing poke through, I'd like to mention that the above mentioned workflow for adding morphs to Genesis that don't affect Genesis' shape, but does affect whatever is conformed, can be a powerful way to add subtle enhancements to movements as well. It might be better to place movement morphs on the clothes themselves, as to keep from having just too many dials on Genesis. But with the new Parameters filters, it's really no big deal.
Now, on with more thoughts:
Joint Controlled Morphs (JCM)
If you've followed along so far, you've seen that, once again, I'm leading folks to read into all of the great new features that we have available as Carrara artists by including DAZ Studio Pro into our workflow. Well I'd like to just draw your attention, if I may, down to one of the more advanced topics: Joint Controlled Morphs (JCM). Personally I find these tutorials to be most generous of DAZ 3D to share with us. Yeah... they want folks to really get into this stuff and become better artists - and, hopefully, become published artists whom make great products for them. That's a great thing, right?
What is a JCM? It's a morph designed to correct problems that might occur when a body part is posed within its normal range. We don't want to restrict the range of natural motion just because the mesh starts to distort in an undesirable way. Well, if it wasn't for JCMs, yeah... we do. JCMs give us the power to teach the mesh to behave better than it otherwise would with nothing more than its rigging information and weight mapping. Even if all of that is excellent, we still have issues crop up. JCM information can add or take away the appearance of elasticity, the ability and tendency to fold, etc.,
Going through the page I've linked to above, you'll learn how easily JCMs can be installed. We can do this to our figures and also to the items that conform to them - giving us an incredible range of power.
Awesome stuff. Don't you think?
Thank you. Very useful. I don't plan to be a published artist, but all of this information will help me in my own projects.
Thank you .....the Winterbrose tut looks amazing along with all your other fantastic material. I struggle with losing morphs eg for V5 if I try to go into Hex and then back to Carrara. Hope going the DS route will solve that???
xx :) SileneUK
Go into Hexagon from DS. Load the character, File > Send to Hexagon
Then send it back to DS when you're done in Hex
Save right to the library, a new morph for Genesis. Then when you load Genesis in Carrara, you'll have the morph dial.
Here are the instructions for saving a Morph
These instructions from DAZ 3D are pretty decent. I'm learning a lot from messing around with this stuff.
...Not sure if this is the correct thread to address this in as it is more of a general modelling question.
While I understand the basic procedure outlined above for saving a model created in Carrara as a .obj to import into Daz Studio, my concern is over UV mapping. Does the UV map carry over with the ,obj or do I only get an unmapped version with no material zones when I import it?
Second, does Carrara have the ability to perform UV unwapping for creation of texture templates?
I have found Hexagon to be just too unstable for my needs and am looking for an alternative for modelling that doesn't cost several months to a half year's rent or require the equivalent of a graduate course in cryptography to figure out its UI.
You may also export the map template in your chosen respolution.
It helps, sometimes, to divide the model into material zones so that you can map directly on that selection.
Unlike some of the other UV Mapping utilities, In Carrara you only get the one box with which to map. This can be a challenge, but if you patiently work with it, you'll get used to how it goes in Carrara in no time. My suggestion is to get the mapping window as large as you can. If your map would improve by doing so, you can make a selection and detach that part from its connections to the rest of the mesh, so that you can drag it to a specific part of the space for reshaping, etc.,
Here's the UV Edit mode view. The right window is where you map the template, left is a view of the object.
Edit: To get into UV edit mode, use the button I circled in the upper right of the interface while in the modeling room, or object edit mode in the assembly room.
Some of this is carried through in the How to export from Carrara 8.5 to Daz Studio 4.5 topic.
...thanks. As I already know my way around Carrara fairly well it will make this a lot simpler to learn.
So do the Material zones save with the .obj as well?
Yep! Just tested!
If you select, None in the save options it won't. I noticed in C7.2 Pro, that when converting procedural shaders to image maps it seems to just bake the color data. Not the noise or other procedural functions. Bummer! Maybe this was improved upon in C8 and later?
...sweet. I just mainly net the material zones as I can do all my texturing and shader work in Daz Studio. This way a zone that needs to be transparent (like for windows) is already there.
Looking into Baker, check this out:
OMG, I am going to love the fact that I now own Baker!!! I haven't made it to texture map phase yet - this will help immensely!
...Daz 4.6 also has a Shader Baking function s well.
I'll have to play with that too. But I love Carrara's shader editor! :)
...agreed, more intuitive than either Poser's Material Room or Daz Studio's Shader Mixer.
The last time I used "patch cords" was with an old Arp 2600.
Would it be possible to export one of these cities including textures to DAZ? I assume the city would be exported as an obj but what about the textures?
http://www.daz3d.com/new-releases/night-and-day-city
Oops! Double post.
Of course the easiest way would be to use Carrara! ;-P
I'd like to use Carrara but I need to render in DAZ with Octane Render. If I could create the city in Carrara and then export it to DAZ that would be ideal.