Novica & Serene Night's Renders, Tips, Tutorials & Product Reviews Part 1
 Novica
Posts: 23,925
Novica
Posts: 23,925
I joined in mid-September 2012, didn't start on my first project until February 2013, five months later. It was so overwhelming with zero experience in 3D. I posted my first render, what I learned after working on it for five weeks, and also direct you to the threads where I got assistance. Here's tips that have helped me. There are screenshots, renders, WIPs (work in progress.)
Feel free to laugh at my boo boos- although I've read constantly about this-and-that... it seemed this-and-that usually got-up-and-went about the time I tried to apply the concepts. There's too many terms for newbies who haven't heard any of them. I remember asking "Did I just Uber?" (No, I rendered.) And UberEnvironment2 is not a second-room-on-the-right somewhere, it's lighting.
Some of the links scattered throughout are now in one place. If there is a *** by a link as you read this thread, it is in the Reference Links section. You'll use this first post often to hop to the sections of this thread- I sure do. However, these are not all the links, the mini tutorials are not included, nor the wealth of other information in the thread.
The thread evolved from having tips and renders to also included product reviews and recommended purchases. Six months after the thread started, in August 2013, with over 24,700 views, I asked SereneNight to join the thread as a co-host. She's a good friend, talented artist, and will also help showcase the products, provide tips, and share her renders.
Use these links to get to the main sections of the forum:
The Prop Stop
http://www.daz3d.com/forums/discussion/19756/P1395/#415932
A list of props to find them fast!
Reference Links:
http://www.daz3d.com/forums/discussion/19756/P285/#336419
Forum tips and tutorials, thread tutorials
Novica's Reviews: Light Presets
http://www.daz3d.com/forums/discussion/19756/P1005/#403475
See what the sets do from World Center (XYZ Translations 0/0/0) This is very helpful- MOVE YOUR SCENE and leave your figures where they loaded in at World Center, and you have a quick and easy way to choose your lighting (and add to it.) This is the alphabetical list for easy reference and the images showing you the lights.
Product Reviews
http://www.daz3d.com/forums/discussion/19756/P1290/#412607
Links to the products reviewed in the thread.
My Art Studio~ L'Atedolce Opus Studio
http://www.daz3d.com/forums/discussion/19756/P1290/#412630
How to combine/completely makeover sets by changing materials, textures, and using Shader Presets! See aspects of L'atelier, La Dolce Vita Restaurant, Opus Magnum, and Studio Paris combined to make a brand new art studio.
Babies First Bug (My Very First Render) CLICK TO SEE FULL SIZE!
This is my first render, totally teaching myself from scratch by just experimenting. Five weeks. I can speed YOU up if you want to learn a bit faster.
Daz 3D is part of 
Connect
DAZ Productions, Inc.
7533 S Center View Ct #4664
West Jordan, UT 84084
Licensing Agreement | Terms of Service | Privacy Policy | EULA
© 2026 Daz Productions Inc. All Rights Reserved.
Comments
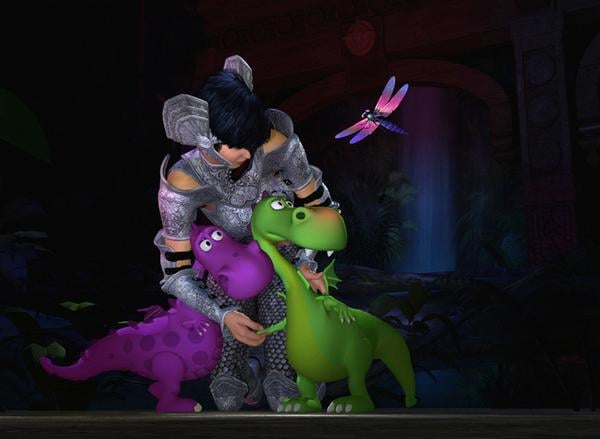
Enjoy the ride! Here's what I am currently working on- Kaetl (pronounced Kay-tul) and the two lost baby dragons.
Details and tips for beginners from beginner me:
TIPS
1.) Is something blocking your view? Getting in the way of posing another object? Go to Scene tab, select the item blocking your view (if you aren't sure what it is called, hover the Universal Tool over it and it will tell you) -and close the eye. That will make the blocking object "disappear" so you can get a clear view of the object you're working with. Don't forget to go turn all the hidden objects back on- just click on the closed eye.
2.) Next, ZOOM IN if you are working with hands. The hands in the image took hours- but are correct from all angles- and I learned all about the Universal Tool cube vs Parameter tab sliders.
3.) Even though you think you have the hands (or object) well placed in relationship to other objects, check from other views. Your hand may be floating in space instead of holding or touching another surface. Kaetl's fingers are exactly placed on that back scale, from all angles. Her hand is holding the dragons, from all angles. When you get ready to render, it makes it SO much nicer to be able to move around without worrying about screw ups from different views.
4.) See image. The most important tip is know what setting your character is going to be in- I knew Kaetl's legs, stretching behind her, would be a problem in some sets, and that she might have limited turning room. Posing before adding the set helped my spot render time- so did the simple clothes instead of the armor- and I could see her features easier.
5.) Put your character in simple clothes and perhaps no hair- when posing. It speeds up spot render time. I got the general poses before adding the scene.
6.) Create your own scene by using bits and pieces of other sets. I used the floor from one, plants from another, temple from another.
Create a plane and make your own floor!
So this sample will show you the different face, shoulder, hip twists experimentation- only a sliver of those that took to get the final pose. The back hand was completely changed to rest on his scale.
EDIT: The clothes used in the pose renders were the 50's outfits. They load quickly and fit well without much tweaking- I just can't work with naked people, the clothes make it similar to what the character will actually look like.
Kaetl's hair includes a geometric shell. (Might as well jump in with both feet, right? The first character with a custom head shape that was hard to fit the Pyrit Hair to, and then to put a shell on top of it...) I have to say, I have had NO problem with the Pyrit Hair except on Kaetl- ScottLivingston and I experimented and I posted the settings for the fit. Will insert that thread and Scott's hair tutorial here when I find them:
The geometric shell is mentioned in the tutorial (and yes, I adjusted both the shell and the hair to get the effect in the picture) The shell gives you more strands and can reduce render time if I recall correctly. It thickened Kaetl's hair. Love it!
TIP:
Scotts hair tutorial- read all, it's excellent, and see end of thread for questions about geometry shell that I had. Dummy me couldn't follow instructions!
http://www.daz3d.com/forums/discussion/17656/
TIP:
Don't forget to make the fingernails, claws, and teeth glossier. Click on the image and look at the dinosaurs eyes and claws. Subtle, but makes a difference. Kaetl's nails are glossier too. Same with lips! Will post the settings for the eyes to give you a good starting point.
Will also post the nail color, although it will vary depending on your lighting.
EDIT: Here's the nail settings. Keep in mind this is not spot rendered. The nails look very natural (at least in this setting. But it will give you a good starting point.) Not shown- Ambient was white. 255 255 255 at 25% strength.
EDIT: The eye settings- Diffuse, Specular, and Ambient all on white (255's) but Specular was 81.5%, Glossiness 88.6%, Specular Strength 100%, Multiply Opacity OFF. Claws are the same settings except Diffuse is a gray blue (192's)
I reread this in the spot render thread, by Szark- (I am a SLOOOWWW learner, keep that in mind.)
"... making something transparent and trying to keep reflections and highlights when the surface is invisible or nearly invisiable-Just think about it logically. You make something transparent in Daz Studio then the highlights and relfections will disappear..yes? So when we want something that is see through and want full highlights and reflections we turn Multiply Through Opacity OFF."
QUESTION- I HAVE THE MULTIPLY THROUGH OPACITY TURNED OFF for the nails, I'll have to go back and experiment and see why I have that. Do you have it off or on when you do fingernails?
TIP:
How to use Surfaces-Make sure the Surface Selection tool is selected. (it looks like three sheets of paper, in the same row as the Universal tool.) Then click on Surfaces tab. Make sure Editor is selected (you have three choices, Presets, Editor, or Shader Baker) Click on the part of the object you want to do the surfaces for.) REMEMBER TO SPOT RENDER!
TIPS:
Tip: Check the product page for the Resource Files- imagine me rolling my eyes this past week (yes, after MONTHS of buying stuff) when I read those files have additional options for the product. Well, duh.
Tip: Use spotlights to change the color of your light colored objects (easiest) such as the dragonfly- which was mostly a light blue! I stacked three spotlights on top of each other to get the bands of color.
Tip: To stack spotlights- after you have created your spotlight (Spotlight one, let's say) and it is selected in the Scene tab, go to Create and select Spotlight, then when the popup appears, choose the option which copies your Spotlight one) Then just use the Parameters tab and the sliders to move it SLIGHTLY up and down (try Y first) Repeat and add as many spotlights as you need for all the bands of color (which you change in parameters tab/light)
Here's where I tackled the dragonfly and a good discussion on lights and settings- I posted the settings for the dragonfly, give them a try! (It's Noggin's dragonfly, btw) THIS THREAD HAS AWESOME CLOSEUPS OF THE DRAGONFLY.
http://www.daz3d.com/forums/discussion/18507/
Tip: for Depth of Field simply put, here's the thread where I asked for clarification. Pop in here and then surf to the links in the thread, if you haven't tackled DOF yet. Note the waterfall behind Kaetl and the dragons has (ta-duh) depth of field. Sikeus was a big help too- tackling it the same time I was- and thanks to Scott-Livingston, Jaderail, Szark, SickleYield, InaneGlory.
***
http://www.daz3d.com/forums/discussion/19195/
Biggest tip on rendering: TURN OFF PROGRESSIVE. Anyone know why it should be on? After 4 hours 15 minutes, I was at 51% with it on. I was at 85% after only 40 minutes when it was turned OFF. Found that in a forum post, can't find it.
***
Jaderail steered me toward AdamR's render setting thread, because I sure had problems when I tried my first render.
http://www.daz3d.com/forums/discussion/16085/
***
The thread I startted asking about long render times, in it's entirety:
http://www.daz3d.com/forums/discussion/18198/
TIP:
Tip: Don't forget to spot render. Your scene may look TOTALLY different from what you see. Somehow, that little tidbit of info played dodgeball and went right past me- I did WEEKS of work on Kaetl and what a shock when I spot rendered! (and you should see what the geometry shell looks like- will try to get a screenshot for you.)
Thread on spot rendering:
***
http://www.daz3d.com/forums/discussion/14716/
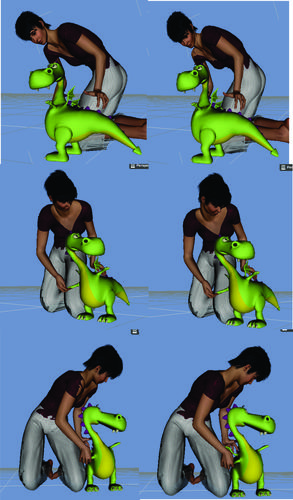
Here's a peek at the hours I spent on the hands- getting the fingers right, checking from all angles. Remember, you can turn off objects so they are not in your way by clicking in the SCENE tab (click on the eye that appears by the item name.) I didn't know that when I was first trying this- then it was SO nice after I did that! The last picture on the lower right was almost the final hand poses. You'll see the fingers overlap, are not bent correctly, etc, in the other poses. It just takes fiddlin' with. :)
TIP: A Good Explanation of Tools
***
http://www.daz3d.com/forums/discussion/18135/P15/#267348
This thread is where I asked about hiding the universal tool cube (and you'll notice it has all kinds of names!) It's the cube that is where the object pivots, it's activated when you use the Universal Tool. But more importantly, Szark does a very nice job of summaring the Region Navigation Tool, Active Pose Tool, Surface Selection Tool, etc. If you're a newbie, check it out! (And bottom line, can't hide that darned cube, you just have to use a different tool.)
Wow, the render turned out very nicely. And I'm really impressed that you've catalogued many of the things you've learned in the process! This will be helpful for many people.
Can't wait to see more renders from you, Cathie! (And keep the tips coming too...I've already learned some things! :cheese: )
Thank you- I've learned how to "get by" so to speak- but certainly would NOT have been able to even get a final render without you! :)
It's just frustrating not knowing what all the stuff is that is impacting the scene- I am using render settings without knowing WHY I am using them. For instance, when I did depth of field, I increased the x and y pixel samples like a good lil soldier-but haven't a clue WHY I did that. I know it decreases the graininess...but why?
I don't know if you checked back on the hair tutorial thread, but yes, doing stuff with the shell did change the hair properties. At least, I think it did! I had to do settings for the shell and the hair. That's one of the things I'll be posting here as soon as I can get a closeup of the hair. (Yes, our beloved Pyrit hair that you and I were trying to do smoothing/collision, lol.)
I'm also sending you a PM to check over a video tutorial if you don't mind. If it's error-free, I'll post the link here. It's for newbies- brand new newbies. I see this question asked over and over again in the new users forum, so thought I'd make it really easy on you CV's and do a tutorial. (I was a training manager for 20,000 folks in the army, and thousands as a regional training manager for the state. It's what I did for a living. NO ZIPPING MOUSE MOVES, NO NARRATION, all in print, all very slow. Try not to fall asleep watching it!)
Cathie
The Babies First Bug is one of the renders (of many) featuring those three characters, to teach kids how to read. I'm working on the second part of the story, that happens a few seconds after the bug. Somethings coming at them from the woods!
Wanted to point out a few things for the new folks.
TIPS
1. Don't forget to spot render. Look at how weird my person looks! But here's something Jaderail answered for me- yes, if you are NOT WORKING ON SOMETHING AT THE MOMENT, and doing a spot render of the scene, turn the objects off over in the Scene tab (shut the eyes) and your spot render will speed up.
2. The blue is the geometry shell hair! Kaetl (my character) has black hair with blue highlights. I'll try to post the settings for the shell and the hair, but this shows you just how hard it is to "picture" what something looks like without spot rendering. (It's that camera up there in the row with the Universal tool.)
3. Use both surfaces (In Surfaces tab) and lights to get the look you want. Look at Kaetl's neck- I reset part of it to the daylight surfaces so you could compare the night surfaces vs the daylight scene surfaces- see how different they are, due to different lighting requirements. (And that may just be because I am new, but it gets the look I want.)
4. BIG TIP- dont set collision and smoothing if you don't need it. See Kaetl's hair? It wasn't showing in the first render so I didn't set it. Sped up my render time. (See how strands are blobbed, and one in her eye? That side was away from the viewer. Not shown!) In this second render, I'll have to address the hair issue. Drats.
This will show why you should spot render often. I am just at the stage of posing the characters for Render Two, the lights are those from Babies First Bug and not set for this scene, but I am using the same set. So, I am testing to see how they look. Look at how much more detail the armor has- and the difference in illumination.
The glossiness of the eyes changed with the spot render too. Look closely at the very first picture, the lower right corner is not rendered yet, compare it to the rest of the eye. The second image, the eyes are done spot rendering.
Tip:
Come up with your own system- there are all kinds of presets- characters, lights, cameras- but I write down my favorite diffuse, specular, and ambient colors such as light peach, light blue, light gold- and which light setup they work best with.
Oh wow. Nice to know this- well, let me start at the beginning for newbies. I'm going to tell you why you shouldn't forget the teeth when you are posing- in the EARLY stages. And what I found out about the mouth and teeth- which was an "OH!"
Genesis has a mouth full of teeth. Big teeth. Distracting teeth in many situations. Nice to have, but you need to know how to tone those suckers down so they don't look like dentures. But alas, you go to Scene, click on Genesis, then Abdomen 2, Chest, Neck, Head- and there's no option for teeth.
TIPS:
1. Teeth are NOT found in the Scene tab. They are in Parameters>Actor
2. Make the bottom teeth smaller first- the top ones aren't as distracting as the top ones (in my opinion) Look at the photos- those bottom teeth take away from the scene, not add to it. The focus is on her open mouth (she is caught off guard) and NOT the teeth. They do not help the scene.
3. Deal with teeth color later, if you hate snow white teeth. You may not need to adjust teeth color, depending on the lighting. Why create work for yourself that is unnecessary? But the main point is- don't forget SIZE and COLOR of teeth, those little details make your renders even better.
4. HERE'S THE BIGGIE- Imagine my surprise when I changed the bottom teeth size, and it CHANGED MY MOUTH SHAPE AND SIZE. Look at the first two set of lips- just by changing the bottom teeth, my mouth changed! The third picture, I enlarged the mouth a bit. (.36) The last image, I increased the mouth further, to compensate for the mouth change. It went from a -0.12 with big bottom teeth, to a .44 with smaller bottom teeth!
In the next post, I'll tell you about the lip colors you see in these images, and do screenshots of the Surfaces tab. This was a "custom" mix of colors by tweaking Surfaces. :) I changed the very last one slightly so you can see the variety of options available with the main color I am using.
EDIT: I found the claw color that dimmed the ultra bright white- it is a grayish blue, 192/192/192 for the Diffuse color. I'll probably try that on the teeth.
Here's the colors for the lips- orange is the color that gives the lips such a nice glowing frost :) I've still got to figure out how to get lips glossy. Any tips on the surfaces settings- jump right in! BTW, the original lip color was just a bit lighter than the base color shown.
http://youtu.be/sSpCf1n4Nds
Here is Video 1 for brand new users of the studio.
If you ever see any errors, DO please let me know. I am a beginner! My background is extensive in training folks so I'm trying to create a SLOW moving (no zippy mouse movements) video series that has the instructions in PRINT instead of voice narration (hate having to rewind and go back, over and over again, because people are talking too fast and zipping the mouse along. Or the videos with "uh...uh...uh" and unprepared dialog. UGH.
Most of you will be bored with the videos right now if you're using the studio AT ALL, this is THE basics. I'm not trying to cover everything, or every way to do something, just to get newbies going!
Cathie
http://youtu.be/xe1rov-cFHM
I went ahead and published Video 2- it shows you:
*how to use the Universal Tool cube to rotate objects
*the Parameter tab- how to change the slider limits
*how to reset the Parameter defaults
*how to use Parameter tab for scaling and translations
*how to undo your actions
Video 3 in progress- creating a character. (The fun stuff)
Cathie
TIPS
First Tip:
***
http://www.daz3d.com/forums/discussion/19194/
For any of you having problems with loading content/ getting started with the studio, Scott-Livingston has put together a remarkable thread covering these technical aspects. It is also a question / answer thread- everything is covered. Here ya go! (Love you Scott-L! I'm in your fan club.)
One thing I've noticed the most- if you don't have content, check to see if you have the Genesis Starting Essentials- that comes up a LOT.
Second Tip:
***
http://www.daz3d.com/forums/discussion/14536/
Szark's wonderful thread on Uber Area Lighting- The Basics
Third Tip:
Here's what I used to clothe Kaetl for posing- both dirt cheap.
http://www.daz3d.com/casual-1950-for-genesis-female ($1.99 Platinum Club)
The pantaloon is from Day Dreamer For Genesis. If you want a cool set of pants then take a peek below. And it's light colored so you can use the Surfaces tab and change the pants to any color! I've included a close up- notice I didnt bother with the collision/fitting- I was just posing and these clothes fit tight enough to show me the character lines of movement.
http://www.daz3d.com/day-dreamer-for-genesis (Platinum Club, 1.99)
This was one of my "What the...?" which was created when I was working on the bands of the dragonfly (the stacked spotlights)
Still not sure how I did it, but I call this one the "Surfboard Dragonfly" because living in Pensacola, of course this reminds me of the beach surfboards' colorful designs.
So, to get something like this.... (other than sheer luck)
TIPS:
1. Put your item in front of something textured, what you see on the wings is grass and tropical plants behind the wings- it is part of the Heart Of The Jungle set.
2. Set the transparency so the background shows through
3. Stack spotlights with different colors. THIS IS THE SAME DRAGONFLY AS IN "Babies First Bug."
I'll see if I can find the other settings that may have contributed to this, and see if they are in that thread. http://www.daz3d.com/forums/discussion/18507/
http://www.daz3d.com/forums/discussion/18507/P30/#274891 Jump in HERE if you want to see just the dragonfly settings. Adding a distant light, of all things, was what changed this dragonfly!
Cool, eh?
EDIT: When still trying to figure out opacity (the opposite of being see through, or transparent) - From that thread, Szark clarified with me about the Multiply Through Opacity. I am so DUH at understanding this stuff, but I'll just try to do as suggested. Thanks to Szark for this-
"This is a simple on or off switch and only really comes in to play when you start making objects transparent using the opacity settings. When it is on the highlight is affected by the opacity settings so it’s just as transparent as the object, when it is set to off the highlight is not affected by the opacity settings and the object is more transparent than the highlight."
Then added when I still didn't "get it"-
"Ok take glass for example, it is very reflective and therefore when clean shiny it is more reflective than when dirty. Anyhoo if we leave this on then when you make the glass surface very transparent then the highlights and reflectivity lowers so by turning this off we can have good relfective properties and strong highslights. So lowering opactity lower these effects, turning it off engages these effects even though the surfaces is either 100% transparent or varing degress of.This goes for the Cornea of the eye, water etc etc."
Thank you Novica! l love your rendered dragons and dragonfly and i for one will be following your tips closely...faltered enough already and i have been a member for a year and still not achieved anything this good, i will check out all the links too, it is handy to have all the information in one place, will also check out the videos - Thanks for taking the time to do this and to all the people who helped you get where you are now....will keep you informed at progress.
You're quite welcome :)
I know the Art Studio section is used for many different things, but since I am a beginner too, I am trying to get this organized so everyone else can zip along faster than I did. So it's not just my gallery of work (I will be somewhat slow at that since I am trying to document information, do videos, etc) but more of a "oh, guess what I just found out..." and a lot of it you probably will know. Feel free to jump in, too- ask questions and tell us what you know :) I need all the help I can get. Is there anything in particular you would like to explore?
That first render only took me FIVE WEEKS. (not kidding. The fingers on one hand took hours.) If I had to summarize THE most important things I learned, it would be-
1. turn off items in the scene when you spot render if you are not testing them.
2. clothe your figure in an uncomplicated outfit to pose (if you don't want to work with a naked person) Don't put on helmets, etc until you have the body language right.
3. have your set in mind- but remember that you can turn off and hide unwelcome parts of the scene! (and it speeds up render time)
4. zoom in to work on hands (and back to #1- turn off things that get in your way of viewing the hands- like legs!)
5. don't set collision and smoothing on things until you determine your pose and your angle of render. Those add time to your rendering, and also waste your time because the area may not show anyway! (like Kaetl's hair)
6. DO NOT RENDER WITH PROGRESSIVE ON!!! (in Render settings.) I had rendered in 45 minutes where I was at four and a half hours!
7. spot render! I didn't know what that was and wasted a week of my time because I thought what was in the viewport was "it." Sheesh.
8. use both Surfaces (tab) and lighting to get good skin tone.
9. consider changing the bottom teeth when you pose the face if the expression calls for an open mouth. It changes the size and shape of the mouth, so doing it before you do the mouth morphs is a consideration.
10. if you aren't getting good lighting, check the defaults in the Surfaces tab. Many characters/objects have BLACK or dark blue for ambient, diffuse, or specular.
TIPS:
1. Check for bundle items before you purchase new items
As we all know (or if you're new, you may not) the Itemized (your products in alphabetical order) does not break down the bundles. It's been posted repeatedly, but here's the link so we keep it organized- the lists of what is in the bundles. I made a spreadsheet and alphabetically listed what I had, so every time I check to see if I have something, I can quickly check those bundle items too.
***
http://home.arcor.de/familie.reichow/3D/fwb1.html
2. And Szark posted the link to this in his sticky thread, but here it is for easy reference- read up on camera and lights.
***
http://digilander.libero.it/maclean/DStutorial.htm
***
3. What I am still fiddlin' with is the Surface tab, the sticky had that reference too-
http://homepage.eircom.net/~neilvpose/ds-settings.htm
Here's my question from another thread:
I don’t know the relationship between the render settings (let’s say a square vs widescreen) and the light presets. (I haven’t done any yet) Will the different render settings ( a square vs more of a rectangular widescreen) affect the translation locations of the lights? Aka, give them a different xyz location when loaded into the next scene? How exactly do presets work?
and thanks to Richard Haseltine here's your answer:
No, the light’s position is stored in3D space, not relative to the viewport.
FYI INFORMATION:
I've got some marvelous help "behind the scenes" with CV's who PM me with additional food for thought- and everyone feel free to do that as newbies and medium-experience users will appreciate it (I know I REALLY do)
Here's the information from Scott-Livingston:
Here's one more thing relevant to the information in Video 1 and Video 2: (and Scott-L was nice enough to point out the link was wrong, it has been fixed. See my signature to view the videos if you are a brand new user, or to see how the series will be done. Working on video 3.)
1.) The translation units are in centimeters. So if you change x translation to 100.00, you've moved the figure one meter to the right.
2.) Additional information: Rotation units are degrees (so 360.00 is the same as 0.00)
3.) Scaling is in percentage of full size.
Thank you Scott-L!
Anyone else want to share some basics with newbies, PM me or feel free to post.
Cathie
Regarding backgrounds:
Jaderail is helping another member with background questions, what I asked was the difference in using a jpg, png, gif, and the size of the background.
Regarding size: you can either select your render size, then resize your 2d image to fit that, or if you have a 2d image you like, set your render to match it. Obviously, if you have a big 2d image that you can crop, you have more options. Let me digress here and discuss your 2d images- remember, it is better to reduce in size than try to enlarge- when you do, your pixels are "stretched" and that's when you can get fuzzy, grainy images. Save your 2d images in larger sizes, you can always reduce them in size, compress them. I use 150 dpi up, but that's just me. If you are going to have a background that is going to be fuzzy due to depth of field, I would think it won't matter about ultra crisp lines. Note- I HAVE NOT DONE A BACKGROUND IMAGE YET.
This thread discussed the difference in jpgs, gifs, pngs- I found it while on the other thread-
***
http://www.daz3d.com/forums/discussion/831/#7468
and then back to this thread- note it is what you SAVE the background as, that is important.
http://www.daz3d.com/forums/discussion/19992/#293617
***
EDIT: And here's the thread about how to zoom a background and your character at the same time- sweet! Thanks Jaderail!
http://www.daz3d.com/forums/discussion/19996/
Reorganizing your content:
***
http://www.daz3d.com/forums/discussion/19934/#292959
This should be a sticky- a beautiful job by HeraldOfFire. If you want to organize your content, this is a must read. A lot of time and effort was put into the explanation, including images.
Well, I'm still struggling with terms so Szark is helping me out tremendously. Here you go- part of the excerpt from Wikipedia, and the link. I asked the question about what to select in Surfaces if I am using Genesis and doing the Basic Female, Victoria 5, Supermodel, etc for the body shape. Over in Surfaces, for the UV map, I had to chose between Genesis and V5- so hmmm. And I'm still learning terms of course. Here's the thread:
***
http://www.daz3d.com/forums/discussion/20002/
And here's the blurb (part of it) about UV maps from Wikipedia.
IFYI: What Is UV Mapping?
"This process projects a texture map onto a 3D object. The letters "U" and "V" denote the axes of the 2D texture[note 1] because "X", "Y" and "Z" are already used to denote the axes of the 3D object in model space.
UV texturing permits polygons that make up a 3D object to be painted with color from an image. The image is called a UV texture map,[1] but it's just an ordinary image. The UV mapping process involves assigning pixels in the image to surface mappings on the polygon, usually done by "programmatically" copying a triangle shaped piece of the image map and pasting it onto a triangle on the object.[2] UV is the alternative to XY, it only maps into a texture space rather than into the geometric space of the object. But the rendering computation uses the UV texture coordinates to determine how to paint the three dimensional surface.
Such a great collection of images and tips.
Thanks so much for sharing them, Novica.
You're so very welcome! Please feel free to jump in and post any tips too- I'm always impressed with your willingness to jump in with the threads :) This isn't just my thread, it's anyone who wants to share their own threads that have good info, others' threads- just something for everyone to collaborate on and get newbies and medium-experience users going. As I get better (in the year 2040 probably) the threads will evolve into more difficult stuff, but since it's as I go, folks starting at the beginning of the thread should be able to move along with me.
And everyone point out ANY wrong jargon that I use. I'll post in a minute about textures, UV Maps, materials.
Cathie
Right now, the thread I'm getting help with that is this one:
http://www.daz3d.com/forums/discussion/20002/#294141
I was learning the difference in UV sets, material presets, textures, etc- and note the patience and a big thank you to....
Szark, Richard H, Jaderail, scorpio64dragon, BWSman. Below I've shared their information.
Information from Szark:
"Here http://www.youtube.com/watch?v=qO28vRt7hqo&list=UU38T95wHAxyCrOO6b1tD7Nw&index=30 you will see why changing the UVmap setting can help with making sure the texture maps are correctly align and has minimal stretching.
So V5 being an extra morph of Genesis base it will have a slightly different and tailor made uvmap, same with the Gorilla, M5 etc etc."
Then:
Szark will show you where the material presets for Victoria 5 are located- see this image if you're having trouble locating them.
http://www.daz3d.com/forums/discussion/20002/#293768
Information by Richard Haseltine:
"By default you can use maps made for Victoria 4, Michael 4 and the Kids 4 on Genesis. If you have Victoria 5 you can also use Victoria 5 maps. DAZ Studio presets, new ones, will apply the correct UV set for you but older items, and Poser material files without DS settings, won’t - for those you need to know which figure the set was made for and select its mapping in the UV Set drop down in the Surfaces pane - generally you can select all surfaces and change them en masse, unless you are mixing and matching."
I was still hashing out the UV Map and texture jargon, not what they did, but what was what. Vs the term "material."
Information by Jaderail:
"Short and Simple UV tut: The UV MAP is what is used to make a Texture to be applied to the surface of a Mesh. The V4 and V5 Shapes are just a little bit different meaning the Textures are just that little bit different. If you wish to use a TEXTURE for a V4 figure you would select the Default V4 UV on genesis even on a V5 shape. The V5 UV is auto loaded for MOST if not all V5 only textures sold here at Daz3D."
Later, he provided this helpful tidbit to clarify something for me-
" It really does not matter which UV set you have selected on Genesis you should still get all your Textures listed for genesis, male or female. DS does not stop you from using any texture just by selecting a UV on Genesis. DS will happily let you load any of them even if they do not fit to the selected UV.
And for Textures the Sample Jeremy and Lana are the Basic Male and Female textures that come with DS. No Basic Male Textures are or Basic Female by those names are supplied with DS."
(Am I the only one just learning this? Probably. In other words, here's some textures to start with that are free, for you to experiment with.)
Information by scorpio64dragon: And thanks for the link for everyone!
"V5’s UVs only comes with the V5 morph so it would require a purchase, I think that Genesis comes with the basic Genesis UV and M4 and V4 and K4 UV’s as well as basic textures for a female a male and a child, or any texture set for these UV’s would work. Reciecup has some nice free ones."
http://rendercandy.com/index.php?manufacturers_id=11
Information by BWSman:
"A “material” is a collection of settings which affect how a mesh looks. It includes settings for diffuse; specular; ambient; reflection; bump & displacement and opacity/transparancy. A texture map is a texture applied to one of those settings (usually the diffuse setting.
Genesis Starter Essentials includes textures for the Basic Male; Female & Child as well as the sample Jeremy & Lana textures."
I'm doing a screenshot of the Basic Child so you can see a texture you get with the Essentials- without buying anything, so you can play around. Back in a bit.
Here's the basic child that comes with DS4.5 so if you want to experiment with a freebie, there you go. I like it. Will do a closeup. Back in a few.