Creating Big City Scenes in DAZ Studio
 RGcincy
Posts: 2,862
RGcincy
Posts: 2,862
I like city scenes and have all three of Stonemason's Urban Sprawl sets. I also like grand landscapes and so have been looking for an environment that combines the two. One set that caught my eye some time ago was Dreamland Models Movie Sets:81 City Blocks but I was always hesitant to buy since it was Poser only. Now that Dreamland Models has products in the Daz store, I decided to take the plunge and give them a try. Instead of 81 City Blocks, I got the somewhat larger Movie Sets: River Front. As I've started to use it, there's been a few things I've needed to do to make it easier to use in Daz Studio. So this thread is for me to share what I've learned in case others can make use of it.
Note (1/1/8/17): I've changed the title of the thread to better reflect its content and direction. When I started, I was just showing how to import and use the new River Front and low poly buildings in Daz Studio as they were made for Poser. Since then, I've expanded to include other DAZ Studio and Poser building sets, skydomes, people, vehicles, scripts, and props which can be used to help assemble large city scenes.
Note: (1/7/19): Links to the Dreamland Models products in this thread lead to a 404 Not Found page as his products are no longer in the Daz store. If you own then already, they will still be in your Product Library. If not, they are now available at Renderosity. Meanwhile, much of the info in this thread is applicable to other products or highlight other city scene products.
New! Complete City - using RiverFront plus over 65 other products to fill it
New! Creating Cities Using SceneCity
People in the City
Vehicles in the City
- Tractor-trailers
- SUV's
- Step Vans
- Pickup Trucks
- Panel Van
- 1950's cars
- Car Ranger and motorcycles
- Ride the Bus!
- Rigging the Bus Doors to Open
- Intercity Coach
- Busy Steets - 60 Low REz Vehicles
- Animated Cars, Biplane and Fire Engine
- Fighting Fires
- Free Vehicle Source
Other City Products
- A Different Type of Big City (Medina Cityscape Generator)
- More Medina (Medina Cityscape Generator)
- The Mediterranean Look (La Piazza Realistic Mediterranean Town)
- The Backstreets and Backstreets By Night
General Scene Tips
- Adding dirt using the LIE editor
- Make it dirtier
- Orienting Trees towards the Camera
- Iray Renders Part 1
- Iray Renders Part 2
- Iray Renders - Night Scene
- Scripts and More Scripts!
- Trashy City
- Creating and Using a Distribution Map to Scatter Objects
- Props for Work Sites
- On the Beach
- Street Construction
- Street Construction - 2
- Let It Rain! More Rain Painted Rain
- Natural Disaster - Flood
Buildings
FirstBastion's Products
Using Dreamland Products in DS
- Creating categories so Dreamland products are in one place
- Adding default textures to River Front
- Adding and adjusting default textures for Low Poly Blocks
- Using and adjusting the camera presets
- Using Pose presets to easily move props to new city locations
- Using parameters to move city blocks (alternative to #5 but not as effective)
- Skydome skies and parameters
- How to fix non-functioning parameter dials (e.g., turn a city block)
- Using the power poles. Part A: adding the default materials. Part B: making a city full of poles
- Setting up and using the Weather Props
- Add a park with D-formers
- Testing grass shaders for River Front
- All 101 blocks in use
- Putting in a new foundation pit
- Dock Crane
- Adding curb cuts
- Replacement skydome
- City Block 18
- A stroll down California Avenue
- Dreamland Single Homes
- Converting smaller 3DL houses to Iray
- Make a Street
- Make a Street with Mixed Houses on the street
Other Products with River Front
- Example 1: Houses and a Church
- Example 2: Streets of NYC and More Houses
- Example 3: Industrial
- Example 4: More Houses
- Example 5: Dystopia City Blocks
- Example 6: School's Out and Prison Yard
- Let's Play Ball!
- Street Signs
Urban Sprawl Products
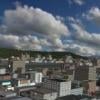
To start, I've focused on 3DL renders. Here's one I've done. The sky, hills, land and water are all part of the River Land set. The buildings are some of the Dreamland Movie Sets: Low Poly Blocks. These render quickly; about 40 seconds.

Daz 3D is part of 
Connect
DAZ Productions, Inc.
7533 S Center View Ct #4664
West Jordan, UT 84084
Licensing Agreement | Terms of Service | Privacy Policy | EULA
© 2026 Daz Productions Inc. All Rights Reserved.
Comments
Creating Categories so Dreamland Products are in One Place
The Dreamland products do not have metadata, so they do not show up in Smart Content. I got tired of jumping around the Content Library to get to various parts so I set up a Dreamland category which lets me get to everything in one place.
1. To make the category, first go to the Content Library and right click on the word "Categories" at the far left. Click on "Create a Sub-Category", enter a name and click on OK.
2. Next go to Poser Formats/My DAZ 3D Library/Figures/Dreamland Models. Right click on Dreamland Models and select "Create a Category From" then "Selected Folder and Sub-Folders". This will add a link to this set of folders under the category you just created.
3. Go back to the Categories label at far left and expand the tree: Categories/Dreamland/Dreamland Models. Right click on the last Dreamland Models and select Rename. Enter "Figures".
4. Repeat the above steps for Cameras, Materials, Poses, and Props. If you don't do the renaming step 3 each time, everything ends up mixed together since the subfolder structures are the same and it will be hard to find things.
Here's what I ended up with:
Adding Default Textures to River Front
When you first load the River Front set, you'll be surprised as there are no materials showing except for the skydome (remember, it's labeled Poser Only). That's easy to correct.
Here's how it looks when used the first time:
1. To add the default materials, first select Riverfront in the Scene tab. Then go to the Surfaces tab and select all the surfaces.
2. Next go to the Materials/River Scene/Defaults folder (here shown in the category I created in the previous post). Double click on the River Front icon.
Here's the same view with the default materials added. If you want, you can save this as a Materials preset so it loads with the materials.
Adding and Adjusting Default Textures for Low Poly Blocks
I have six of the nine Movie Sets: Low Poly Blocks. Blocks 6, 7, 8 and 9 load with materials; Blocks 3 and 4 do not.
This is easy to correct doing the same thing I explained in my last post: load the block (e.g., 3), select it in the Scene tab, select all the surfaces in the Surface tab, navigate to the right block folder (e.g., Materials/03 Low Poly Block Three) and click on the Default icon.
One thing I noticed is some of the surfaces are very bright. It turns out the Specular Strength is quite high (like walls at 100%). I suspect this means some Poser setting is not compatible with Daz material settings. I select all the surfaces and change the Specular Strength to something like 5% which takes care of the problem. I'll likely go back and fine tune some of the individual surfaces (such as the windows) as I learn more about using these sets.
Using and Adjusting the Camera Presets
The River Front set comes with a lot of cameras: 121 Free Form and 74 Street Navigation. The Street Navigation cameras are positioned along the periphery of each street. The Free Form cameras take you to all sorts of interesting spots - this is a great help as this set is so large it takes quite a while to move a camera by the usual means.
There are several problems using these cameras made for Poser in Daz Studio. There are ways to solve them, which I will cover in this post.
1. Here's a screenshot of some of the cameras in the Free Form folder. We'll use Camera 042.
2. Double click to load it. You will immediately see that the camera does not show what the Camera 042 preset images shows: the field of view is much narrower, the sky is different, and the horizon is missing distant mountains. This is true for all the cameras that come with the set (remember, its Poser only, so we are fixing it to work in Daz Studio).
3. Select the camera in the Scene tab (it will be listed as MAIN_CAMERA). Go to the Parameters tab and select Camera. You will see that the Focal Length is 95.07 (that's telephoto, a zoomed in focal length). Change the focal length to 45. Now it will show the same field of view as the preset.
4. OPTIONAL: The presets use the Summer Sky texture for the skydome. The set loads with the Fall Sky texture. You can leave it as is, but if you want to change it, here's how. First select the Skydome in the scene tab (found under the "river front" heading. Go to the surfaces tab and select the skydome surface. Click on the image in the left corner of the Diffuse Color setting. Browse to Runtime/Texture/Dreamland Models/River Scene and select Sky Summer.jpg.
5. OPTIONAL: The skydome is too low in Daz Studio compared to the camera presets. You can leave it as is, but if you want to change it, here's how. Go to the scene tab and select "river front" - do NOT select skydome as the parameters you need are associated with river front. Go to the Parameters tab and select Skydome. Then change Up Down parameter to 150.
Now the camera is giving you the same scene as you would expect from the preset:
6. So you don't have to do steps 3-5 all the time, you can save this view as a camera preset. I saved it as RF 042. You will find any presets you save in the Content Library under DAZ Studio Formats/My Library/Presets/Cameras. You can leave as is, or if you want to categorize it, right click and add it to the Dreamland category we created before (since there are already 121 Cameras in the Free Form camera folder, I created a new sub-category called My Free Form to hold the adjusted cameras.)
There's a big advantage to doing step 6. By default, Daz Studio replaces ALL cameras in the scene if you use a camera preset. You can avoid this by holding down the CTRL key as you click on the preset, but that does not work with these Poser camera presets (at least I couldn't figure it out). If you save and use your own presets, CTRL+click brings up a dialog which lets you choose to add the camera while keeping any others you have loaded in the scene, helpful for a big scene..
7. You can also save Material presets for the skydome materials so you don't have to repeat step 4. It's a similar process to saving a camera preset (step 6). After saving the preset, I just categorized them in the same folder as the original skydome material presets. Note that the original presets that come with River Front do not appear to work in Daz Studio, at least I haven't figured out how.
Using Pose Presets to Easily Move Props to New City Locations
Each block in River Land is 10,000 by 10,000. Most items load at world center, which is block 047. So to move a Low Poly Block or any prop to its desired location by dragging the X Translate or Z Translate sliders is very slow. You can type units into the X and Z Translate text boxes in multiples of 10,000 if you want to keep track of +/- direction and how many blocks you need to move, but there's two easier ways to do it. This post will talk about method one and the next will talk about method two.
One thing to do before you start trying to add and move things around the world is to print out the city block map which you can find in My DAZ 3D Library/ReadMe's as file 33107_river-front-wharf-layout.jpg. That way you know which block number you are at and where you want to target.
1. Load a prop, in this case I'm using Low Poly Block Three. It loads at world center which is block 046. Be sure it is selected before step 2.
2. Go to Poses/RiverScene/Move Block Locations. There you will find 101 icons labeled with the block number. One, 046, shows an X across it which is a reminder this is world center.
3. Double-click on your choice of block location, here I'm showing 001. The block instantly jumps to that location. Much easier than typing in numbers.
4. You can use the same poses to move other props. In this case, I loaded Steel Town Blast Furnace. It comes in at world center.
5. Select the furnace in the Scene tab and use pose 067 to move it across the river.
6. Since I want it on the wharf, I manually changed Z Translate by -10,000 and changed Y Rotate to 180 for it's final position.
Using Parameters to Move City Blocks
In my previous post I discussed moving props to new locations using the Move Block Location poses. A second way is to use a set of parameter dials found when using Dreamland Products Low Poly Blocks. It's not intuitively obvious how to use these so this will get you up to speed.
When you load a Low Poly Block (in this example Block 03) you'll find two descriptors in the Scene tab. One will read "Low Poly Three" and a second one will read "LowPolyThree". Note the difference is one contains spaces and one does not. If you look at the parameters for the object WITHOUT spaces, it has the usual parameters like translate, rotate, scale, etc. If you look at the parameters for the object WITH spaces, it has atypical ones: West East, North South, Tip, Tilt. See image below.
These two objects are not parented when they load, but I'm thinking they should be, as otherwise, the parameters have no obvious effect. So first thing I do is drag the one WITHOUT spaces on top of the one WITH spaces to create a parented pair.
Next select the object WITH spaces and go to the Parameters tab. You will see the parameters as shown above with the top two dials being duplicates (showing a (2) before the name and a value of <?>.) Don't use these. Instead, expand the selection on the left and select the "General" level as shown below. If you move the top two sliders,the poly block move in large increments, which helps you quickly move a block from one end of the city to the other. If these were the typical X and Z translate dials, you'd find it near impossible to move the blocks that far by sliding the parameter dial. Because you are dragging and not typing in values, you'll find the city block needs fine tuning so it doesn't end up sitting on the road or sidewalk.
Tip and tilt work to change the orientation of the block. The sliders don't change the values very quickly, so you won't easily detect any change, but if you type in say 45, the buildings will tilt or tip that amount. Not sure why you would do that but it may help in some circumstances.
There are several other parameter in the hierarchy: Align to Camera (turn), Local Limits (WE, NS), and Transform (turn). These must do something in Poser but they don't appear to do anything in Daz Studio. I'll continue to study them to see if I can figure them out but if anyone understands how they work or should work in DS, let me know. EDIT: I figured it out and made a post below that explains how to get it functioning.
To sum up, this alternative way to move the blocks is slower and clumsier than using the Move Block Location poses and the Y-rotate dial on the prop, so I don't expect to use this method much at all.
Skydome Skies and Parameters
River Front loads with the Sky Fall texture on the skydome. The material presets that come with the set were made for Poser and do not appear to work in Daz Studio. You can load the other textures via the Surfaces tab and make your own material presets as discussed below. The pose controls do work and that's also discussed below.
MATERIAL PRESETS:
1. Select the Skydome in the scene tab (found under the "river front" heading. Go to the surfaces tab and select the skydome surface. Click on the image in the left corner of the Diffuse Color setting. Browse to Runtime/Texture/Dreamland Models/River Scene and select Sky Summer.jpg or Sky Winter.jpg.
2. Save a Material presets from the File menu File/Save As/Material Preset. You will find any presets you save in the Content Library under DAZ Studio Formats/My Library/Presets/Materials. You can leave as is, or if you want to categorize it, right click and add it to the Dreamland categories we created before. I put them in the same category folder with the original skydome material presets.
3. The River Front set comes with 3 sky images. But you can use others that you have in your runtime. For example, I tried one from FirstBastion.
SKYDOME CONTROLS:
1. The skydome has three parameter dials. To get to them, go to the scene tab and select "river front". Do NOT select skydome as the parameters you need are not there.
2. Go to the Parameters tab and select Skydome.
3. Turn is the same as rotate. It's hard to use as the limits are set at +/- 7200. You can change it by clicking on the gear icon in the upper right, select Parameter Settings, and change the value to 360. Now it will rotate at a speed slow enough to adjust. OPTIONAL: I also set the Nudge value to 15, so that if I click on the - or + on the parameter icon, it takes bigger steps.
4. Height stretches the image map vertically.
5. Up Down is very useful as the skydome when it comes into Daz Studio does not display the distant mountains in the image. I think they add a lot of visual interest and create the felling of a bigger scene, so I adjust this value to about 125. One watchout: at least one of the images has a tree that will appear, massively out of scale, so don't raise it too high.
Thanks alot for sharing these great tips. I have quite a few of the dreamland products from Rendo but haven't played with them in DAZ yet.
Glad they can be of help. I'm learning a lot myself about Daz Studio as I'm doing this.
How to Fix Non-Functioning Parameter Dials (e.g., turn a city block)
I've mentioned in at least one of my previous posts that some of the parameters made for Poser don't work in Daz Studio. I haven't ever tried to edit a parameter before, but did track down how to do so, which I will share here. Although I only talk about one specific parameter, I expect the same procedure will work for others you may find not functioning (in this or other Poser products).
1. To begin, load a Low Poly Block (in this example Block 03). You'll find two descriptors in the Scene tab: one will read "Low Poly Three" and a second will read "LowPolyThree". Note the difference is one contains spaces and one does not. Drag the label WITHOUT spaces on top of the one WITH spaces to create a parented pair as shown on the right image below.
2. Next, select the object WITH spaces and go to the Parameters tab. Expand the selection on the left and choose the "Align to Camera" label as shown below. You will find that the turn parameter dial on the right does not appear to work.
3. Left click on the gear icon. This will bring up the Parameter Settings dialog. You will see that there are no sub-components listed. Click Cancel.
4. Right click on the word "turn" in the paremeter box and choose "Edit Mode". You'll know you are in edit mode when you see a segmented square around a P (see image below).
5. Next right click on the gear icon and select "ERC Freeze". That will bring up the ERC Freeze Options dialog box.
6. Check the "Attenuate" box. Click on the Node button and select Low Poly Three. Click on the Property box and pick YRotate (turn). Click on the Accept button. To see what changed, repeat step 5 and the dialog box will now show the Property YRotate (see below).
7. Now left click on the gear icon. Note that you are still in edit mode. This will bring up the Parameter Settings dialog. You will see that there is now a sub-component listed.
8. I made several changes to the settings. First, the colors switched to black for some reason. I made them a dark gray (140) but you can pick whatever colors you'd like. Second, I changed the Min and Max to -180 and 180. This means sliding the parameter dial slider from one end to the other will do one complete turn. Third, I set Nudge at 90. This means each time I click on the - and + icons on the parameter dial I'll move the building 90 degrees. Click on the Accept button.
9. Right click on the word "turn" and choose "Edit Mode". That will turn it off and you are in business with a functioning turn parameter dial.
Using the Power Poles
Part A: Adding the Default Materials
Just about all cities since the early 1900's have power and telephone lines running through them. River Front comes with a figure composed of 8 poles and adjoining wires. This post is the first of two parts dealing with the power poles: this Part A deals with adding the default materials and Part B deals with creating a city full of poles.
1. First you need to load the poles. I have them categorized in the Content Library under Dreamland/Figures/River Scene. They come in at world center, block 046. There are two items that load but they are not parented; drag the branch labeled 81PowerPoles on top of power poles to create the parent. The materials are missing so the power poles will render white.
2. Next, in the Scene tab, expand 81Power Poles and select the sub-branch Poles. Find the default materials, in my case categorized in the Content Library under Dreamland/Materials/River Scene/Defaults. Double-click on Defaults and most of the materials will load. Some of the power cables though will still render white.
3. The cables labeled PowerLinesN, S, W and E have an acceptable material on them. Select one of them in the Scene tab, go to the Surfaces tab, select PowerCable (you may need to expand PowerLines to find it), left click on the icon with multiple horizontal lines at the upper right of the Surface pane, and choose Copy Selected Surface(s). Next go back to the scene tab , select Poles (under 81 PowerPoles), select PowerCables in the Surface pane, click on the upper right icon again, and choose Paste to Selected Surface(s). Now all the cables and poles have useable materials. You could adjust the insulator which is still showing white, but in most scenes it's quite small so I left it alone. If you want to tone it done, reduce Specular Strength from 100% to something like 15-20%.
The next post will cover Part B, filling the city with poles.
Using the Power Poles
Part B: Making a City Full of Poles
This post is the second of two dealing with power poles: Part A deals with adding the default materials and this Part B deals with creating a city full of poles.
If you followed the steps in part A, you have one set of textured poles and wires at world center, block 046. To quickly populate the city, I used instances, which creates a copy of the original object in a memory-efficient manner. All the instances (children) share the parent's geometry, materials, and poses. However, you can translate, rotate, scale, and hide instances individually.
1. Select the parent pole as shown below.
2. Click on menu Create/New Node Instances (note the plural) and type 101 when the dialog box appears.
3. I'm not entirely sure this is needed, but I broke apart the instances group. Click on menu Edit/Object/Instances/Break Apart Instance Group. The scene tab will look something like this:
4. Go to the River Front poses (in my installation, it's under Categories/Dreamland/Poses/River Scene/Move Bock Locations. There are 101 icons relating to each block in the city.
5. Select Poles_Inst_1 and click on Move Block Locations icon 001. That instance will move to block 001 in the far corner of the city. Repeat for Ins_2, Inst_3, etc. until Inst_100.
6. Change the name of Poles_Inst_0 to Poles_Inst_101. Drag this branch on top of the branch Instances Group. It will pop to the end of the list. Click on Move Block Locations icon 101. You now have 101 poles spread across the city.
7. If needed, you can turn individual instances on and off by clicking on the eye icon in the Scene tab.
8. To keep this for future use, I saved it as a Scene Subset, keeping only the poles and instances and not the rest of the River Front set (ground, trees, skydome, etc.). Then it can be merged into any of your scenes.
There is also a Road Signs figure. You can replicate it to fill the 101 blocks by following these same instructions. Note that the Low Poly Blocks already come with road signs, so watch for duplication.
Very thorough - appreciate your sharing these tips & methods! - Ray
Thanks Ray, more to come.
Setting Up and Using the Weather Props
River Land comes with two Weather Props: Weather Away and Weather Close. They load as two small planes with a semi-transparent image. Weather Away shows vertical rain streaks and Weather Close has a fog/cloud pattern. I'm not sure how they are intended to work in Poser, so I'll explain how I'm using them.
1. Load both props from Dreamland/Props/River Scene. Adjust rotate parameters to zero. Adjust Down-Up to -176 for both and adjust Away-Towards to -485 for Weather Close and to -423 for Weather Away.
3. Create a new camera from menu and select Default Settings. Set X Translate to 0, Y to 176, Z to 156. Set all rotate parameters to zero. It's helpful to rename the camera to Weather Cam. Set camera Focal Length to 53 and Focal Distance to 720.
4. In the Scene tab, drag the Weather Away and Weather Close labels on top of the new camera to parent them. This will make the weather props move along with the weather camera. Go to Front View and you'll see that the weather props are just slightly bigger than the camera's view. I also show another view of what the setup looks like.
5. Save as a Scene Subset and you can merge it into any scene. Remember that if you add one of the camera presets from River Land, it will replace all cameras in the scene. In that case, if you already had loaded the weather cam, it will disappear. The best way to add the weather cam is to first set a camera to the view you want, select it in the scene tab and type Ctrl+C, merge in the weather cam scene subset, select the camera in the scene tab and type Ctrl+V. Now the weather cam has the same view as the original camera, although you may need to adjust focal length to match.
Some examples of the weather props in use. You can rotate and scale the weather images as needed; for example, to have rain at a diagonal instead of vertical. Click on the images for a bigger view.
6. River Land comes with several rain and fog textures. You can find them in My DAZ 3D Library/Runtime/Textures/Dreamland Models/River Scene. To change the image, use the surface tool to select the prop, go to the Surfaces Tab and change the image in the Diffuse Color and Opacity channels.
7. River Land also comes with several lightning textures. You can use alone or you can do as I did, use LIE to add it to a fog image. To do so, go to Diffuse Color in the Surfaces tab, left-click on the small image icon and select Layered Image Editor from the list. The editor dialog will appear
8. Click on the + icon at right center, choose Add Layer, and a new layer will appear. Click on the New Layer name, click on Resource and browse to the lightning images in My DAZ 3D Library/Runtime/Textures/Dreamland Models/River Scene. Choose one. Change Blend Mode to Additive Blend and you'll see the lightning superimposed over the cloud layer. Change scale and position as needed.
Some examples of the weather prop with lightning in use:
Adding Dirt Using the LIE Editor
Some may find the textures of the low-poly blocks to be too clean, not showing any dirt. I'm not overly familiar with modifying surfaces in Daz Studio but I know enough to be able to add some grime to an object. Here's how I did it:
1. I created a geometry shell by selecting the object in the Scene tab and clicking on menu Create/New Geometry Shell. This forms a duplicate surface offset by 0.1 units (which is the default, you can change the offset to whatever amount you want).
2. The shell will be parented to the object. When asked for a name, I added a number that corresponded to the block it was attached to (e.g., Low Poly 7 has Geometry Shell 7).
3. You add the grime to the shell, and can then turn the full shell (i.e., the dirt) on and off at will by clicking on the eye icon in the Scene tab. You can also turn off parts of the shell using the Parameters tab. Each defined surface in the object (e.g., wall 12) has it's own switch. That way you can make part of an object dirty while keeping another part clean (e.g., on low-poly block 8, there's a sign with cutout letters - a grime layer is seen in midair if you don't turn it off for the sign).
4. Select the shell with the Surface tool. Add a grunge shader if you have one or create your own. I did the latter. Left-click on the image icon at the left side of the Opacity Strength setting found on the Surfaces tab. Select Layered Image Editor from the list. The editor dialog will appear.
5. Click on the + icon at right center, choose Add Layer, and a new layer will appear. Click on the New Layer name, click on Resource and browse to a suitable image in My DAZ 3D Library/Runtime/Textures/artistnames. I chose an image from a FirstBastion set called mist2side-alpha.jpg as it had a cloudy appearance. Note: there is an order of precedence in the LIE editor. If the images are of different sizes, pick the bigger one first, otherwise it will be cropped to the size of the smaller image.
6. Next, click on the + icon a second time and choose Add Layer. Click on the New Layer name, click on Resource and browse to another suitable image. This time I chose an image a Stonemason set called U3 Glass Rough 2.jpg as it has a lot of vertical streaks. It is 1/4 the size of the first image, so change it's x and y scale to 400%. Change Blend Mode to Additive Blend and you'll see the two images mixed together. On the Surfaces tab, set Opacity Strength to 100% and set Diffuse Color to something dark.
7. The image below shows a 3DL render: the upper buildings are as the default materials load while the lower buildings show the dirt applied. Click on the image for a larger size. The effect is subtle but discernible using the images I chose.
8. You can vary the Diffuse Color to get different effects. Use black for soot, something light for dust, and something yellowish for clay-colored dirt. In the image below, the top row is default materials (no dirt), the second row is black soot, the third is white dust (see it especially on the red brick), and the bottom row is clay.
Make It Dirtier
In the previous post I discussed using the Layered Image Editor (LIE) to add a dirt texture to a geometry shell. The texture was based on two images that I picked from my Runtime texture folders. The result was a subtle but discernible layer of grime. In this post I'll explain how to make the dirt effect more intense.
1. The images I used in LIE were grayscale images with mid-tone values, not a full range of black to white. I took a copy of each image into GIMP (a Photoshop clone) and used Color/Auto/Normalize to expand the values to fill the space from full black to full white. What this does is give you a wide range of opacities to work with.
2. I used the two modified images back in the LIE editor (see steps 4-6 in the previous post for directions). Because they have more intense values that are added together, I reduced the opacity of each layer down to 80%. If I were doing a finished render instead of a tutorial, I would probably use something even lower like 50%. You want variation in the dirt, not large areas of solid color.
3. In the comparison I showed at the end of the previous post, you can see some tiling along the red brick windows. To minimize the tiling, I reduced the Horizontal and Vertical Tiles values in the Surfaces tab from 1.0 down to 0.1.
4. Here is the result. As you can see, the dirt layers are more intense (too much so for the white dust layer) than in the comparison I showed at the end of the previous post. (Click on images to see larger versions.)
Add a Park with D-Formers
River Land gives a nice grid of city streets but you may find it a bit flat compared to a real city. You may also find you don't have enough content to fully fill the city, leaving a string of empty blocks like a suburban housing development being built. In this post I will explain how to add a park using a cube and a D-former. I will then use that same cube to fill up a few blocks to remove the streets.
1. Add a cube by clicking on menu Create/New Primitive. I used a size of 275 ft to fill the space of one city block between the sidewalks. I used divisions of 20; you want enough divisions so you can distort the shape.
2. Change the Y Scale of the cube to about 8%. Change Y Translate to lower the cube so the top surface is just barely above the existing grass surface.
3. With the cube selected, click on menu Create/New D-former and give it a name. In the Scene tab, you will find it as three parts attached to the cube: D-Former_name Base, D-Former_name, and D-Former_name Field.
4. Select D-Former_name and set Y Translate at 900. The higher the D-Former is located, the more distortion of the mesh in the direction of the D-Former. You will find that the top surface of the cube now has a big bump.
5. Select the Field in the Scene tab, go to the Parameters tab and click on the Influence label, then change the Influence Mode to Weight Map. You will have seen the mesh distort in step 4 when you moved the D-Former. When you select Weight Map, you will see the mesh snap back to a flat surface because you have yet to create the weight map.
6. Go to the Tools Settings tab. click on the Active Tool drop down box and pick Node Weight Map Brush. A new dialog will appear in the Tools Setting tab.
7. Make sure the label Weight Maps is highlighted (half way down the tab) and click on Add Map. You'll now see red and blue colors appear on the cube's surface and the cube's top will be arched again like in step 4.
8. Paint with the brush and you will add hills to the surface. Hold down ALT key while painting and you will create valleys among the hills (but the valleys won't extend below the original cube's height. You'll need a second D-former to make a lake).
9. The brush can make for some sharp transitions. You can smooth them by selecting the brush near the top of the Tool Settings tab that has a small S (for smoothing) next to it. Run the smoothing brush along the edge near the sidewalks while holding down the ALT key and you will flatten the terrain so it matches up with the level of the sidewalk. To paint more hills, go back to the brush with the small P. The combination of brush strokes and D-Former height (step 4) will determine how high the hills go.
10. Add the same grass texture as found in River Front. You'll need to change Horizontal and Vertical Tiles in the Surfaces tab to something like 20 to match the tiling. Add some trees and your citizens now have some green space to enjoy on a sunny day. Add a second deformer to lower some of the terrain, insert a small plane and you now have a park lake.
11. Select the same cube, change its scale to about 218% to cover 4 city blocks, and adjust the Y Translate to lower the cube. You'll likely want to lower the D-Former to keep the hills in scale to the buildings. You'll need to increase Horizontal and Vertical Tiles in the Surfaces tab to something like 40 to match the tiling.
Please keep going as I am learning about Daz Studio. :-)
Almost ready to start with Daz Studio versions of my products.
Awesome program in my opinion.
Thanks for your passion!
I can see there is a huge need for me to figure out a Daz version of my grasses as the grass covers a huge amount of my products.
Here is what one style of the grass should look like, from a Poser test render for Movie Sets: City Block One, the Poser version.
Notice there is no tiling like the straight applied grass texture you see in your renders.
If you can come up with a similar grass shader that I can tweak in the Shader Mixer that would be very cool...
Tom
That's good news! I'm looking forward to those coming out.
I'm not overly familiar with shader manipulation but I will test out the various grass shaders I own. I really like the grass you show in your image. One problem with materials for Daz Studio is the fact that many people are using Iray only for renders while others are still using 3Delight (or like me, both). Some 3DL materials work well with just the Iray Uber Base shader added but others, especially those that use displacement, don't translate well. Ideally you'd have a product that works equally well for both render engines.
Two people who comment in the forums that seem to know a lot about shaders are Mec4D who has released merchant resource shaders and may be collaborating with some PA's and timmens.williams who has some free Iray shaders (link in his post signature) but also does a lot of art in 3DL (see his Tips thread).
There's also a recent script product called Ultrascatter that is being used by PA's and us regular folks to scatter vegetation and prop instances around a scene. It has a lot of settings that can restrict where and how things scatter. I'm going to be testing that on the River Land product soon to place people, debris, trees, etc.
Such a great thread! I wasn't sure if the weather stuff from the River set would work in DS so I held off getting that one. I was thinking of getting the City Blocks instead. After seeing what you've been doing, I might end up getting both. I've learned a lot while visiting here, too. :)
Really nice work on the park Rich! Although just skimming through the instructions, instead of doing anything with weight mapping, when I tinkered with terrain d-formers, I just created the first morph and choose not to delete it, then simply moved the field of the d-former (and can't remember exactly, think I moved the base too) and then created another morph, rinse, repeat. Goes very quickly.
This really is a great thread!
Tom
Good to hear! That's why I've been documenting what I've been doing. It even helps me; I've already gone back to a section or two to see "how did I do that?"
Yes, that's a good way to do it and for some people it will be easier to manage. I like the weight maps as you can do more fine tuning as you gain mastery with it. And you can combine the two as I did to make the lake.
Thanks Tom!
Testing Grass Shaders for River Front
Tom raised the issue of grass showing tiling marks in Daz Studio. It gets magnified when you have a large area to cover like one of the blocks or all the blocks in River Land. Even with seamless tiles that match up on the edges, you'll find repetitive patterns that catch the eye. I don't have an abundance of grass shaders but I tested those I have. Note these are all 3DL, I haven't started to take a look at Iray yet. For better comparisons, click on the images and you'll get larger versions.
1. This is the default grass that comes with River Land at a distance and up close. I picked a camera angle that emphasizes the pattern.
2. A quick way I found to reduce (but not eliminate) patterning was to use new images from Grass Collection Merchant Resource - Vol1 (PBR Textures). There are 10 different grass texture images. Each texture has Albedo, Ambient Occlusion, Diffuse, Displacement, Normal, and Specular versions. I selected the grass using the Surface tool and replaced the Diffuse Strength and Bump Strength maps with those from this pack. It took a bit of time to find them as they are not in the texture folder but are rather installed in My DAZ 3D Library/General/iSource Textures/Grass Collection - Vol1. The images show what it looks like after just replacing the two maps. You'll still see some patterning but not as intensely as with the default materials.
3. Seaside Shore Shaders have some grassy textures. They use what is called world space mapping. From a distance, they give a very smooth look. Up close, you can see some patterning. This used shader AWSP17. It renders very bright when loaded - I found you need to change the color on the surface setting (6): Image from white to a mid-tone gray.
4. Shades Of Life - Nature has 10 grassy shaders. Most show fairly severe patterning but I found Grass 9 (shown below) had tight patterning so was not as bad. Other shader sets such as Woodland Floors, Primp My Prop, JG Nature Shaders, and Ground Shaders all suffer from severe patterning that I could not easily rectify.
5. AoA Grass Shader for DAZ Studio has always been well-liked for 3DL grass. It has a pattern but not from tiling; rather, it comes from multiple grass colors. It also uses displacement, so up close you can see grass height and clumping variation.
I found the AoA shader renders way too bright when loaded, so bright I uninstalled and reinstalled it thinking Daz 4.9 might be messing with it. The usual surface settings didn't affect the brightness but I found that if you made all the grass colors darker it would tone down the intensity. If you increase Color Variation Frequency from 5% to 38% you remove the more intense color patches. Both effects are shown below:
Here's the default grass vs. the last AoA grass shader settings. Click on images for larger versions. There's one extra step to take when using the AoA grass shader as it will grow grass right through the concrete sidewalks of the low-poly block. To prevent this, in the Scene tab select RiverFront/Property/101 Blocks Container and turn off the eye for the block (in this case, Block 046).
Using Other Sets with River Front - 1: Houses and a Church
River Front gives you an extensive city layout which needs content to fill. I'm going through my product library and testing out other structures and sets to see how they look. Check back to this post as I'll be adding images periodically. Click on images for larger views.
Collective3d Modern Home Deluxe 1: I used the house and fence. One original and 4 instances. I deleted the interior walls and props which cut the number of polygons in half. There's also a garage along with grass/sidewalk/driveway/street edge. If you use the lot, you'll find that five instances don't quite fill a block in River Front and six are too many. The curb cuts and roads also interfere with each other. When I get a chance, I may try to see what modifications can be done for smoother integration.
Here's Merlin's The Church. Fits right in.
Fill 'Er Up!
I've been wanting to fill up the 101 blocks of River Front to see what impression it makes, so I did a scene where I made 16 instances each of the 6 low-poly blocks I own. I manually scattered them about by moving them with the River Front Move Block Location poses. I then rotated various blocks to change which side of the block would be seen. Here is the result. Even though there's a lot of objects in the scene, it was still quick to rotate and adjust the camera in the viewport and fast to render (3DL). Click on the image for a larger view.
This shows mostly commercial-type businesses, I'll have to try a scene with different districts as I identify what other products work well with RF.
Using Other Sets with River Front - 2: More Houses
Here's Stonemason's The Streets Of NYC Townhouse Row. There's two different buildings and I added two instances of each. They could use a little work at the front step to get rid of the grass between the bottom step and the sidewalk. A simple plane added with a copy of the sidewalk texture should work. These buildings have no interiors, so theyaren't resource intensive. Click on image for larger render.
Since my first experience with Collective3D buildings worked well, I picked up some more homes in the catch-up sale this weekend. Here's the Modern Home Deluxe 1, Modern Home Exterior 1, and Neighborhood Ranch House 1. I made a set of all three, then created 3 more instances to fill in the block. The latter two have no interiors, so no need to delete interior walls to reduce the polygon count. Click on image for larger render.
I hate to interrupt this thread with just a comment, but this thread/contribution kicks-butt!
I own most of the DreamLand world, so this information is simply priceless!
Thanks and WOW on the full-scene sample and the kit-bashing/mixing renders. Very inspiring!
cheers,
--ms
I really like seeing you populate all of those blocks with other sets to fill in while we patiently collect all of the blocks! I actually have some of those sets so I'm going to have to see what I can do. I really like your idea of using instancing for some of those houses! Brilliant!