Geo Grafting
 Marmalade Boy
Posts: 103
Marmalade Boy
Posts: 103
Hi There,
I have searched the forum and the internet for any information about Geg-Grafting but could find nothing of substance, save a tutorial by Hiro Protagonist. The tutorial was simple and I was able to reproduce the results. However, I wanted to try it on a larger scale. I did everything I did before but I can't get the stupid polygon faces to attach to the body.
I painstakingly made sure that the perimeter (the edge loop of faces) match those on the genesis figure. I put about 3 to 4 hours into this on Thanksgiving Day and I would like to see this project through. Could it possibly be because I am trying to do this on a morph? When I followed the tutorial, I used the base genesis figure (un-morphed). I exported the figure at the lowest subdivision.
Any assistance will be greatly appreciated.
Daz 3D is part of 
Connect
DAZ Productions, Inc.
224 S 200 W, Suite #250
Salt Lake City, UT 84101
Licensing Agreement | Terms of Service | Privacy Policy | EULA
© 2024 Daz Productions Inc. All Rights Reserved.
Comments
The GeoGraft has to match up with a zeroed Genesis - if this is for use only with the morph, you could try doing a fairly basic match up with the zeroed figure (as long as the border vertices match) and then load the original mesh as a morph to go with the body morph - as long as there's no scaling involved that should give the desired result.
Hi Richard,
Thank you for your response, I spent an hour and tried the same thing with the base/zeroed figure...to no avail. This is my workflow.
1. Export the Genesis figure, zeroed in the lowest subdivision as .OBJ for editing in Maya.
2. Cut and position the mesh where I want it using the tools in Maya (I am well versed in Maya) making sure to match the boards on the figure.
3. Reposition the arm mesh back to is original position and export back to Daz and rig using Transfer Utility with fit to source figure unchecked
4. Once rigging is completed, position the arm where I want it, select the perimeter faces on Genesis, click on polygon assignment set graph faces for fitted figure.
5. Select the arm and fit to genesis.
The hand jumps back up to the same position as the Genesis hand and I can't move it back down. Additionally, perimeter faces are not attached.
Admittedly, when I did the tutorial I mentioned, I used a horn which was attached to the head. This is an arm that needs to be moved down. I know for a fact that I am doing something wrong but I can't work out what it is.
Given the above workflow, can you advise what it is I am doing wrong? Perhaps I am doing everything wrong.
The mesh has to line up with the zeroed figure in its zeroed state - you can't reposition it to line it up I'm afraid.
Huh….that would explain why the horns worked but the arms didn’t. Is Geo-Grafting only for thing like horns (such as the below), tails, and other thing on the boys that don’t require you to reposition it?
I suppose I could always export both the hand & the body using Collada format, attach the mesh and parent the joints in Maya. It will be more work but I can’t see a workaround.
Many thanks for your responses.
I don't see why it shouldn't be grafting if the arm when imported into DAZ is in the right position and the faces line up exactly with zeroed Genesis. It should be a "dumb" obj at this point with no rigging. When converted to a figure prior to grafting it will be given a hip bone only, so you will have to completely rig it as an arm once you have it grafted.
Encouraging news!
Thanks Hero, you were correct. It was my workflow that was the issue. I was moving the arms up to the arm position to be rigged.
This time I imported it and left where it was and rigged it from there. Also, you must do this on the Default genesis figure.
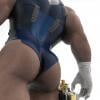
Below are my results. Notice the rig for the arms is are not in the correct place. i tried using adjust rigging to shape but it didn’t work. Any suggestions on how to handle this? I am all excited and fired up!
I haven't done any 'out of place' parts, so I'm not 100% sure, but I think you'll need to manually adjust the rig with the Joint Editor and adjust the weight maps....
Hi mjc1016,
Is that difficult to do? I have known about Daz for quite some time but I have only recently started using it. I downloaded the content creator tutorials from YouTube and tried following it but got lost with the weight mapping. I never liked weight mapping but got use to it in Maya. Never the less, I am dedicated to this project now. I guess I will give it another looksee.
I will work on it for an hour or so and post my results as I progress, that is…if I make any progress.
Anyone out there can explain weight mapping in DAZ to me in a dumb down way?
There is already a four-arms product using - it may be simpler to buy that, though you will probably need to create a new morph to make it match the rest of the body shape and you'll also need to create or modify a texture for it if you don't want the default. The bones for the additional arms, if you continue with your own project, do need to have unique names or they will be locked to the main arms as in your images.
Yes, I was looking at that product but I don't really like the look of it. Thanks for the tip about naming the bones; I wondered why it kept moving in tandem with the figure. I want to continue with this partly because it is forcing me to use certain tools/features in Daz that I would have never touched.
I was playing around with the joint editor tool last night; is it possible to manually copy and paste weight maps from one figure to another? Is there a mirror function for surfaces? I couldn’t find it, Daz has so many hidden functions that I am not sure I was looking in the right place.
Another thing that’s really annoying me is the adjust rigging to shape option. If I understand correctly, this option should snap the bones back into the body. I have used it with success before but do not seem to work now.
I think Adjust Rigging to Shape relies on the bones being inside the mesh to start with - are you trying to use it to snap the bones into the moved arms on your graft figure?
Your graft may have the same relative vertex order as the original figure, but by removing the other parts the absolute vertex numbers will be different - I think that will break any possibility of copying the weight map across from the base Genesis, though I'm not certain of that.
Correct, however, I have since learned that the bones being outside the body is not an issue. When the hands are fitted to the Genesis figure, the bones snap up to match the bones on the figure and actually works; I’m just not sure if it’s supposed to do that.
When I use Adjust Rigging to Shape, nothing appears to happen; if I then fit the hands to Genesis, I get a double transformation (the effect usually seen before the adjust rigging is applied). I tried renaming the joints as suggested but it did not allow the arms to be moved independently of the genesis figure.
The weight mapping remains problematic. I found out you can copy and pasted the weight maps but can’t figure out how to do it from one figure to another other. What I found in the Document Center can be found here. Nowhere does it state that it has to be on the same figure so I assume it can be copied from one figure to another.
As I am back to work tomorrow, I will have less time to work on this, perhaps an hour a day after work. I wonder if I manually rig the arms instead of using the transfer utility tool will make a difference. Thoughts…anyone?
Yes, you need to manually rig - changing the name after the fact changes only the label, if you are using the Scene pane, and that doesn't stop the arms from conforming to the original arms (since the names match) like a piece of clothing.
The manual rigging did not work for me. I wasted about 5 hours only to find out that the arms won't morph correctly when I change the figure shape. Not to mention there were a ton of weight maps to adjust. On the plus side, I have a MUCH better understanding about rigging and painting weight maps in Daz.
Today, I used the transfer utility tool to rig the extra arms in the original position. I then renamed all the Node Names (not the Node labels) of all the bones. This allowed me to move the arms independently from the Genesis body once it’s been fitted. Unfortunately, when I fit it to the figure, it will not rotate in any direction with the figure (if I moved the figure, the arms did not move). I was thinking of parenting the Hip, Abdomen, Abdomen 2, Chest, Neck, left and right collar and head bones of the arms, to the genesis figure. That would solve my rotations/movement problem.
What it all boils down to is, I got the stupid thing to work if I leave it in the original arm position that I rigged it in and only rename the bones in the arms starting with the shoulders down. The arms would be in the armpit of the original arms and not where I want them. I have to figure out a way to keep the movement and the independence of the arms.
The journey continues.
That's awesome thing you do here buddy. Mind making a tutorial for others to follow?