Luxus Skin Settings
 Slosh
Posts: 2,391
Slosh
Posts: 2,391
Edit: Added this link to ShareCG where my scene file is there for download to follow along with this thread. Previously, only Freak 5 owners could use the file, but I have updated it with Genesis Male instead so anyone can come to play!
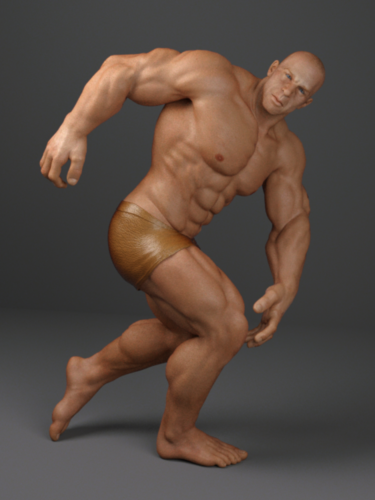
As promised a few days ago in other threads, here are the exact skin settings I used for the image shown below.
In my scene, I enclosed Freak in a primitive cube and used the 2 area light preset that came with Luxus. For each light I changed the strength in the surfaces tab. Area Light 1 was changed to 70%, Area light 2 was changed to 50%
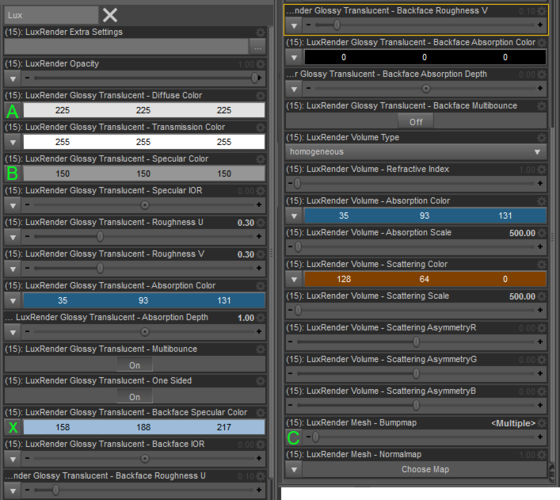
To apply the settings, first choose all of the head, torso and limb materials in Surfaces Pane, and convert them to LuxRender material: Glossy Translucent with Volume and Copy Studio Settings.
Then apply the attached settings to each material zone. Use the texture maps associated with each area.
A: is the head, torso, limbs texture. I used Andrei for F5 by Morris.
B: is the specular map
C: is the bump map
X: is also the specular map, but this section is not activated so you don't need to put a map in here, nor do you need to set the color. I had it set during my tests, but ended up not needing it. When I turned on "One Sided", this section became inactive. I just forgot to delete the map.
For rendering, I used Renderer:Sample with Sampler:LowDiscrepancy. This was a tip from czexarna to help reduce the sparkle effect you get with SSS and volumes. Cut my render time from 32 hours to only 1 hour. Let it render longer than 1 hour of course and it will get even better, but the image below was after just one hour.
In LuxRender, I used the Linear tone mapping settings. For Film ISO: 200, Shutter: 1/2, f-stop: 5.6. I also used Color Space: Adobe RGB 98 and the Preset Daylight. Gamma + Film Response was set to Advantix 200.
Hopefully, I have covered everything here. I posted a different render in the Luxus Discussion thread, which has slightly more realistic settings on David 5, since he is not an oiled up bodybuilder. I will be working on an in-depth tutorial for that image, explaining the various settings and what you can expect from each.
Enjoy! Post your renders in this thread. I would love to see what you come up with using these settings, tweaked to your liking or just as is.
Brian, aka Slosh
Daz 3D is part of 
Connect
DAZ Productions, Inc.
224 S 200 W, Suite #250
Salt Lake City, UT 84101
Licensing Agreement | Terms of Service | Privacy Policy | EULA
© 2024 Daz Productions Inc. All Rights Reserved.
Comments
Thank you very much, I haven't really known where to start.
Thank you Slosh, nice to see more of the settings as I've been chucking in random numbers trying to fill in the missing gaps that have'nt been posted. Although I've now got a nice selection of 'Alien coloured skins' and a nice blue avatar skin - sorta. hmm.
I guess some of the pros keep their cards close to their chest, as they've no doubt gone through many many hours to get to where they are.
Thanks again for sharing.
Well, as a new user myself I feel sharing is the best way for us to learn. I share with you, you say, "Hey, what about doing this?" or "I know a quicker, better, more realistic way." If I keep things to myself just so that I can get 1,000 atta-boys, then I have to continue figuring things out for myself because no one is going to want to share with me.
Now, this won't necessarily work perfectly for all characters. Freak is a tall, thick, muscley dude and these setting would look ridiculous on Aiko 5 or one of the teens. I used the Andrei textures by Morris, but if you don't have that character and use another texture instead, it may or may not look the same. I haven't tried it with another texture yet, except the Genesis Basic Male (Jeremy) texture. Also, texture resolution plays a big part. We are talking about a resolution difference of almost quadrupal. Jeremy maps are 1024x1024 and Andrei maps are 4000x4000. Makes a big difference.
Might have to try out your settings on Bruno's skin and see how it looks. Your render looks like a photo! Very nice!
Thanks! And I hope you will post the results in this thread so I can see how the settings work for other people.
Thanks for pointing out the sampler tip. I had actuallly given up on playing with skin shaders for a while because it took an hour or so to get anything like a decent preview. This should help.
Couple things I've noticed in my experiments and mining the Lux Manual
Specular IOR (Index of Refraction) is really important. It tells LuxRender how your surface reacts to light. IOR for skin is roughly about 1.4
Absorption Depth is set to 1.0 That's one meter deep. Probably more than you need. Lowering the depth might also require lowering the Scale to get similar results.
Glossy Translucent Absorption Color and Volume Absorption Color shouldn't be the same exact color. The first one is for light bouncing off the skin, the second for light penetrating the skin.
Take a look at this picture, too, which I used basically the same settings, but with minor tweaks to the absorption colors and the specular roughness/color. David has a lighter skin tone and is not oiled up like the Freak, so there had to be some modifications.
I don't disagree. In the case of Freak (above), keeping the GT and Volume Absorption colors the same gave a favorable effect. However that may be, in more realistic characters, like the one Iink to above, it is necessary to do as you have said. I have a couple more IOR settings that I found on the internet if anyone is interested. Also, keep in mind that if you use IOR, the specular color automatically gets treated as 50% gray so the color in that channel is irrelevant. The specular maps still have effect, so I would recommend using them regardless of whether you use IOR or not.
IOR for the human cornea is 1.376, or about 1.4. IOR for human hair is about 1.55, and for skin I found 1.45.
As for absorption depth, the Freak is a big guy and I treated him as such. Maybe not a meter thick, but pretty big just the same, hence the 1 as depth. In a later test, I tried .65 which also gave a more natural look. Don't remember what I used for David offhand, but it was not 1.
Please remember, folks, I was asked to provide settings in response to that particular image, which is exactly what I did. Keep in mind, I have experimented more since then, but at that time, those settings looked wonderful to me, so I shared them as is.
Keep the suggestions and comments coming. I sincerely welcome them and take no offense to any criticisms or suggestions that do not match what I did.
Unfortunately, this is what I get with the same settings. :down:
That is interesting. What texture set did you use? Also, how about lights and did you use a cube around the scene? What settings did you use in LuxRender? Linear, with the settings I indicated?
Really puzzled as to what is going on in your scene. I ran my original scene, but deleted all lights and the cube, so the only thing left in the scene was Freak and his boxer shorts. This is what I got after only 5 minutes...
Yeah, that's weird. I did everything. Even used the horrible Freak character as a last resource.
Well, thanks! Hope it work for others. :)
Confusing. I applied this same thing to Victoria 5, David 5, Hiro 5, all worked just as expected. Is there any chance your lights are intersecting the box?
I tried to send you my scene file via PM, but the attachments box apparently doesn't really work. I'd really like to see you be able to use the settings. Odd, my settings did not work for you and yours did not work for me.
thanks for this. I look forward to checking it out :)
I'll run a test and see what results I get. The discrepancy is just odd.
Biggest issue I've had with skin is trying to get better results than Luxus is getting auto-converting anything using UberSurface2. So far I haven't been able to do that on my own even after searching for clues through multiple .lxs files. I haven't spent a whole lot of time messing with the skin settings as I've been getting pretty good auto-conversions out of the box and most of my time has been concentrating on lights.
Here are a couple of very quick and very dirty test renders (I only ran them up to 10 S/p)
All settings are the same between all three tests. Texture set is elite Ariana
1st one is a Luxus auto-convert
2nd uses Slosh's settings as given above
3rd one is the best I've done on my own using a mix manually applied Luxus materials (Glossy Translucent, Volume, Copy DS settings) and info I've gleaned from auto-converted .lxs files
I'm not very happy with it but here are the values I used
LuxRender Glossy Translucent - Diffuse Color: 255-255-255 (Diffuse Map)
LuxRender Glossy Translucent - Transmission Color: 255-255-255
LuxRender Glossy Translucent - Specular Color: 143-176-186 (Specular Map)
LuxRender Glossy Translucent - Specular IOR: 1.4
LuxRender Glossy Translucent - Specular Roughness U: 0.8
LuxRender Glossy Translucent - Specular Roughness V: 0.8
LuxRender Glossy Translucent - Absorption Color: 0-0-0
LuxRender Glossy Translucent - Absorption Depth: 0
LuxRender Glossy Translucent - Multibounce: On
LuxRender Glossy Translucent - One Sided: On
LuxRender Volume Type: Homogenous
LuxRender Volume - Refractive Index: 1.3
LuxRender Volume - Absorption Color: 23-123-255
LuxRender Volume - Absorption Scale: 2250
LuxRender Volume - Scattering Color: 64-52-45
LuxRender Volume - Scattering Scale: 4
LuxRender Mesh - Bumpmap: 1 (Bump Map)
4th pic is a finished render using Luxus auto-conversions (same as in #1 except film response is different) 525S/p
This is what I have after a few minutes. -scratches head-
This is just crazy! I can't understand how NO ONE has been able to duplicate my results. Just as a suggestion, can someone try it where you reduce the Glossy-Translucent Absorption scale to 0.6 and the Volume Absorption and Volume Scatter to 100? I have used this adjustment with some of my less "Freaky" models and it gleans better results.
Otherwise, or additionally, I am going to post my scene file to ShareCG. Go ahead and download it and give it a try. Just make sure that you make the adjustments to the Tone Mapping area in LuxRender. I already have permission to share the scene file since it only references items that should already be in your runtime. If you don't have Andrei for Freak 5, DS will ask you to search for the textures. Just choose a texture in your runtime as a replacement. Also, if you don't have Freak 5, it won't work.
Eagerly awaiting updates....
Here is the link to the scene file: Luxus Skin by Slosh at ShareCG.
The problem is clearly with my PC. I couldn't recreate Hellboy's python guy results, and I had really bad results using InaneGlory's settings. In each case, I got horribly pale, dry skin and really big displacement and bump. I wonder what is different about my computer? I installed the No OpenCL version of LuxRender because my video card is inferior. What do the rest of you have?
Below is my results using InaneGlory's custom settings. I do see some problem, IG, with your settings that could help. Mainly, the use of pure white and pure black in your diffuse channel and your Glossy-Trans absorption. You will get a more fleshy appearance if you use the absorption setting. Try a medium blue, or slightly darker but not lighter. Lighter colors render darker and vice versa. What I do is pick a flesh color that I like, say 255:203:170 and I subtract each value from 255. So, I would use 0:152:185 as my absorption color. The Abs. depth should be realistic to the size of your figure. Like stated before in this thread, the scale goes 1 = 1 meter, or 3 feet. The body is approximately 1/3 of that size, plus a little more. So, setting the scale to around .34 or .38 will do nicely. As for anything you want to use white for (like your diffuse channel) just lower it a bit, like maybe 225:225:225. This will still keep your texture map colors, but will keep them from blowing out and being too bright when the lights hit. Lastly, Your scattering scale is way to low in relation to your absorption scale in the volume settings. The scattering color should be something redder, since this is the color that will scatter below the skin and is usually reddish because of the blood and muscles under your skin. If you make these adjustments, I think you will see better results.
Oh yeah, and your bump setting is way to high. Try something more along the lines of .002.
I re-rendered the previous image with InaneGlory's settings, but tweaked them with the suggestions I gave. Here are the actual values I changed and the reasons for it.
LuxRender Glossy Translucent - Diffuse Color: 255-255-255 (Diffuse Map)
(I changed to 225:225:225)
LuxRender Glossy Translucent - Transmission Color: 255-255-255
LuxRender Glossy Translucent - Specular Color: 143-176-186 (Specular Map)
LuxRender Glossy Translucent - Specular IOR: 1.4
(changed to 1.45, more accurate for skin)
LuxRender Glossy Translucent - Specular Roughness U: 0.8
(changed to 0.4, to make shinier)
LuxRender Glossy Translucent - Specular Roughness V: 0.8
(changed to 0.4, to make shinier)
LuxRender Glossy Translucent - Absorption Color: 0-0-0
(changed to 0:50:71 for fleshier color. Yours was actually orange)
LuxRender Glossy Translucent - Absorption Depth: 0
(changed to 0.38)
LuxRender Glossy Translucent - Multibounce: On
LuxRender Glossy Translucent - One Sided: On
LuxRender Volume Type: Homogenous
LuxRender Volume - Refractive Index: 1.3
(changed to 1.45 for human skin)
LuxRender Volume - Absorption Color: 23-123-255
(changed to 23:94:122, a fleshier color)
LuxRender Volume - Absorption Scale: 2250
(left the same)
LuxRender Volume - Scattering Color: 64-52-45
(changed to 128:64:0, which is redder, but still brown)
LuxRender Volume - Scattering Scale: 4
(changed to 100 to penetrate deeper into the large volume of 2250)
LuxRender Mesh - Bumpmap: 1 (Bump Map)
(changed to .002, Lux overdoes the transferred bump)
I feel a little odd about offering suggestions now, since it seems obvious that what clearly works for me, clearly does not work for ANYONE else. I don't know what to say. Maybe we can all discover it here, together. I will have to rethink my suggestions.
I don't suppose anyone else who has posted here would like to send me their scene file, so I can see what their settings look like on my pc? I have all of the Gen5 figures and most of the textures that came with the bundles. I truly hope someone will take me up on it. I will give you my personal email address if you PM me and you can send me your scene files.
Couple of things I've found from my experiments:
Try darkening the diffuse to about [200 200 200] or [160 180 200] depending how pink the skin is - the glossy translucent material is energy conservative, so only lets through what doesn't bounce off from specular and diffuse - and put the diffuse map in the translucent channel too.
Specular roughness needs to be 0.3-0.6 usually - 0.8 is heading to 'super matte' regions.
Volume absorption colour component of 255 means theres no absorption of that component - dropping it to 250 will put some absorption in.
Absorption scale - try values around 250-500, similar for scattering scale.
Scattering colour - a good red/orange has worked for me, again it depends on the skin map colours to some extent. Maybe [255 200 150]
Bump scale - as Slosh notes, this is in meters so a value of about 1-2mm is what's needed.
Hope this helps some ...
Currently testing out some of these settings, mucho thanks Slosh. Just a side note it explains on the LUX wiki that you should use a multi volume integrator not single for heavy scattering.
Thanks, Michael. I do have multi volume selected on my setup, hopefully the others do as well. Maybe we will find that to be the culprit in this mystery!
Edit: Nope. Just tried changing to "single" and it still renders the same for me.
This is what im working on right now, the texture seams are bugging the crap out of me.
This is probably a noob question, but since messing with lux glossy transparent settings, I've lost the UV skin/eyebrows. I'm just using skinface as a test area.
Originally I had a glass2 geoshell with the opacity turned right down, but since I've tried messing with the Genesis skin settings, my foot has gotten a lot closer to the monitor - arghhh.
Don't know if you already know this Michael_G, But Sperical suggested to me in another thread to put subdivision up to 2, with regards to seams.
All I've produced so far using a mixture of suggested settings is:
According to that explanation, although they very technically do different things -- reflected versus absorbed/passed-through light, although both address it in terms of what gets absorbed -- they seem to require the same settings.
Most likely your glossy translucent absorption scale is too high. If you go too high, it's like the translucent part (I think of it as an epidermis over your texture) is so thick, you can't see the details underneath. Like coating it with wax. try lowering it to somewhere between .3 and .4. I've gone as high as .7, which gives a very deep tan to my characters.
Do you have displacement activated? I've run into the problem where the edges of the texture get displaced, especially if the original .jpg is surrounded by white. Either lower the displacement or perhaps modify the .jpg to bleed the skin color outside of the borders or replace the white entirely with flesh tones.
Do you have displacement activated? I've run into the problem where the edges of the texture get displaced, especially if the original .jpg is surrounded by white. Either lower the displacement or perhaps modify the .jpg to bleed the skin color outside of the borders or replace the white entirely with flesh tones.
Nope, I have custom made normal maps and all have the same settings when i created them.