Figure setup question
 3WC
Posts: 1,095
3WC
Posts: 1,095
In the picture here, I'm trying to make the gauge needle rotate. But the bone is affecting surrounding geometry, too. Is there an easy way to make the bone affect just the needle geometry, without trying to scale down the static and dynamic spheres.
This is the last thing preventing me from releasing a freebie for M4, so any help would be appreciated, and will benefit you, too. ;-)
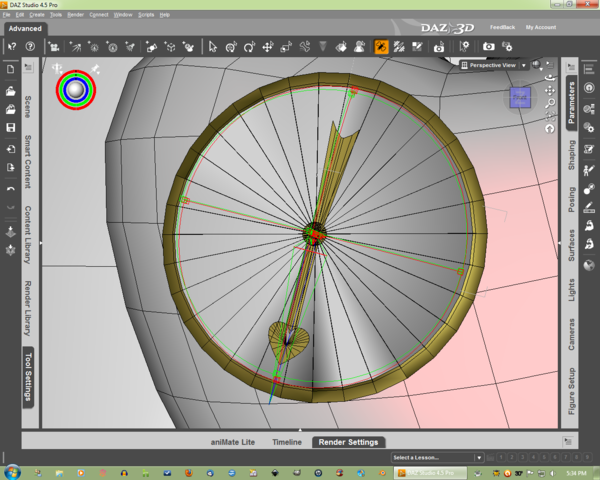
Untitled.png
1280 x 1024 - 278K
Daz 3D is part of 
Connect
DAZ Productions, Inc.
224 S 200 W, Suite #250
Salt Lake City, UT 84101
Licensing Agreement | Terms of Service | Privacy Policy | EULA
© 2024 Daz Productions Inc. All Rights Reserved.
Comments
Hmmm. When I worked with cr2s I did it mostly in Poser, which has an "add/remove falloff zones" dialogue in the Joint Editor in Setup Room. I'm trying to find an equivalent in DS for you.
Aha.
You need a tool settings tab and the bone tool. Select the bone. Then go to the settings tab and the Parameter drop down and select the rotations in turn. You should have the option to uncheck "enable angles." If your dial is painted 100% to the bone and nothing else is, this should enable it to rotate independent of surrounding geometry (I think).
If you mean what I think you mean, you need to have the bone "not welded" to the parent.
Is the needle its own group? If not, you might need to paint a weight map to tell it only to move the needle. If it's a traditionally rigged figure and isn't a separate group, I'm not sure, but what SickleYield says sounds good to me. Making the needle a separate group is probably the simplest way to do it in either case, though.
If there's nothing that needs to bend in the model, just select all parts and in the Parameters pane turn off the Bend button. If other parts do need to bend, try selecting the needle and its parent and turning Bend off just for them (as I recall the setting needs to be off for both bones to stop bending, so other parts attached should still dform normally - though if not you can add a fake bone between the needle and the thing it's attached to which will also limit the bending as only the bone's own group and that of its parent can be affected).
What you're wanting is much like what's done for the eyes in all the figures. It's actually a simple matter, but I just can't tell you exactly how to do it at the momment--give me tomorrow. But if you really need it now, look up the .cr2 files of the Poser 2 or 3 figures in a text editor, like Notepad or Wordpad, focus on how the Head and Eyes are arranged.
Basically, there's a few cross-over parameters that other joints normally have--but which are missing between the Head & Eyes.
Well, thanks for the responses. I've tried all this and more, with no success. Except, when I try to adjust weight mapping to make sure only the needle mesh is affected, I get the dialog box below. Any ideas on how I convert my figure to use weight mapping?
If it's a conformer for Michael 4 you shouldn't, since M4 uses the legacy Parametric Rigging. Did you try my last suggestion, adding a ghost bone (one without any geometry) between the needle and whatever the needle is attached to?
shouldn't need to do any of that... simply go into the figure as loaded in daz and turn "bending" to off... for the dial bone... sometimes it also works to simply adjust the joint zones to show all green so that they aren't affecting surrounding parts... it's a little hard to explain but simple to resolve... after turning bending to off in your parameters tab your dial will spin but it won't affect the surrounding parts... simply save out the cr2 once you're done changing that setting...
Note; this won't affect the items ability to conform... sorry... i realised after posting this that i'd missed Richard had already said about it...
Yes, tried it, now nothing is moving. Though I may have changed something else, too.
Tried this too, no change. Sorry.
Maybe tomorrow or when I get time I can document my steps as I go, that may make it easier to find a solution.
Okay, I've started over, and I'll outline what I'm doing.
This is a full body suit for M4, so I imported the obj. file with all the body parts, used figure setup to make the skeleton, and adjusted everything with joint editor so that it worked (reasonably well, anyway). Then I exported that as a cr2. So far so good, that all worked.
There are two gauges on the chest, though, that I wanted to have the needles move on. So I created a child bone off the chest, called it heart, and with polygon tool assigned everything around the gauge needles except the needles themselves. I turned off any rotation or smoothing or bending for the heart bone.
Then I created two more child bones off heart, called them needle01 and needle02, and assigned the needles to each respectively with the polygon tool. Since I only want them to rotate in the z direction, I turned off everything except the zrot, turned off bending, smoothing, etc. But the z rotation slider is having no effect on the needle geometry. Nothing happens. The bone moves, but not the geometry.
I tried again. This time I parented needle01 directly to the chest. Turned everything off except zrot, and as you can see, I get major distortion in the mesh. Even with bending turned off, the needle bends in the middle. I guess I can adjust the falloff zones, but that was what I was trying to avoid when I started this thread.
It seems like the bone is moving too many vertices, or none at all. Am I still missing something?
Granted, I know nothing about what you are doing. But just wondering, could you not just create the needle as a separate object from the suit that the user could import into their scene (or it loads as a separate object), allowing the user to manipulate the rotation of the object separately as if any other item in the scene, of course with the object being properly imported into the scene in the needed positioning necessary for the suit?? (hope this is clear)
You will for sure need to adjust the fall-off zones for the rotation... also you should check your center/end point for the needle... i'd get your twist point and fall-off zones centered in the shaft the needle attaches to... you'll need to adjust the fall-off zones so that they aren't grabbing any of the mesh points from the dial face and are only affecting the needle itself.... the needle bending in the middle is because the fall-off zones are only currently affecting the front portion of it in that screenshot of yours...
This actually gave me an idea that worked. I just stopped messing with DS4.5 and text-hacked an old cr2 where I had done something similar with a window hook-latch. I made a separate prop cr2 that works perfectly! Now I'll just paste the relevant parts back into the main cr2, and see if all goes well.
(It's just kind of frustrating that I can get better results from a text-hack than from the tools DS provides.) :roll:
Oh that's wonderful. I felt kind of silly after I had posted. But you know what they say about fresh eyes. I hope it works out.
I do appologize, wwes.
I promised that I would get you something the day after my last posting. I found this thread again yesterday (again @ work) & tried looking for something quick online--I found a few tutorials about what the various features do in the .cr2 files--but unfortunately, I don't think what you were really needing. Lots of really good info in them, but maybe too much explanation as to "what this command does" or "why it's laid out like this", and not enough of "what you really need to do is just simply this...."
But I see you finally did what I always rely on--looking at somebody else's .cr2 file in a text editor.
For anyone else who might be needing to do something similar, it's really very simple:
In most of the software that creates a new figure in Poser, all the children of body parts get the same treatment--they all get welded to the parent, and various bending parameters get set in both the parent and child. What the Eyes, and in wwes' case, the Needle, needs to work properly is to have some of that text ripped out...
Below is a sample .cr2. I edited out all of the extraneous stuff (but vitally neccessary, so DON'T rip out what I did here) to make it easier to see:
If you compare the Neck vs Head & Head vs Eyes, you'll immediately see the differences.
As the Neck & Head need to distort together in order to look right, they have several channels listing "otherActor" cross-referencing each other....Joint, Twist, SmoothScale.
But in contrast, with the Eyes, the Head has NO channel to reference either Eye, and the Eyes ONLY have SmoothScaleY to refer back to the Head--There are NO Joints or Twist channels at all! ONLY the Rotate channels.
In addition, the section for Weld (almost all the way at the end of the file), the Eyes are NOT welded to the Head.
Note, however, the AddChild section right above Weld still establishes the Eyes as children to the Head.
in wwes' case, those channels in the Chest referring to the Needle would have to be ripped out of the file as well as the Joint & Twist channels in the Needle have to go, and finally remove the Needle from being Welded to the Chest.
One final note, depending on how wwes orients the Needle to the Chest, he may need to adjust the Orientation to get the desired look when the Needle rotates. If the part of the Chest where the gague is located isn't exactly verticle, and the Needle is exactly perpendicular to the Chest surface, then there might be some minor tweaking neccessary for the Needle's Orientation.
Again, I appologize for being so late to respond.
Very simple to have any one bone not welded to its parent.
Thanks everybody for all the replies and your help, I'm sure you all know what you are talking about, i just have a hard time using the info in the context of what I'm doing. So by fits and starts, you at least pushed me in the right direction, and I got it working. Expect the freebie release SOOOOON! :coolcheese:
Glad you got it working!
Hey, congrats, I'm glad you got it worked out!
I have much the same issues with trying to learn about ERCs and all its variations. I read up on all the tutorials, then try to apply what I read. Then I try to pick apart somebody's .cr2 file.
Most times, the figure doesn't respond at all. But I can tell I'm getting closer when Poser instantly crashes on loading the character....
....i know it's supposed to work.....
....in theory....:blank:
stuff like eyes & propeller-like spinning objects are pretty simple in comparison.