Removing the grains from image
 witcherask_a3dd58a1c6
Posts: 194
witcherask_a3dd58a1c6
Posts: 194
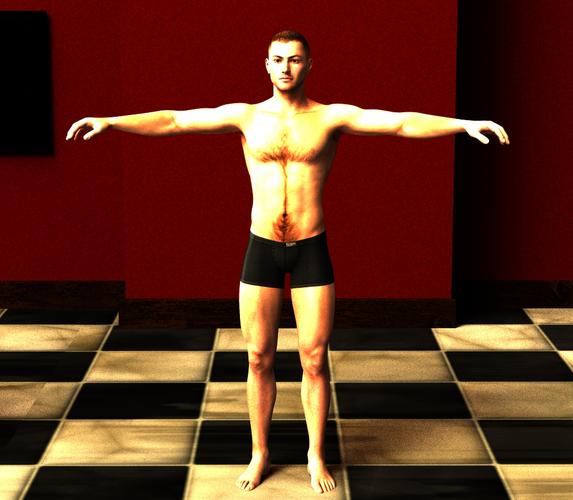
How to remove the grains from an image without reducing the quality. I tried to reduce the occulsion strength to 0 but then image becomes too bright and not realastic looking. Any way to remove the grains.
a1.jpg
1010 x 882 - 659K
Post edited by witcherask_a3dd58a1c6 on
Daz 3D is part of 
Connect
DAZ Productions, Inc.
224 S 200 W, Suite #250
Salt Lake City, UT 84101
Licensing Agreement | Terms of Service | Privacy Policy | EULA
© 2024 Daz Productions Inc. All Rights Reserved.
Comments
You want to make sure that your Occlusion Samples are around 128 and that your UE Shading Rate (on the Parameters Tab) for UE2 is set to 1.0. The "4x High" setting will have it at 8.0 which is fine if their are auxiliary lights but not so great if UE2 is the primary light.
well the grains are still present though
Can you repost the pic with the specific problem areas circled?
And a screenshot of your render settings?
http://www.imagebam.com/image/fabcf8225543347
Heres my render settings
As for the pic look carefully the entire pic contains small grains. Its visible at chars legs and also on the ground
Well...half or more of the problem is the settings...
3Delight likes 'power of two' numbers best...but whole, even numbers work fine. Odd, fractional numbers make it 'work harder',
Now, for things like Pixel Samples (X,Y) 8 should be enough. Shadow Samples of 8, or 16 should for most things, be fine. Gain and Gamma should be left at default values. Pixel Filter Width...default is fine, but they MUST MATCH...and overall shading rate of above 1 is 'draft' mode...a shading rate of .2 is 'acceptable' and down to 0,01 for extremely fine, final production renders.
even with ur settings grains doesnt dissappear
The graininess will depend on your Shading Rate on the render settings and the Shading Rate of any UberEnvironment lights you have in the set. The lower the better, but be warned that lowering it will also slow down render times considerably. One thing to remember is that UE lights aren't true lights, they're shaders. The shading rate determines how much work goes into each pixel, and with higher shading rates it effectively 'clumps' sets of pixels together, which is what gives you patches sometimes.
Of course, that's a very over-simplified version. If you're still getting patchy spots with very low shading rates then post your light configuration and maybe we can help further. It might also help to know the surface types which are most effected.
Heres my uber settings
http://www.imagebam.com/image/ba0f53225587980
I have 1 distant light with intensity at 40
I don't see anything in those settings which should cause the patches you've been getting. I assume you're using the pre-packaged 3Delight renderer? What are the materials which are most affected?
entire screen is affected
This image is UE2 only.
The following settings were used:
Advanced Render Settings:
- Max Ray Trace Depth : 2
- Pixel Samples X/Y : 16
- Shadow Samples: 16
- Gain 1.00
- Gamma 1.00
- Shading Rate 0.20
UE2 Parameter Settings:
- Color: 255,255,255 w/OmKHPark_Env.tif map
- Environment Mode: Occlusion w/Directional Shadows
- Saturation : 100%
- Contrast : 100%
- Occluasion Strength : 100%
- Indirect Lighting Strength : 100%
- Occlusion Color: 0, 0, 0
- Occlusion Samples: 128
- Shadow Bias : 0.10
- Shading Rate: 0.50
- Max Error : 0.10
- Maximum Trace Distance: 150
With 1 Distant Light, aligned to match the UE2 environment sphere...
UE2 and Advanced Render Settings as above.
Distant Light Settings:
- Shadow Type: Raytraced Shadows
- Shadow Softness: 40%
- Shadow Bias: 1.00
- Illumination: On
- Color : 255, 255, 255
- Intensity: 40%
Result, a little blown out still (I'd lower the intensity on UE2 to about 60% honestly but I forgot)...
with same settings i am getting this
.Can see the grains in the body
I am using uber env base
Post a screencap of your advanced render settings and the parameters tab of your UE2 element please.
I saw that you got "Progressive Rendering" enabled, imho this causes more trouble than any gain at the moment. Not sure if it could lead to the result you are getting, but you might want to try to disable this.
adamr001, thanks for the settings - this has helped me immensely!